How to use Inventory Management module
Main menu of “Inventory Module.”

A Inventory Module: manage item, stock receiving vourcher, stock delivery voucher, internal transfer, loss & adjustment, transaction history of warehouse, report.
I. Settings (Inventory -> Setting)
Warehouse menu setting menu: In this menu define seting use for create new item ( Commodity type, group, subgroup, unit, color, size…), custom fields for warehouse, maximum and minimum for inventory quantity of item, profit margin, approval setting, prefix of report… define option use for feature in module.
-
- Commodity Type (Inventory / Setting / Commodity type)
It is attributes of item
Create new Commodity type: Inventory -> Setting ->Commodity Type -> Add commodity type1.1 Manage Commodity type view
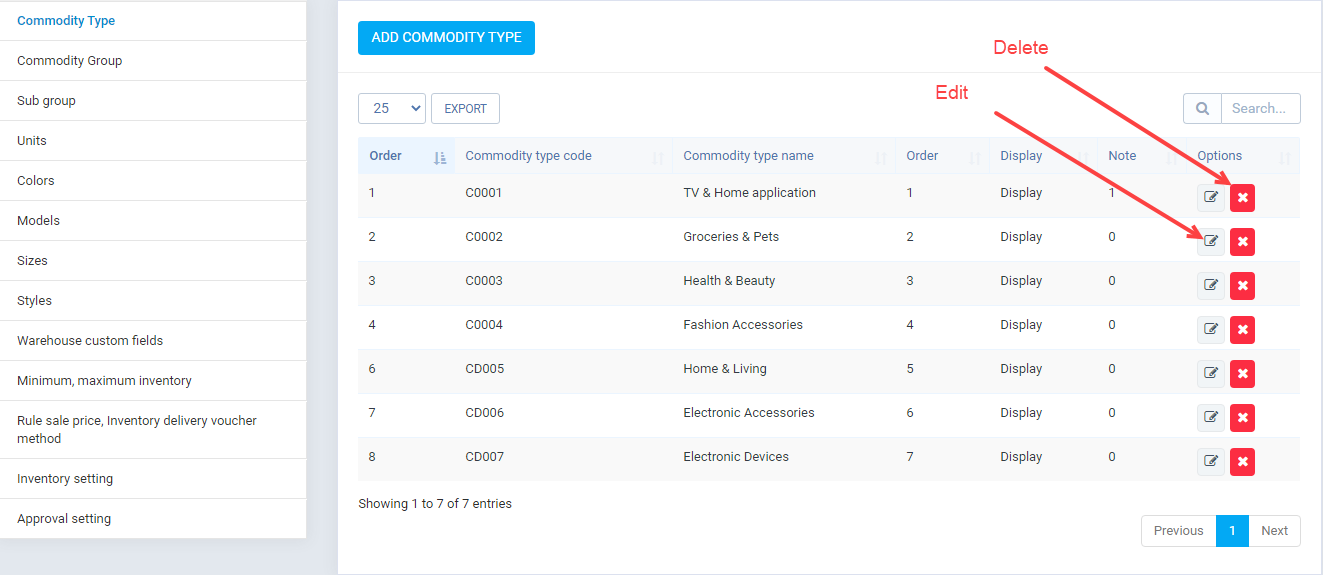
In this view display all Commodity type, allow “create”, “edit”, “delete”.1.2 Create New Commoddity type view
In manage view click button “ADD COMMODITY TYPE”.
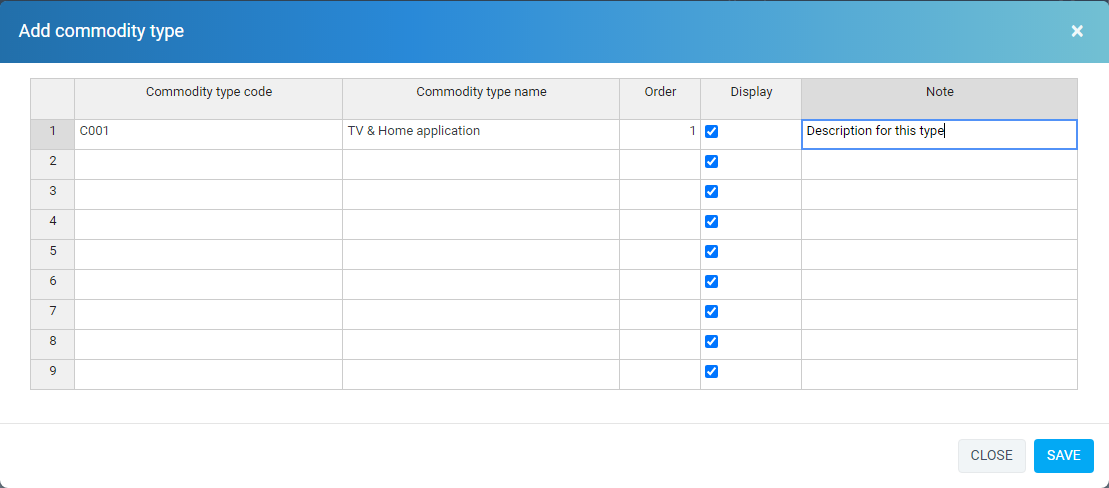
In this view create Commodity type.Commodity type with attribute.
– “code”, “name”, – “order”: order display on select box when create new item. – “display”: If is “display” => option that display on select box when create new item, if is “Not display” => in select box when create item will have .1.3 Edit Commodity type view
In manage view click button “Edit”.

Note.
– “Commodity code” : don’t allow edit,
– Allow edit “name”, “order”, “Display”, “Note”.1.4 Delete Commodity type
In manage view click button “Delete”.
-
-
- Commodity Group (Inventory / Setting / Commodity Group)
It is attributes of item
Create new Commodity Group: Inventory -> Setting ->Commodity Group -> Add commodity group2.1 Manage Commodity type view
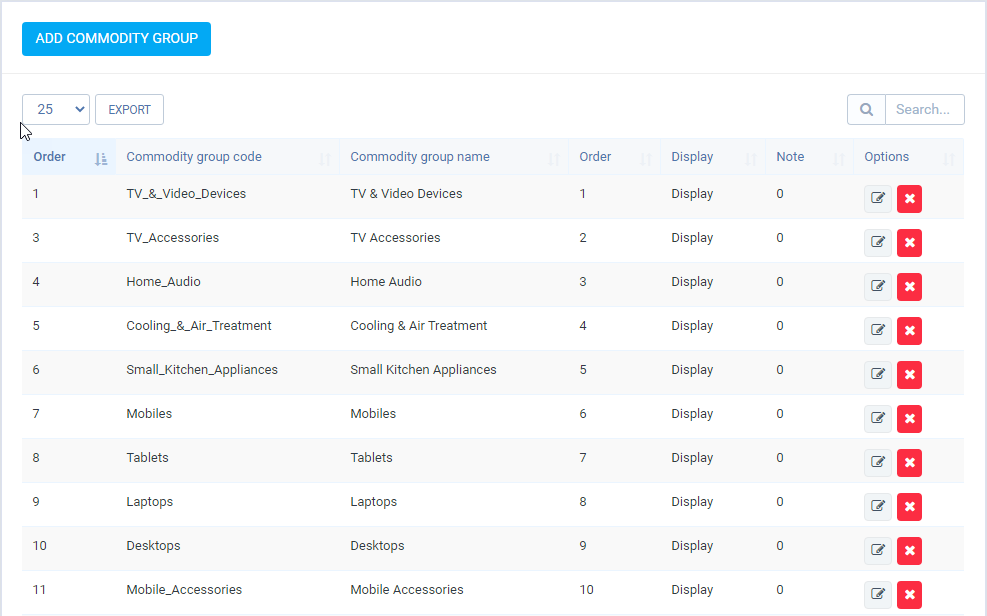
In this view display all Commodity group, allow “create”, “edit”, “delete”.2.2 Create New Commodity group view
In manage view click button “ADD COMMODITY GROUP”.
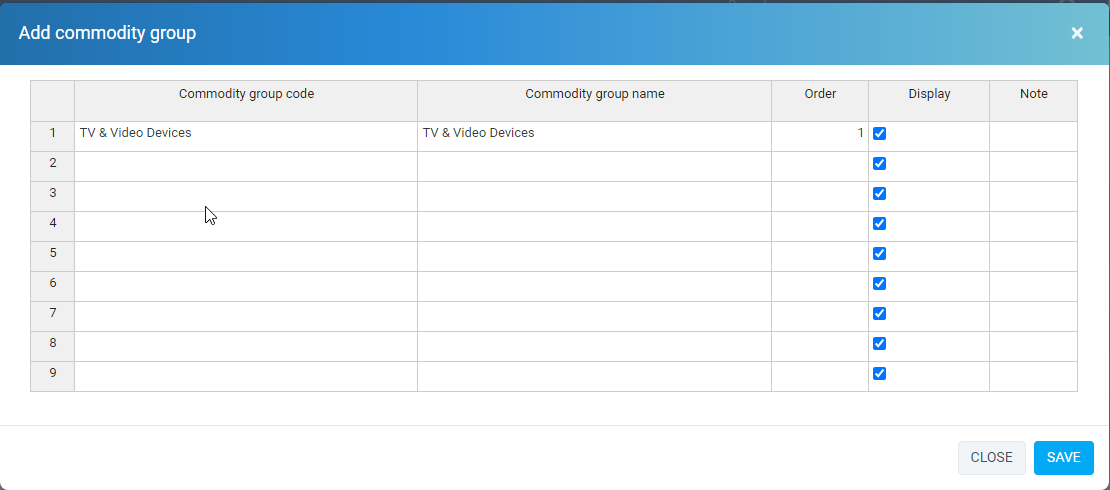
In this view create Commodity group.Commodity group with attribute.
– “code”, “name”, – “order”: order display on select box when create new item. – “display”: If is “display” => option that display on select box when create new item, if is “Not display” => in select box when create item will have .2.3 Edit Commodity group view
In manage view click button “Edit”.

– Allow edit “code”, “name”, “order”, “Display”, “Note”.
2.4 Delete Commodity group
In manage view click button “Delete”.
- Commodity Group (Inventory / Setting / Commodity Group)
-
- Sub Group (Inventory / Setting / Sub Group)
It is attributes of item
Create new Sub Group: Inventory -> Setting ->Sub Group -> Add Sub Group3.1 Manage Sub Group view
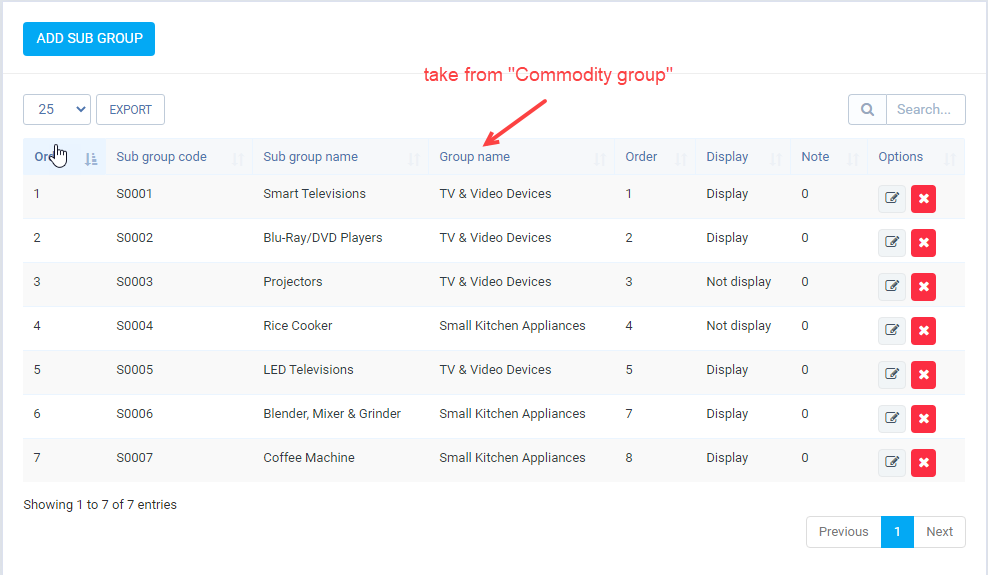
In this view display all Sub Group, allow “create”, “edit”, “delete”.3.2 Create New Commodity type view
In manage view click button “ADD Sub Group”.
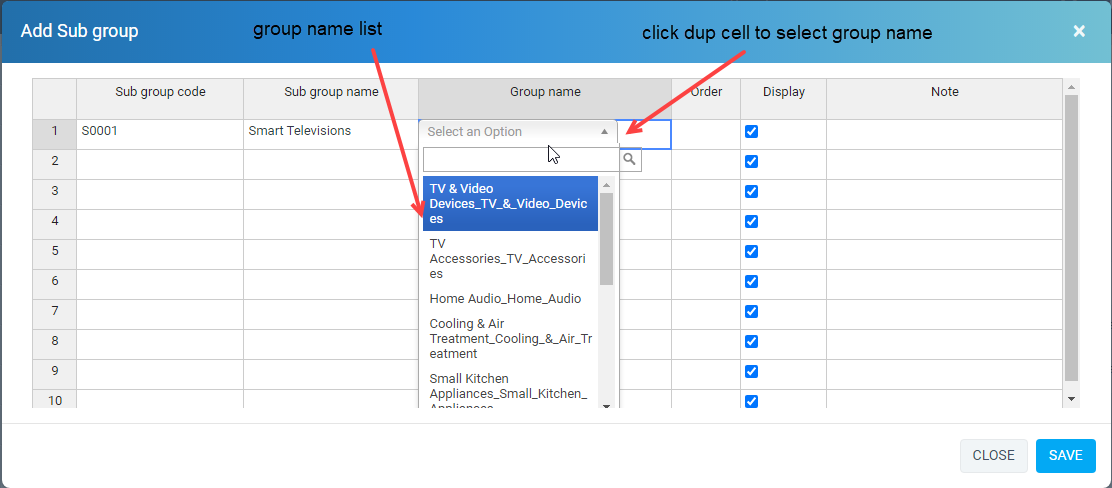
In this view create Sub Group.Sub Group with attribute.
– “code”, “name”, “group name” – “order”: order display on select box when create new item. – “display”: If is “display” => option that display on select box when create new new item, if is “Not display” => in select box when create item will have .3.3 Edit Sub group view
In manage view click button “Edit”.
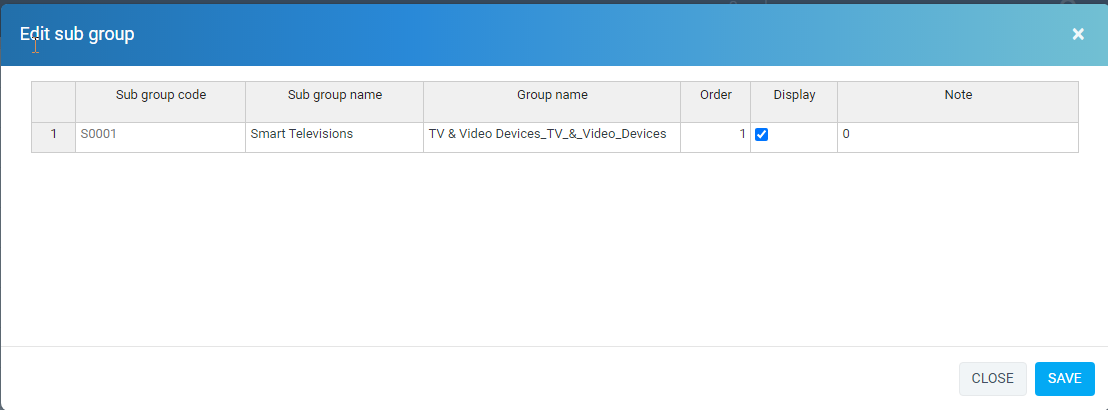
Note.
– “code” : don’t allow edit,
– Allow edit “name”, “group name”, “order”, “Display”, “Note”.3.4 Delete Sub Group
In manage view click button “Delete”.
- Sub Group (Inventory / Setting / Sub Group)
-
- Unit (Inventory / Setting / Unit)
It is attributes of item
Create new Unit: Inventory -> Setting ->Unit -> Add Unit4.1 Manage Unit view
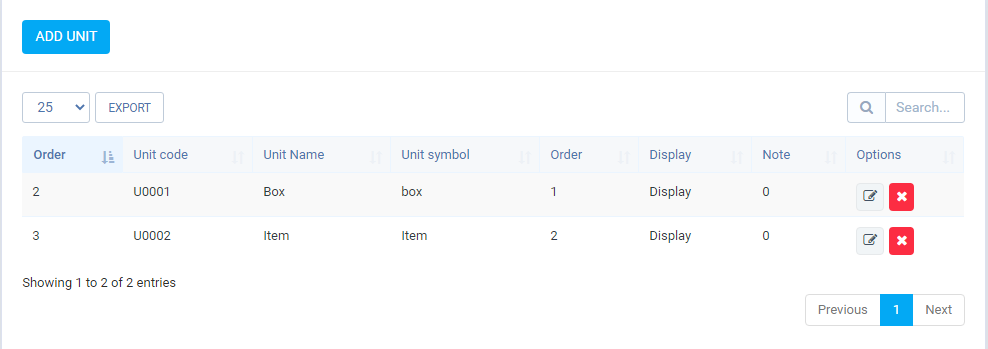
In this view display all Unit, allow “create”, “edit”, “delete”.4.2 Create New Commodity type view
In manage view click button “ADD Unit”.
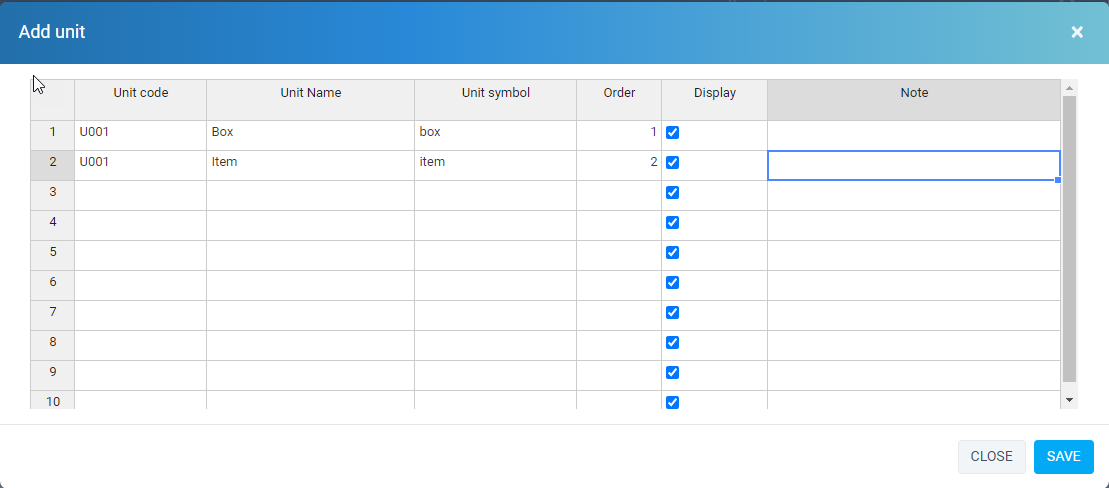
In this view create Unit.Unit with attribute.
– “code”, “name”, “symbol” – “order”: order display on select box when create new item. – “display”: If is “display” => option that display on select box when create new new item, if is “Not display” => in select box when create item will have .4.3 Edit Unit view
In manage view click button “Edit”.

Note.
– “code” : don’t allow edit,
– Allow edit “name”, “group name”, “order”, “Display”, “Note”.4.4 Delete Unit
In manage view click button “Delete”.
- Unit (Inventory / Setting / Unit)
-
- Colors
Colors (Inventory / Setting / Colors)
It is attributes of item
Create new Colors: Inventory -> Setting ->Colors -> Add Colors5.1 Manage Colors view
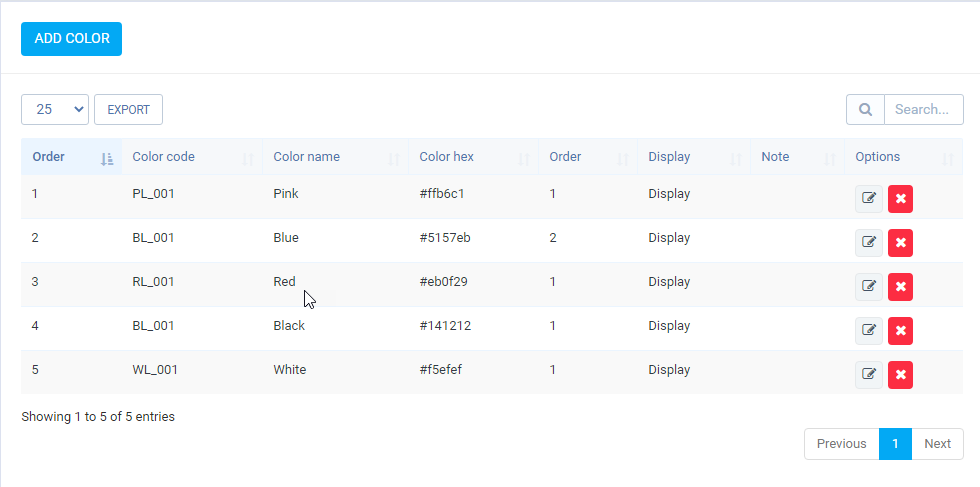
In this view display all Colors, allow “create”, “edit”, “delete”.5.2 Create New Color type view
In manage view click button “ADD Colors”.
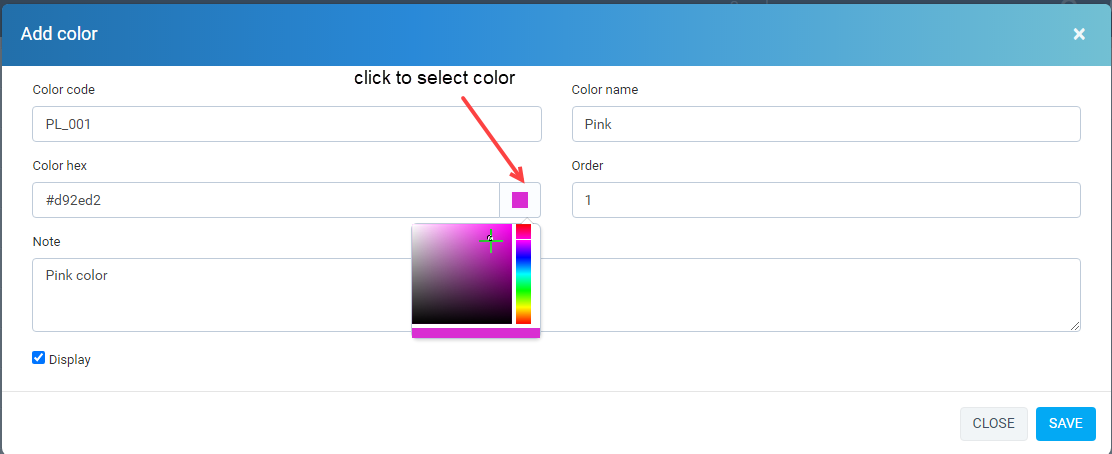
In this view create Colors.Colors with attribute.
– “code”, “name”, “symbol” – “order”: order display on select box when create new item. – “display”: If is “display” => option that display on select box when create new new item, if is “Not display” => in select box when create item will have .5.3 Edit Colors view
In manage view click button “Edit”.
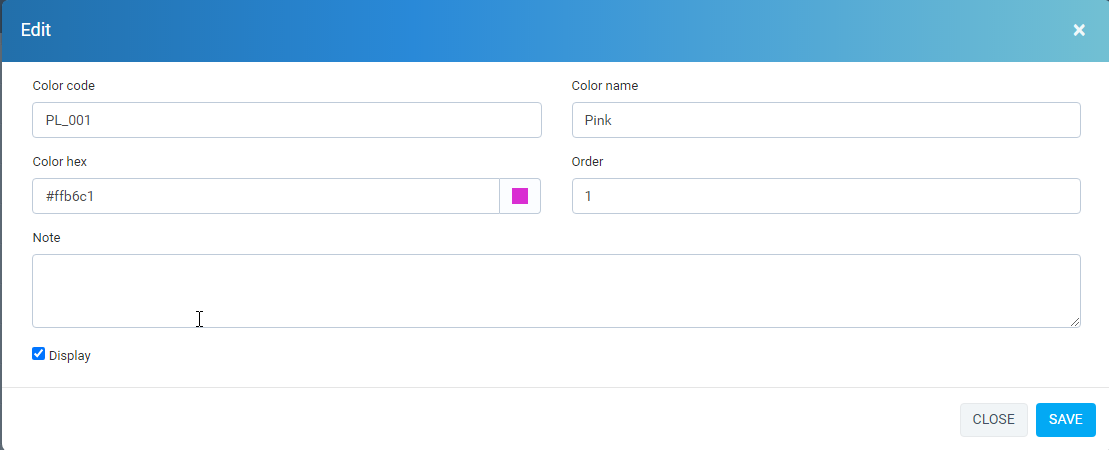
Note.
– Allow edit “code”, “name”, “color hex”, “order”, “Display”, “Note”.5.4 Delete Colors
In manage view click button “Delete”.
- Colors
-
- Models
Models (Inventory / Setting / Models)
It is attributes of item
Create new Models: Inventory -> Setting ->Models -> Add Model6.1 Manage Models view
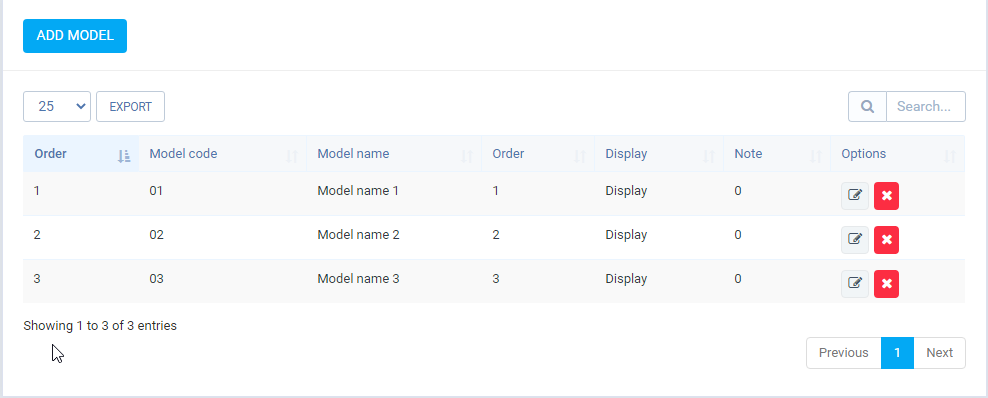
In this view display all Colors, allow “create”, “edit”, “delete”.6.2 Create New Models type view
In manage view click button “ADD Model”.
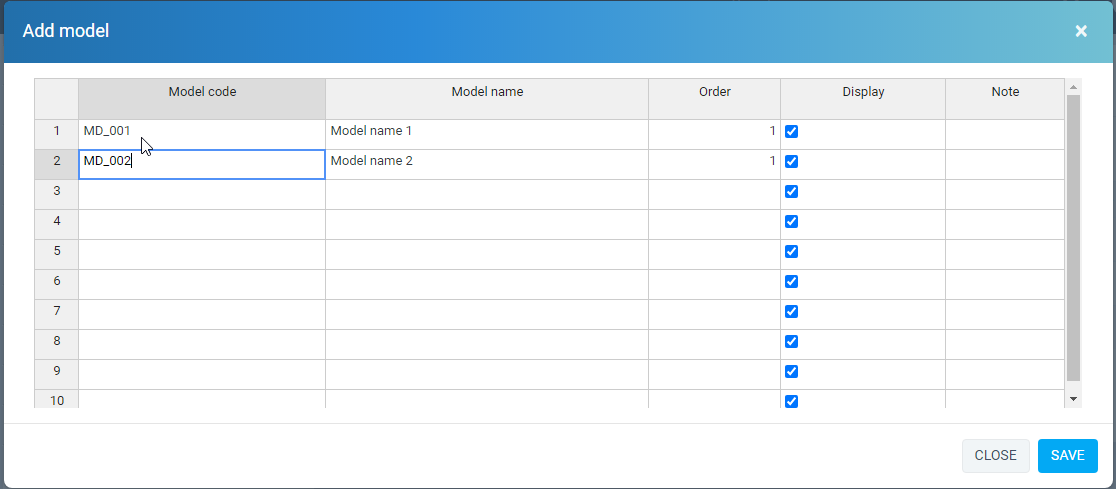
In this view create Models.Models with attribute.
– “code”, “name”, “note” – “order”: order display on select box when create new item. – “display”: If is “display” => option that display on select box when create new new item, if is “Not display” => in select box when create item will have .6.3 Edit Model view
In manage view click button “Edit”.

Note.
– “code” don’t allow edit – Allow edit “code”, “name”, “color hex”, “order”, “Display”, “Note”.6.4 Delete Model
In manage view click button “Delete”.
- Models
-
- Sizes (Inventory / Setting / Sizes)
It is attributes of item
Create new Size: Inventory -> Setting ->Sizes -> Add Size7.1 Manage Sizes view
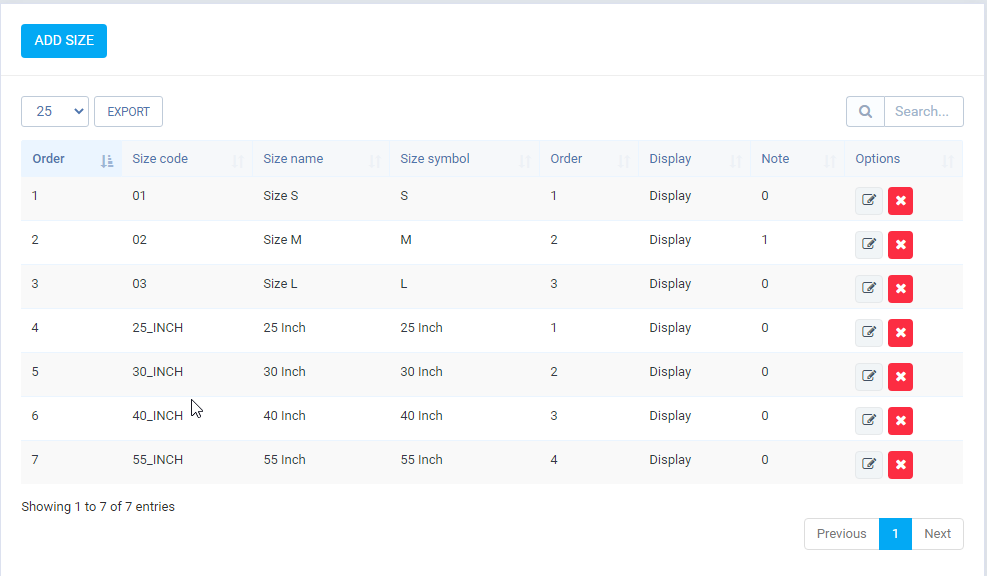
In this view display all Colors, allow “create”, “edit”, “delete”.7.2 Create New Size view
In manage view click button “ADD Size”.
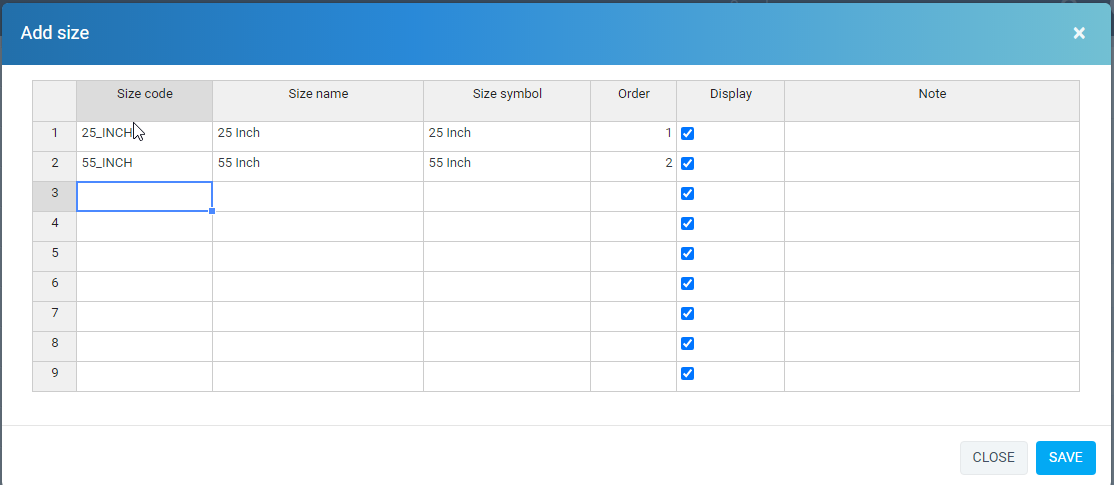
In this view create Size.Size with attribute.
– “code”, “name”, “note” – “order”: order display on select box when create new item. – “display”: If is “display” => option that display on select box when create new new item, if is “Not display” => in select box when create item will have .7.3 Edit Model view
In manage Size click button “Edit”.

Note.
– “code” don’t allow edit – Allow edit “code”, “name”, “color hex”, “order”, “Display”, “Note”.7.4 Delete Model
In manage view click button “Delete”.
- Sizes (Inventory / Setting / Sizes)
-
- Styles (Inventory / Setting / Styles)
It is attributes of item
Create new Style: Inventory -> Setting ->Sizes -> Add Style8.1 Manage Styles view
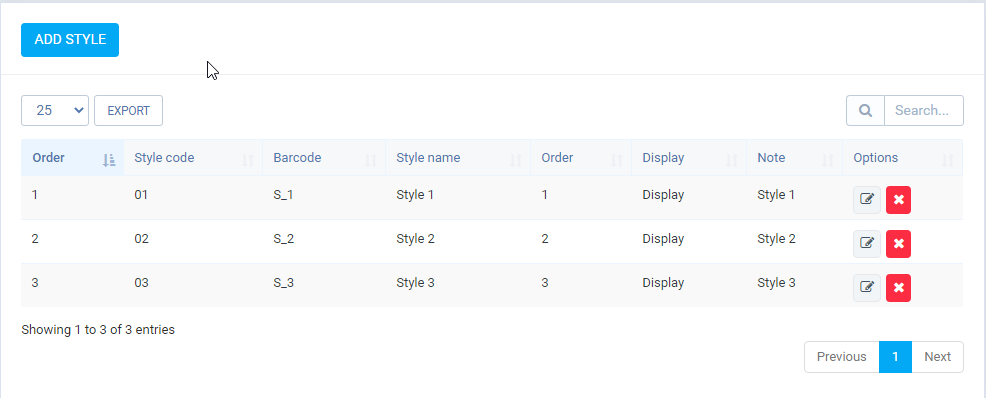
In this view display all Colors, allow “create”, “edit”, “delete”.8.2 Create New Styles view
In manage view click button “ADD Style”.
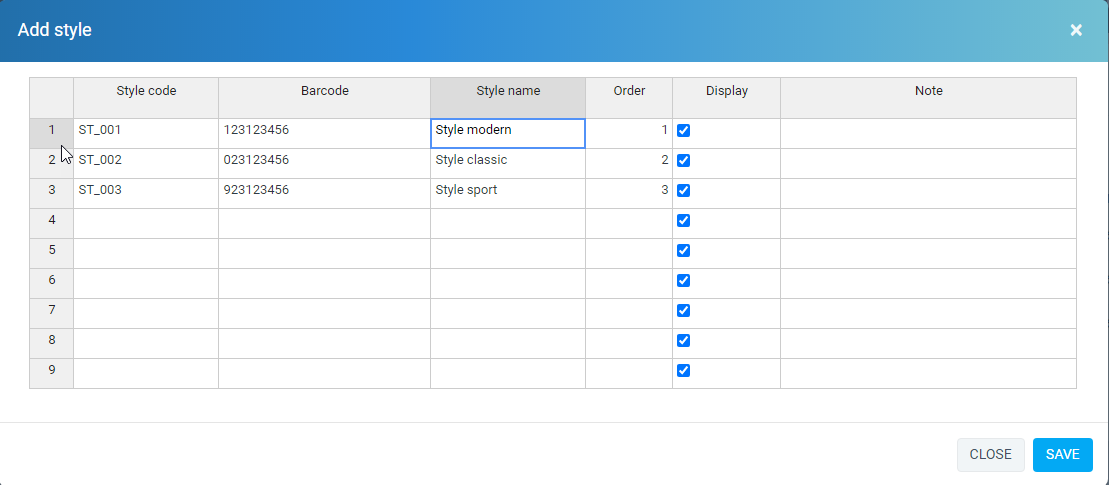
In this view create Style.Style with attribute.
– “code”, “name”, “note” – “order”: order display on select box when create new item. – “display”: If is “display” => option that display on select box when create new new item, if is “Not display” => in select box when create item will have .8.3 Edit Style view
In manage Style click button “Edit”.

Note.
– “code” don’t allow edit – Allow edit “code”, “name”, “color hex”, “order”, “Display”, “Note”.8.4 Delete Style
In manage view click button “Delete”.
- Styles (Inventory / Setting / Styles)
-
- Warehouse custom fields (Inventory / Setting / Warehouse custom fields)
It is attributes of item
Create new Warehouse custom field: Inventory -> Setting ->Warehouse custom fields -> Add9.1 Manage Warehouse custom fields view
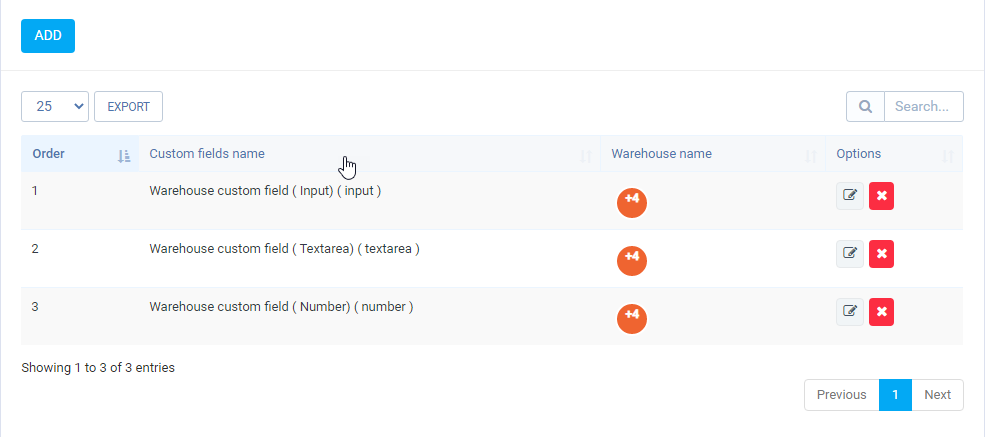
In this view display all custom fields, allow “create”, “edit”, “delete”.9.2 Create New custom fields view
In manage view click button “ADD”.
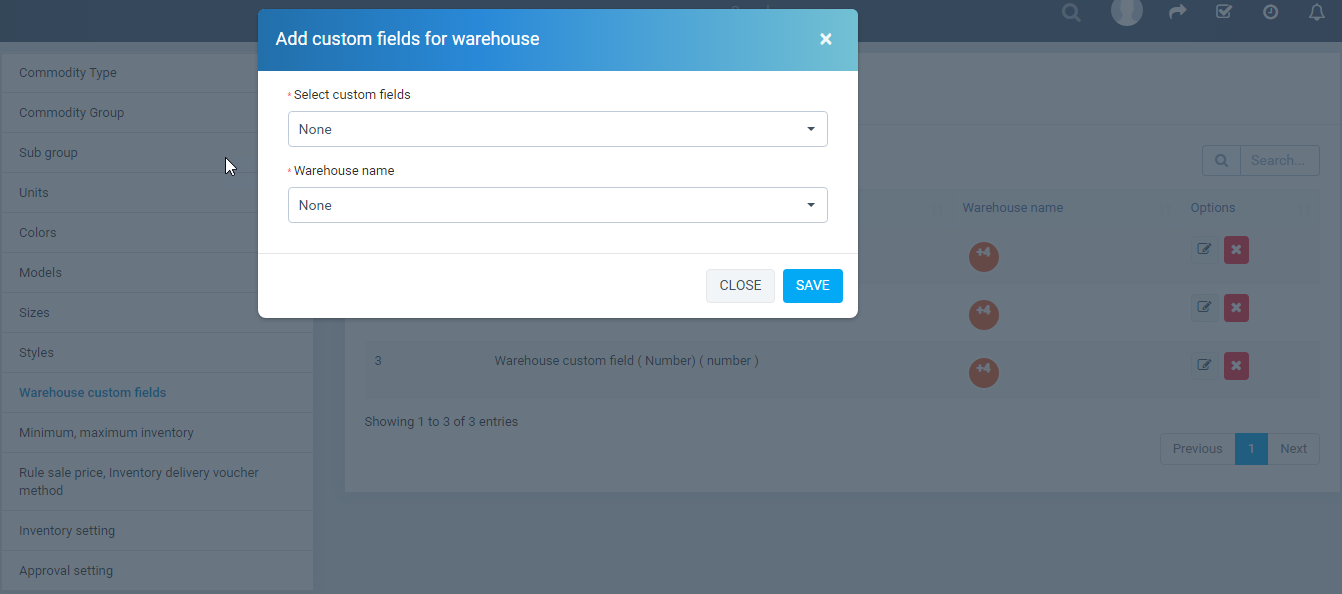
In this view create Warehouse custom fields.Style with attribute.
– “Custom fields”: select custom fields have been create from “setup/custom fields” (with Field Belong to is “Warehouse”). – “Warehouse name”: custom fields apply for that warehouse. – one warehouse have many Custom fields, 1 custom fields apply for many warehouse.9.3 Edit warehouse custom fields view
In manage Style click button “Edit”.
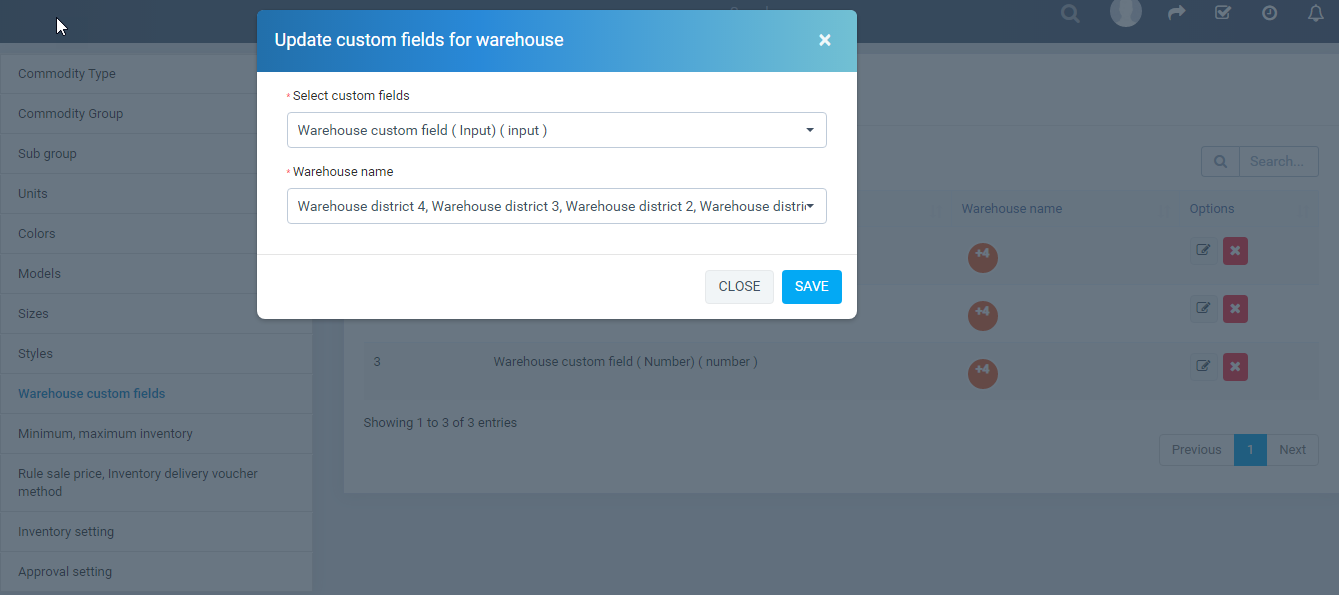
9.4 Delete Warehouse custom fields
In manage view click button “Delete”.
- Warehouse custom fields (Inventory / Setting / Warehouse custom fields)
-
- Minimum, Maximum inventory
In this vie you have define maximum, minimum quantity for item10.1 Manage Minimum, Maximum inventory
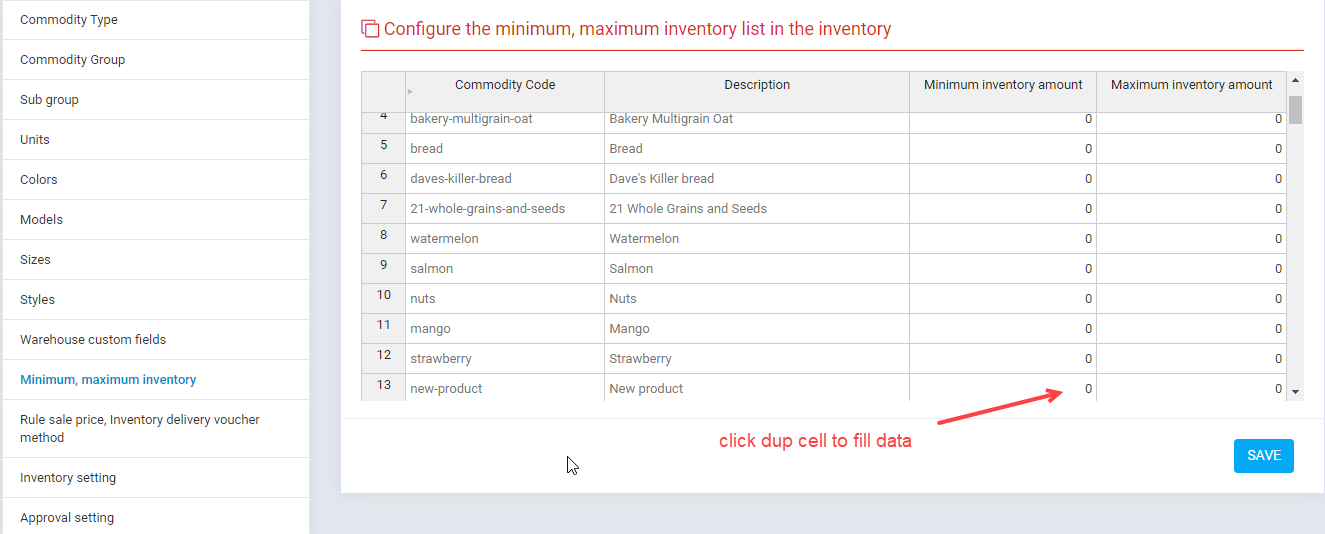
- Minimum, Maximum inventory
-
- Rule sale price, Inventory delivery voucher method
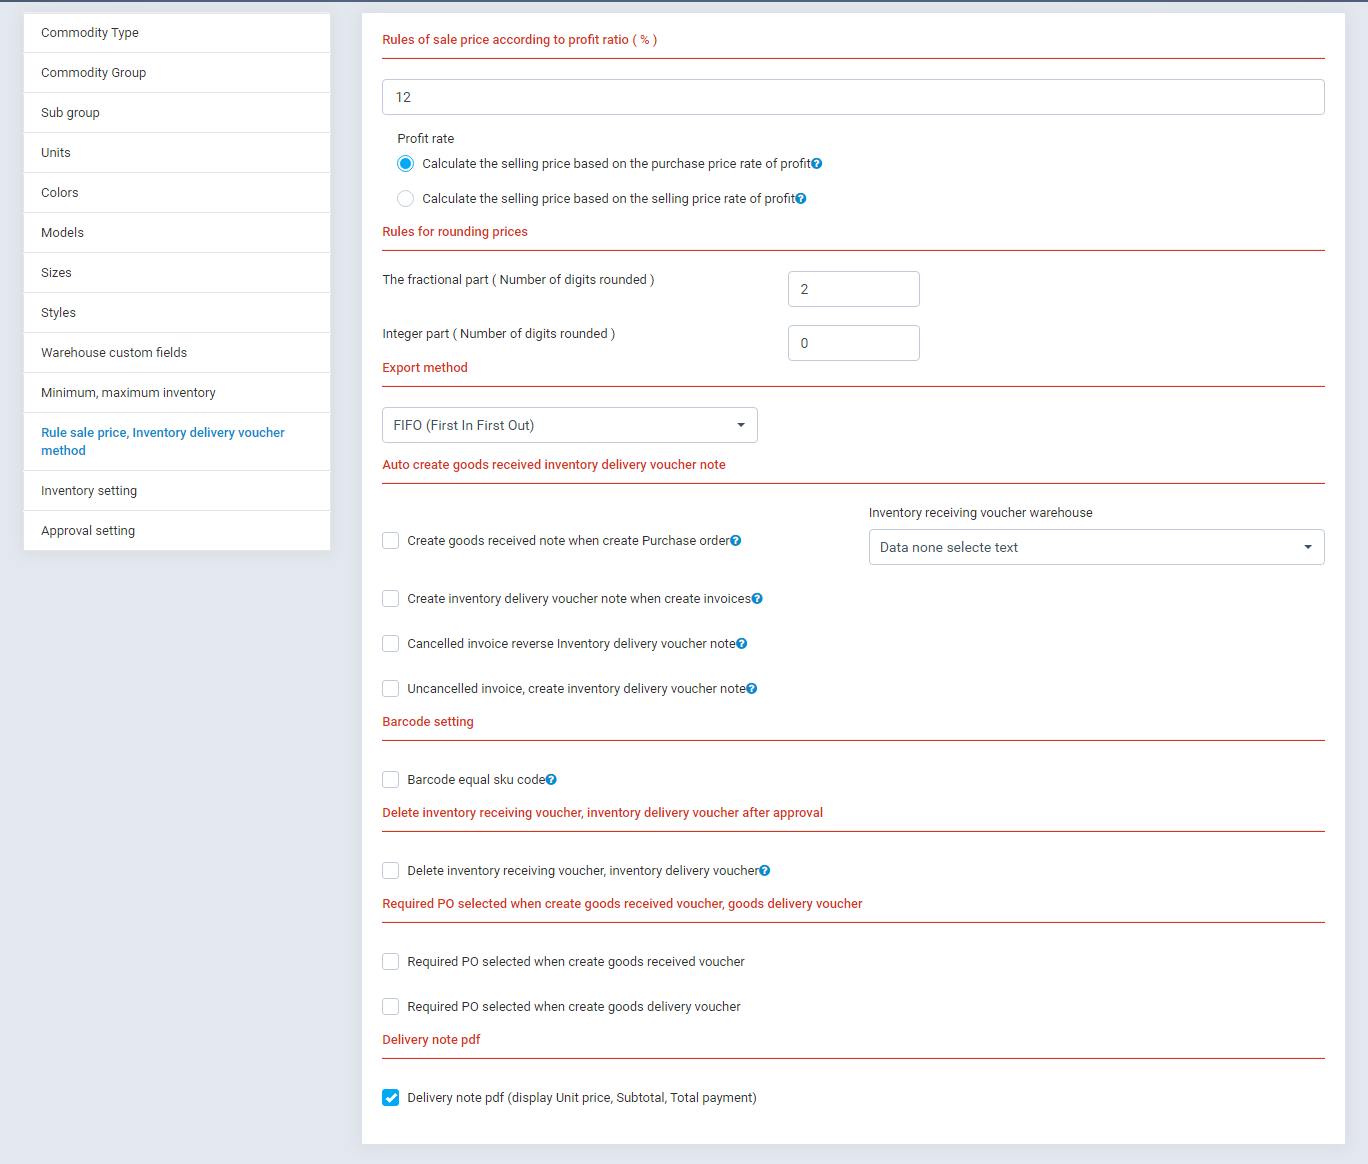
10.1 Manage Rule sale price, Inventory delivery voucher method
10.2 Rules of sale price according to profit ratio
– Rules of sale price according to profit ratio: This option define profit margin of item and method calculation sale price based on profit margin
+ 12 is profit margin apply for all item when create ( you can edit profit margin when create new item on form create new item) + “Calculate the selling price based on the purchase price rate of profit”: (sale price = Purchase price * (1 + Profit ratio)), ex: if purchase price is 100, profit ratio define is 12% => sale price = 100 * ( 1 + 12%) = 112.
+ “Calculate the selling price based on the sale price rate of profit”: (sale price = Purchase price * (1 – Profit ratio)), ex: if purchase price is 100, profit ratio define is 12% => sale price = 100 / ( 1 – 12%) = 113.63636363610.3 Rules for rounding prices
– This Rules for roundung prices apply for calculate selling price
10.4 Export method
– “Inventory delivery voucher when take item from warehouse use method FIFO (First In First Out)”
10.5 Auto create goods received, goods delivery voucher note– “Create goods received note when create Purchase order”: this option related to “Purchase module”, if you use Purchase module so when “Purchase or apprval” then automatically created “Inventory receiving voucher” with information take from purchase order and it auto approval, the number quantity take effect on below warehouse ( below option you select warehouse use for this option .)
– “Inventory receiving voucher warehouse”: this option related to above option
– “Create inventory delivery voucher note when create invoices”: when invoices (in sales/invoices) created then automatically create “Inventory delivery voucher” => auto approval ( if inventory quantity is sufficient otherwise it have status “Not yet approve”)
– “Cancelled invoice reverse Inventory delivery voucher note”: when one invoice created and option “Create inventory delivery voucher note when create invoices” checked => auto create “inventory delivery”, and now when cancelled that invoice => revert transaction create inventory delivery voucher.
– “Uncancelled invoice, create inventory delivery voucher note”: sample above, when uncancelled invoice create “Inventory delivery voucher” - Inventory setting
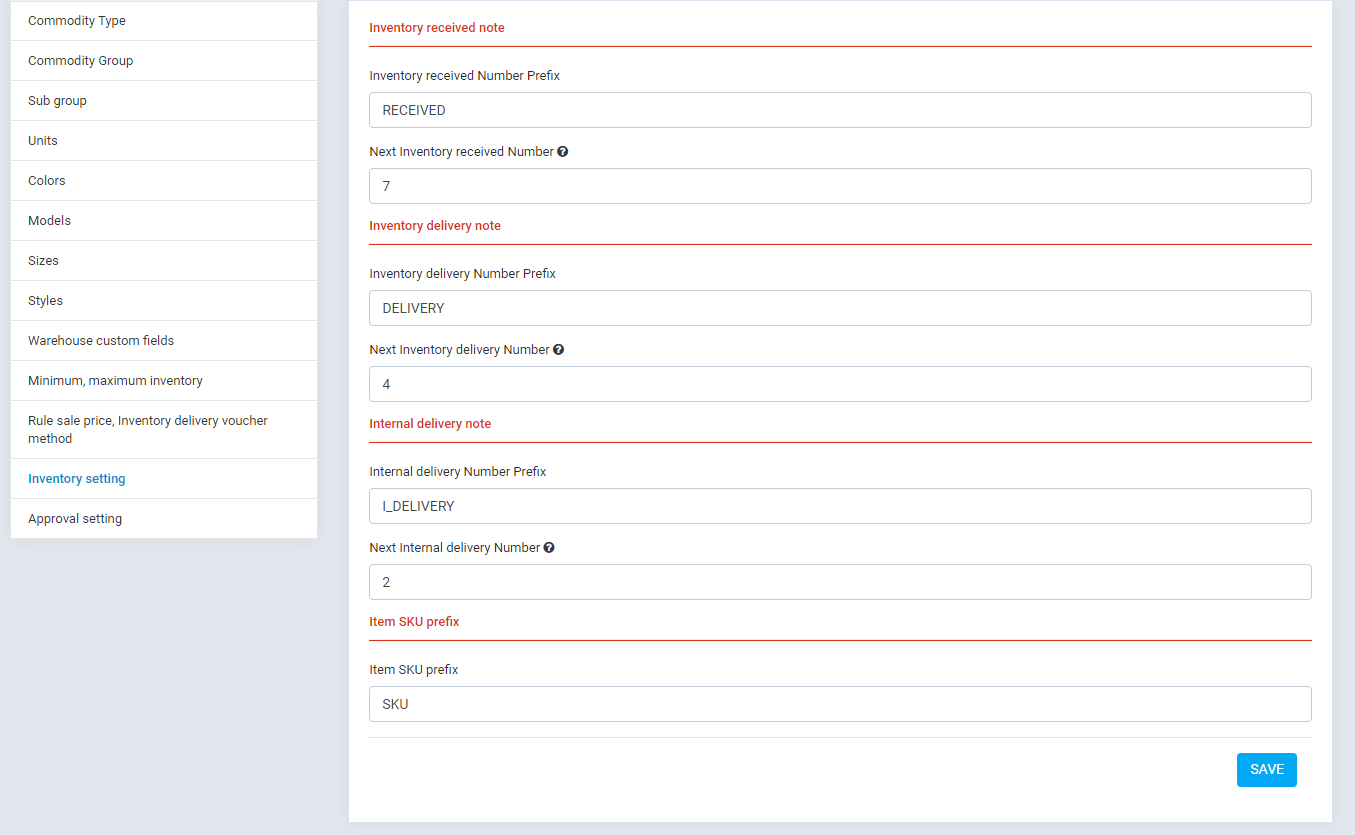
Define prefix, number for “Inventory receiving voucher”, “Inventory delivery voucher”, “Internal delivery”, “sku prefix”
– Example:


- Rule sale price, Inventory delivery voucher method
- Approval setting
Approval setting (Inventory / Setting / Approval setting)
It define
Create new Approval setting: Inventory -> Setting ->Approval setting -> New approval setting13.1 Manage Approval setting view
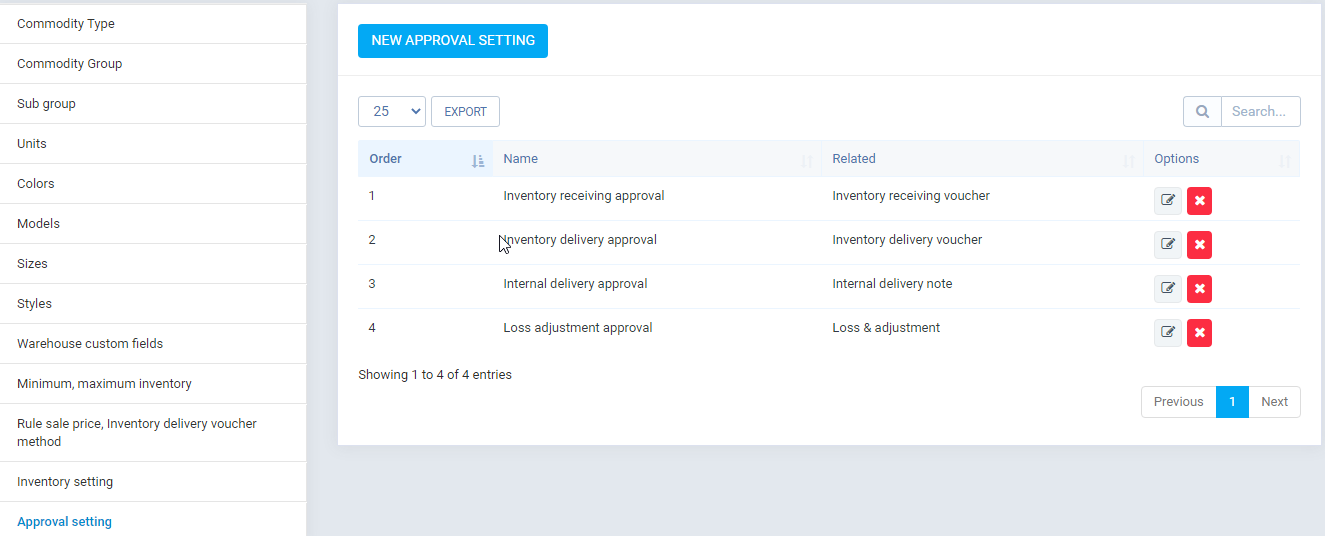
Display all approval setting.13.2 Create Approval setting view
In manage view click button “New approval setting”.
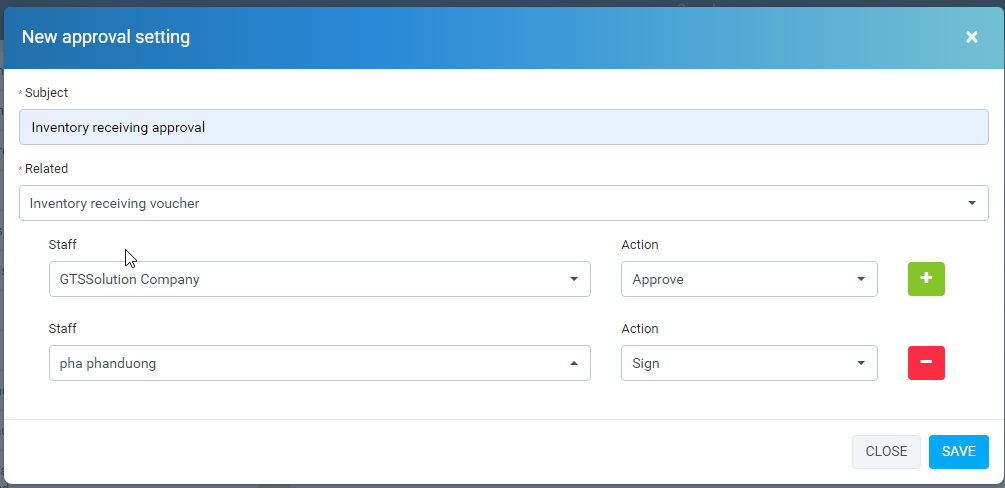
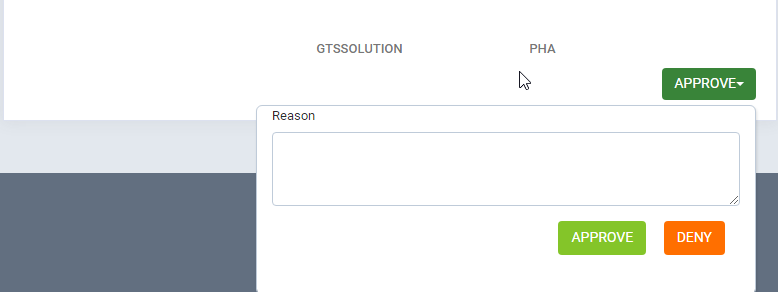
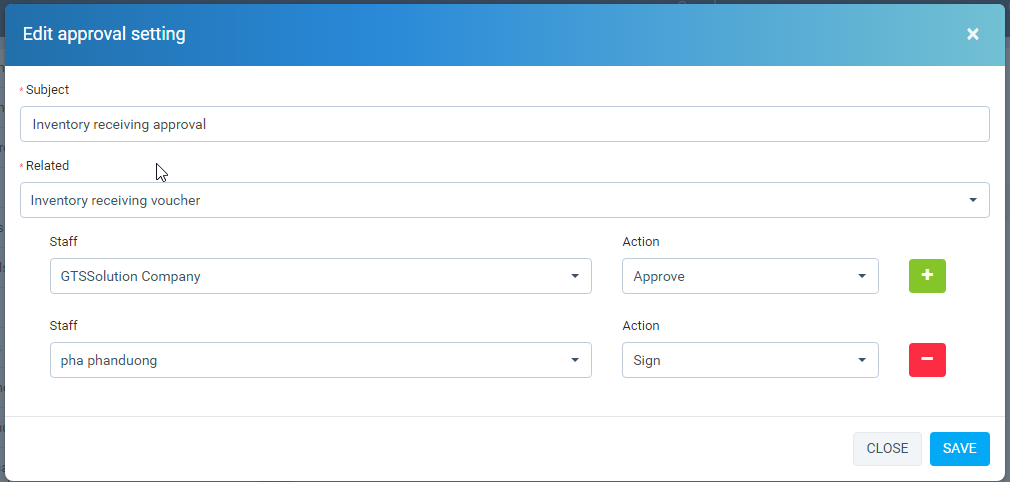
In this view create Approval setting. Allow define approval process, for example “Inventory receiving voucher” must go through all the steps in that process to be valid ( step 1: staff “GTSSolution” approve, step 2 “pha” to sign)– image of staff “GTSSolution” approval
– image of staff “Pha” approval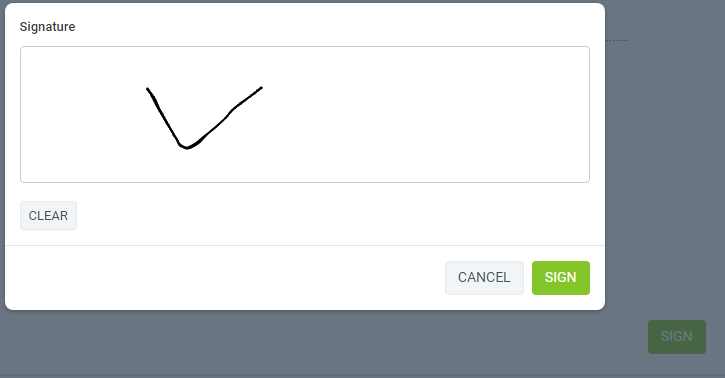
– Subject: approval setting name
– Related: have 4 option “Inventory receiving voucher”, “Inventory delivery voucher”, “Loss & adjustment”, “Internal delivery note”.
– The next: define step for one approval13.3 Edit Approval setting view
In manage Style click button “Edit”.
13.4 Delete Approval setting
In manage view click button “Delete”.
II. Items
- Create, edit, delete
1.1 Create new item view : (Inventory -> Items -> Add)
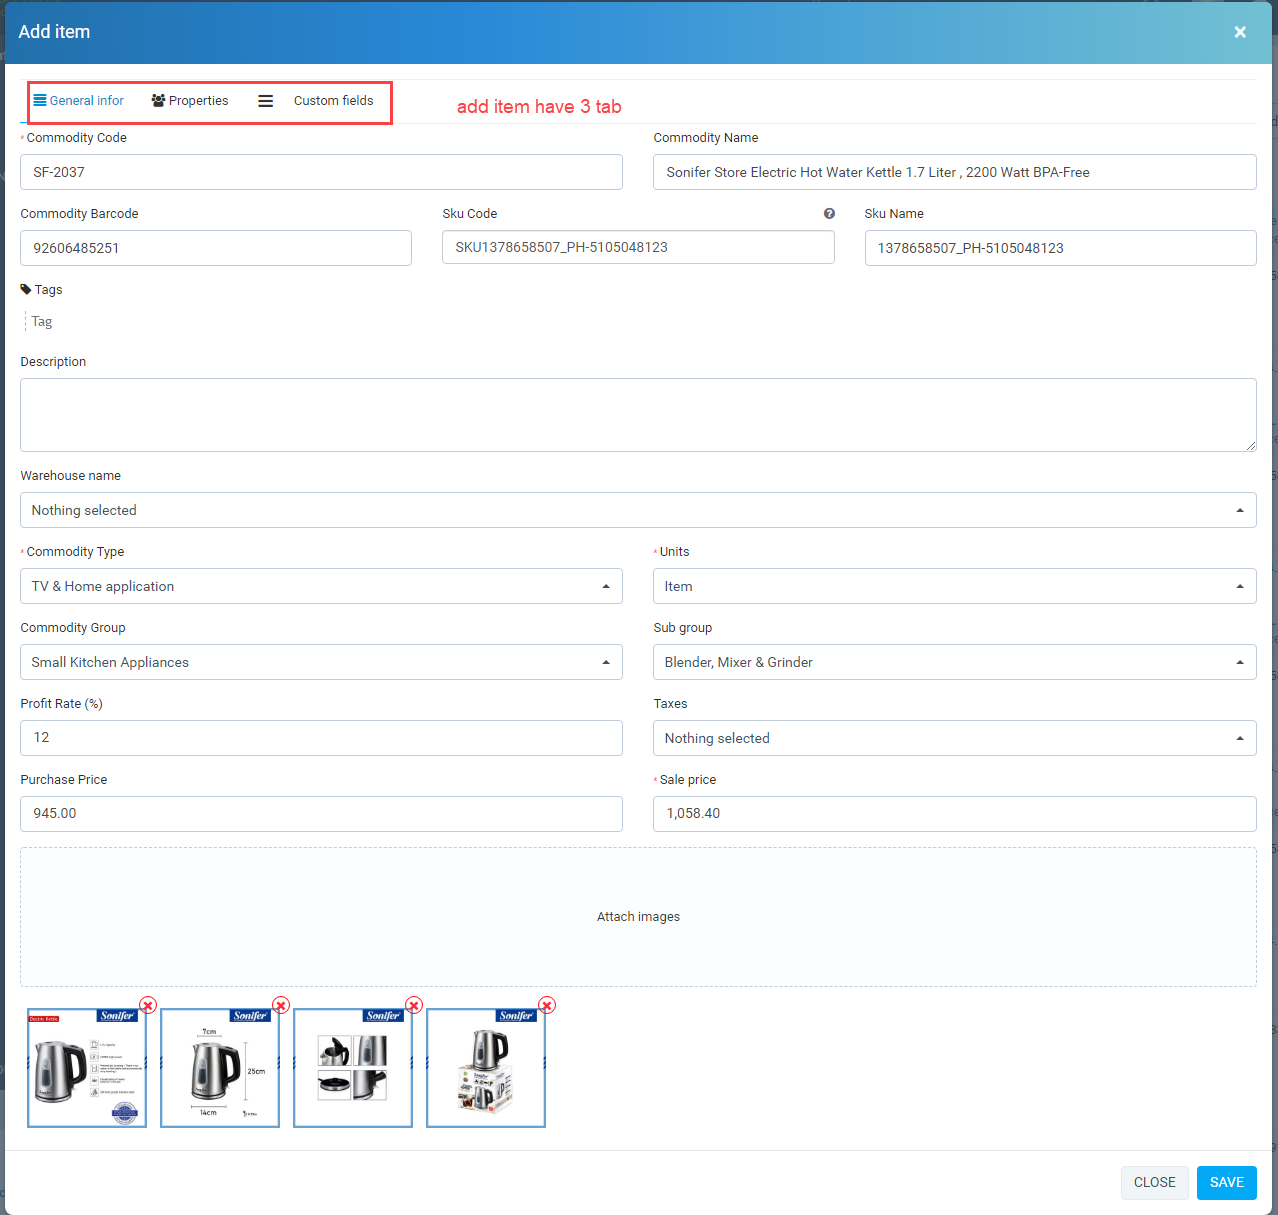
The first tab: define need attribute of item
– Commodity barcode you can fill manual, fill via barcode scanner, or if you don’t fill so automatically created
+ get commodity barcode via barcode scanner: you need barcode scanner, after connect barcode scanner with computer so we need test barcode scanner is working. Opening new tab on web browser and need a product have barcode, after mouse point over the address bar and use barcode scanner to scan barcode on the product, if barcode display on address bar => barcode scanner working well so you go to the next step otherwise check barcode scanner.
+ So get barcode via barcode scanner when the create, edit new item just you open new, edit view after use barcode scanner to scan barcode on the product and it auto fill in “barcode” field on the form. If you don’t open new, edit form => it automatically search item based on barcode.
+ “Barcode equal sku code”: option in “setting -> Rule sale price, inventory delivery voucher method”, if in setting that option has checked when create, edit item => “barcode” like “skucode”.
+ “SKU Code”: if you fill it take value fill , otherwise it created had format: “Prefix “+”the first character of group code “+”subgroup code “+” id auto increase has 4 character”. “Prefix” get from “Inventory -> setting -> Inventory setting -> Item SKU prefix”
+ “Commodity type”, “Unit”, “Commodity group”, “Sub group”, “Profit Rate” take from setting menu.
+ “Taxes”: take from “Setup -> Finance -> Tax Rate”
+”Sale price”: Calculate when fill “purchase price”, if edit “Profit Rate” => “Sale price” changes, edit “Purchase price” => “Sale price” changes.
+ “Attach images”: Attach multiple images (drop file or open folder and select file)The second tab: define need attribute of item
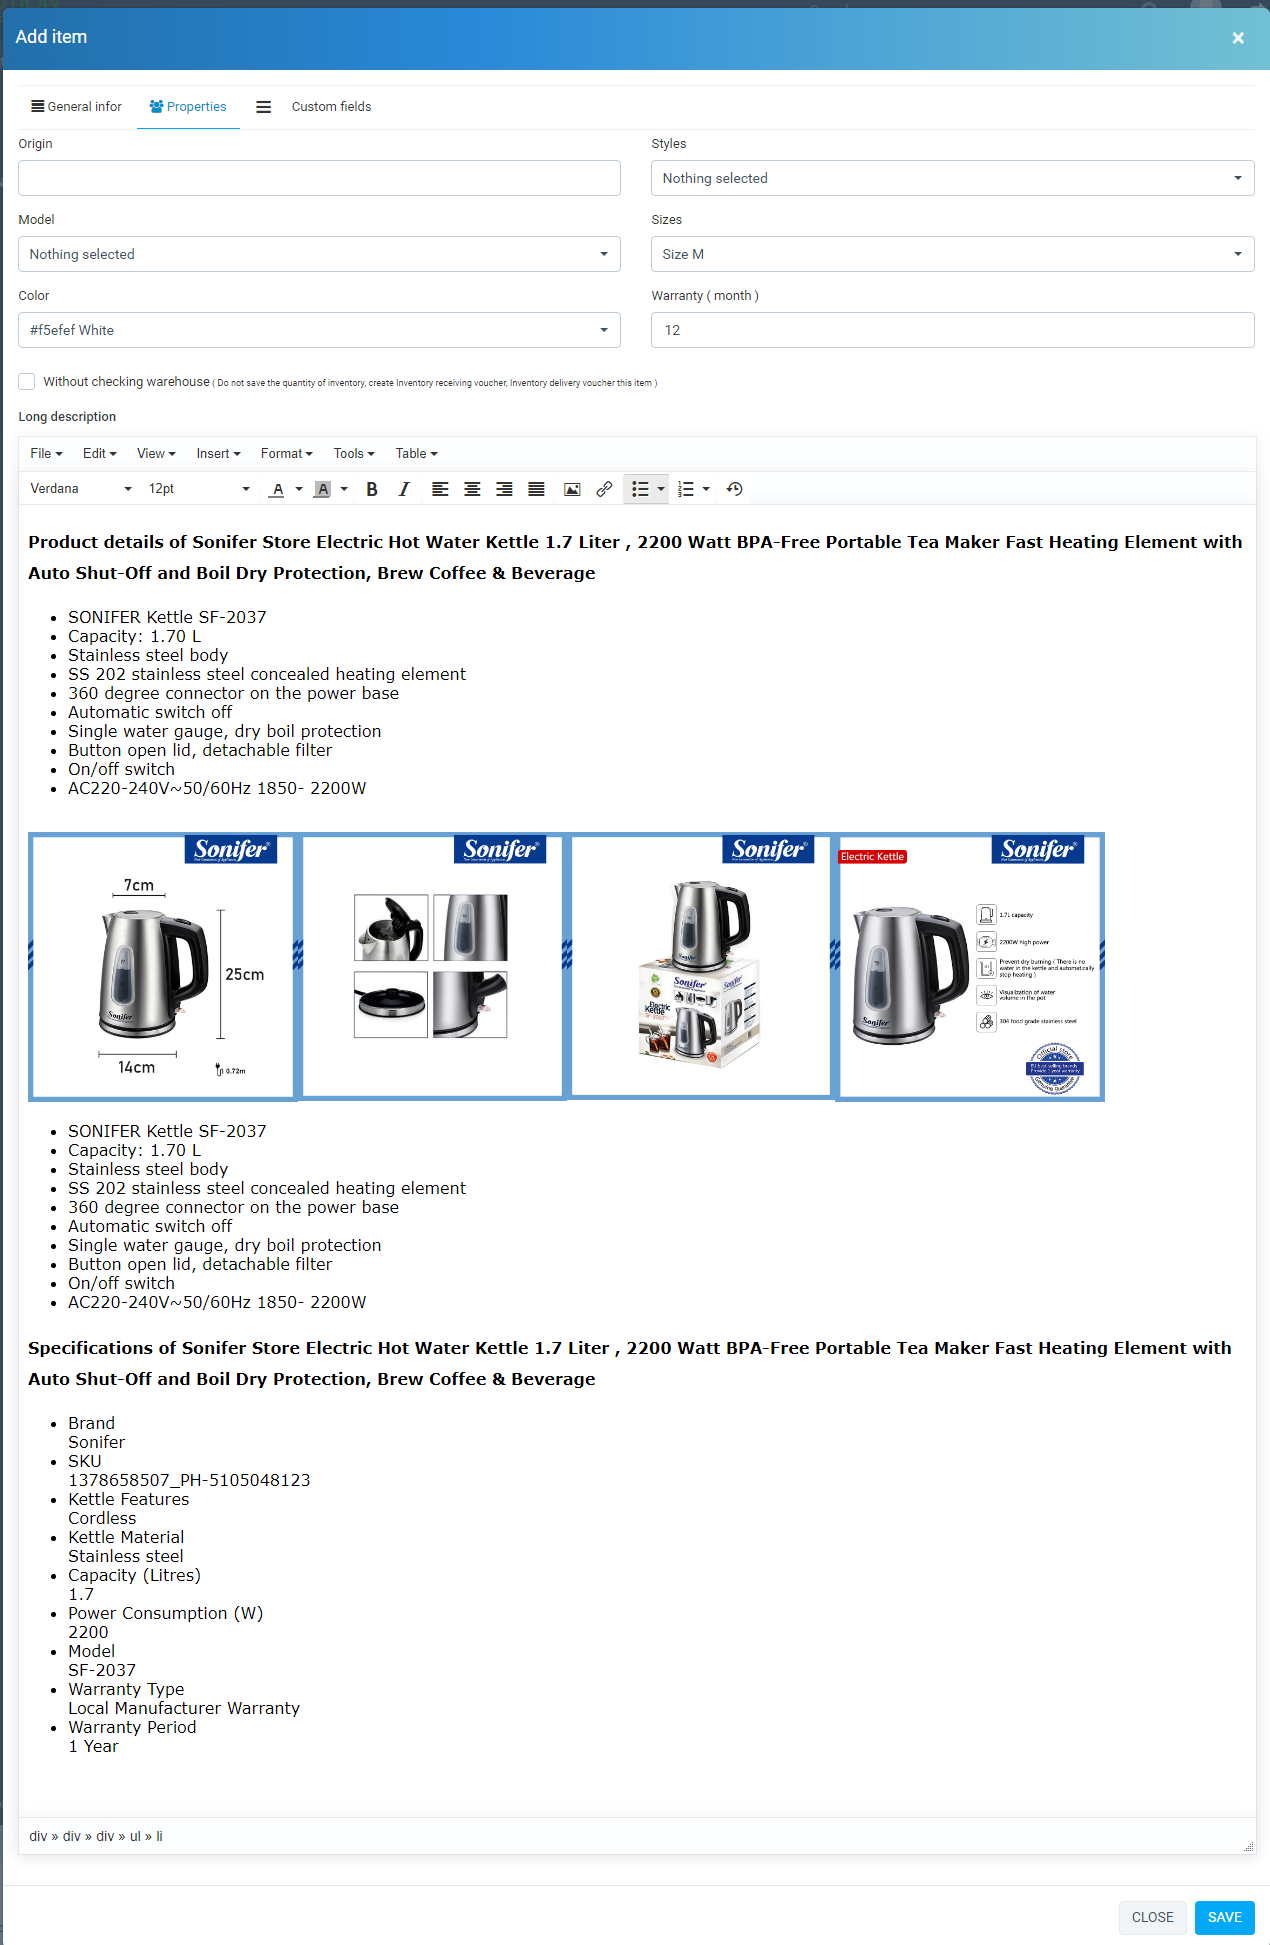
+ “Styles”, “Model”, “Size”, “Color” get from setting.
+ “Without checking warehouse”: If this option is checked so when create “Inventory receiving voucher”, “Inventory delivery voucher” => it create but “inventory quantity” of the product in warehouse not changes and don’t “Write log for this”. This option support create “Inventory receiving voucher”, “Inventory delivery voucher” but does not affect “inventory quantity” of item in warehouse .The third tab

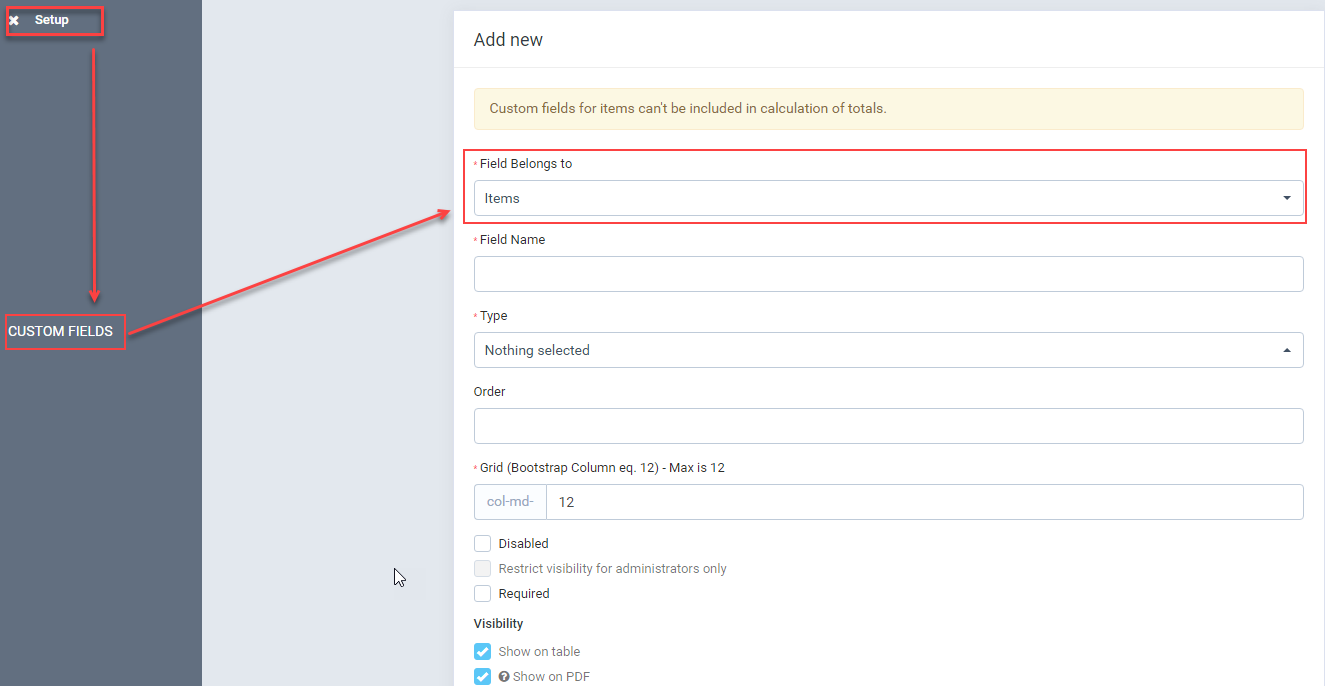
+ display “custom fields” the declaration for the item. So declaration for the item, go to “Setup -> Custom fields -> new custom fields” and select “Field Belong to” id Items so created custom fields for item.
1.2 Edit item

– On manage item, click edit to edit.
1.3 delete item
– On manage item, click delete to delete.
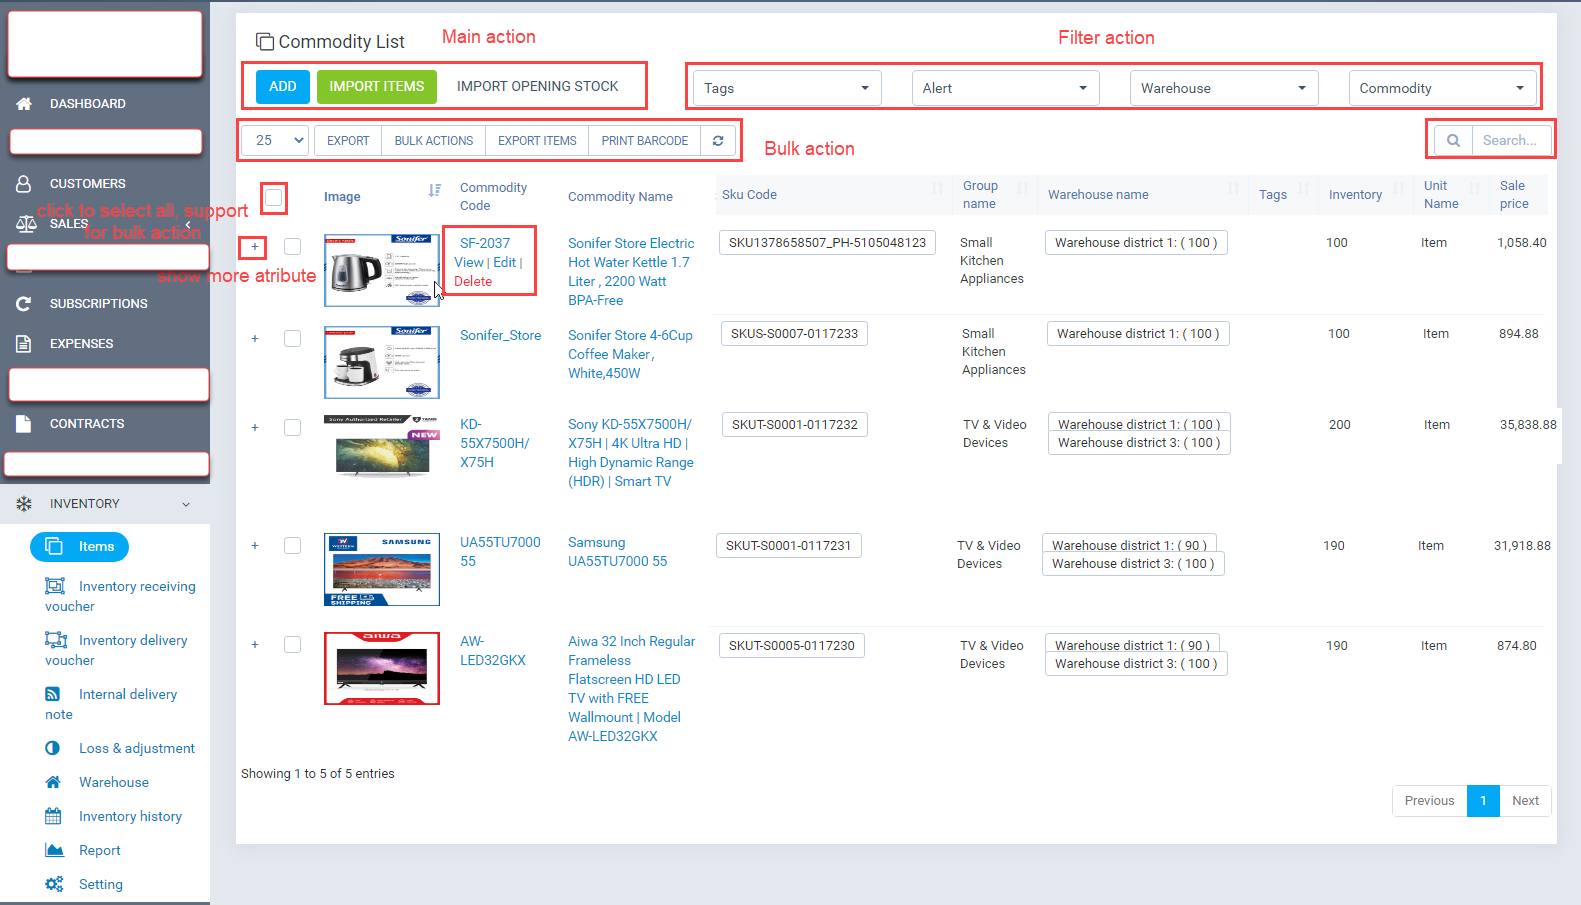
1.4 Manage Items view
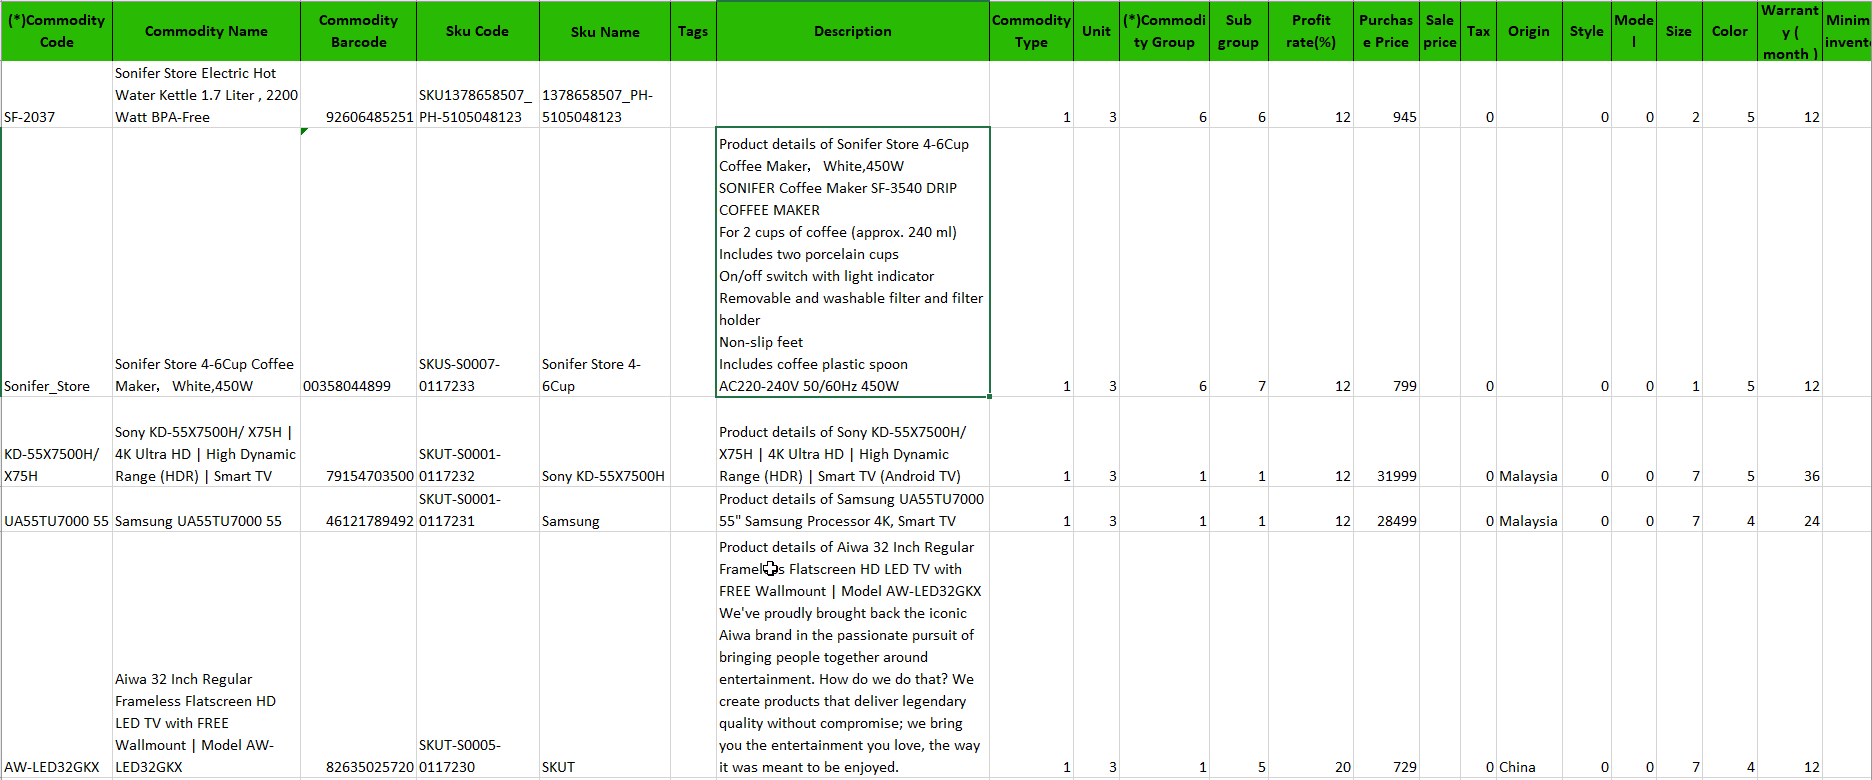
a) Import items: When create new item you can create manual, you can create multiple item with import list item via excel file
+ In manage items view: click “Import items” .
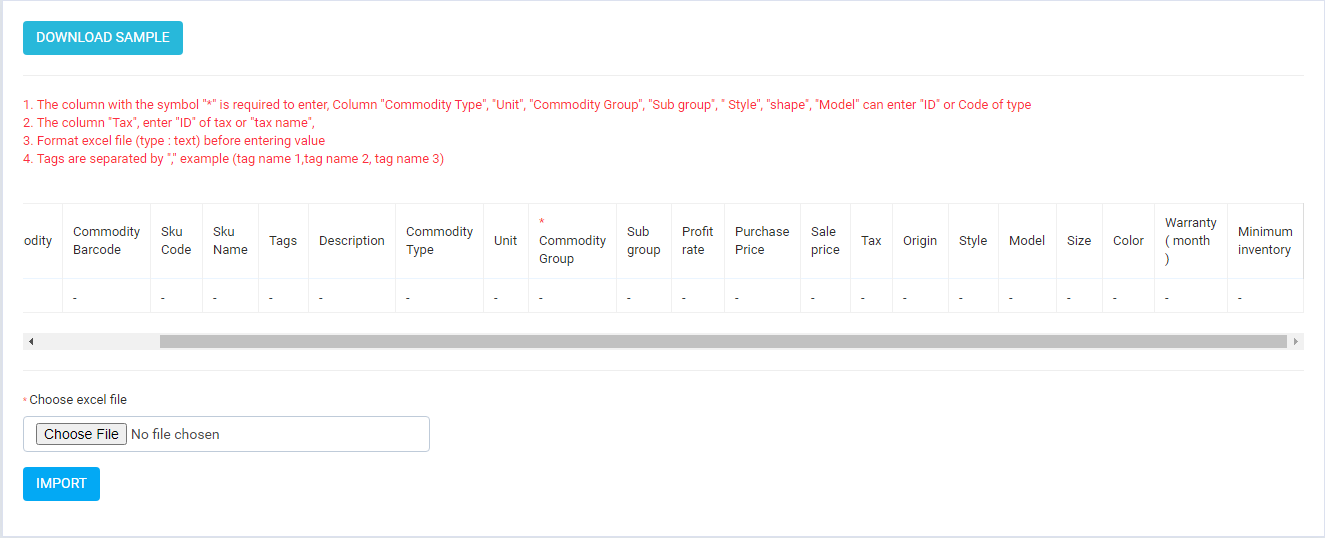
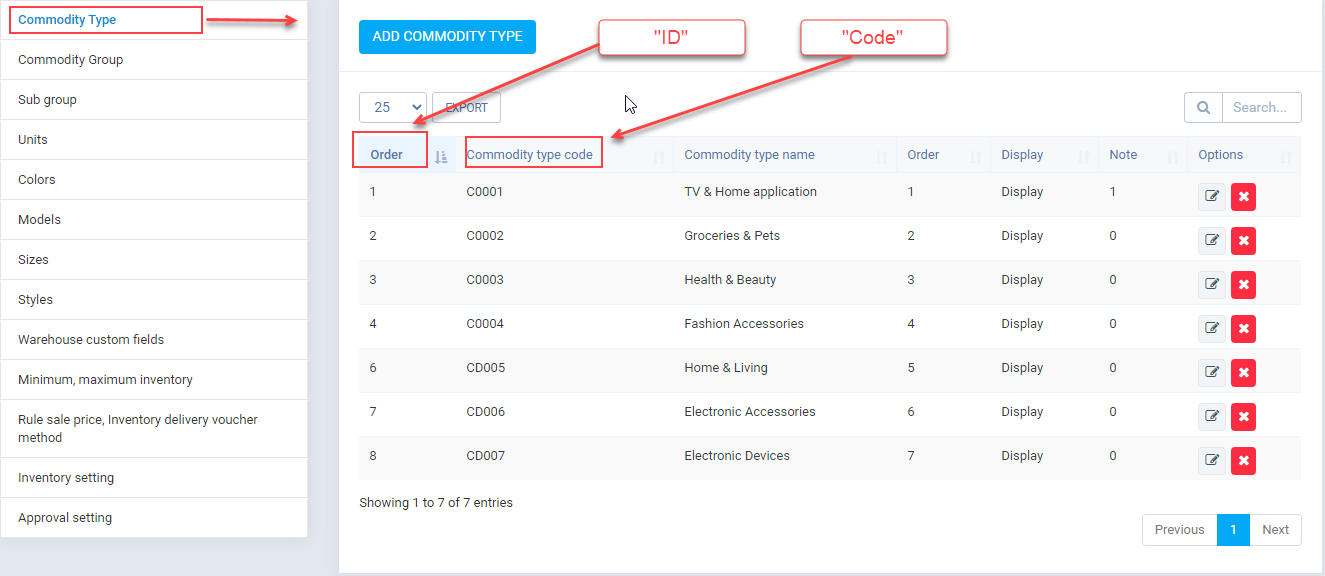
+ You need attention: Column “Commodity Type”, “Unit”, “Commodity Group”, “Sub group”, ” Style”, “Size”, “Color”, “Model” can you enter “ID”, or “Code” (We recommend using an ID to ensure accuracy). After down load sample file -> fill into file -> import that file .
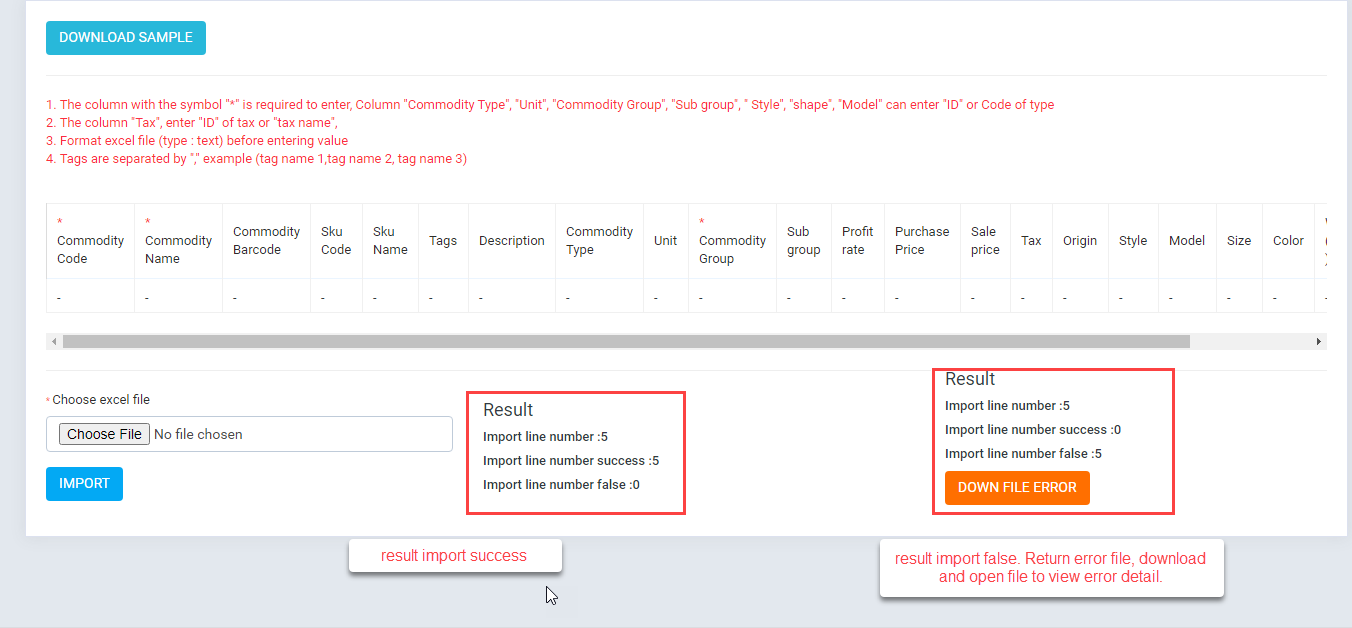
+ Result: If error -> download error file -> checked -> retry
+ Example
- Import Opening stock
Similar to import items - Export items
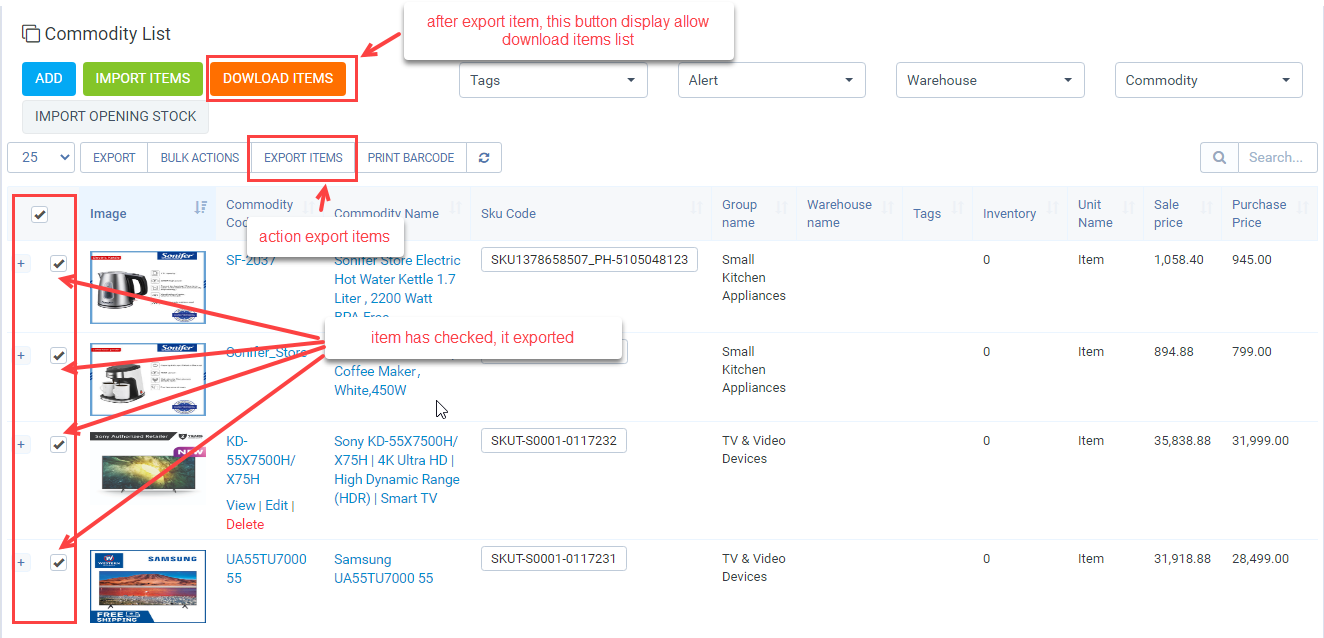
+ Select item to export: to select multiple click check box on header, select each item -> click check box at the top of the row (if you want display item all -> click drop down -> select “All”.)
+ Click “Export items”
+ Click “Download items” - Print barcode
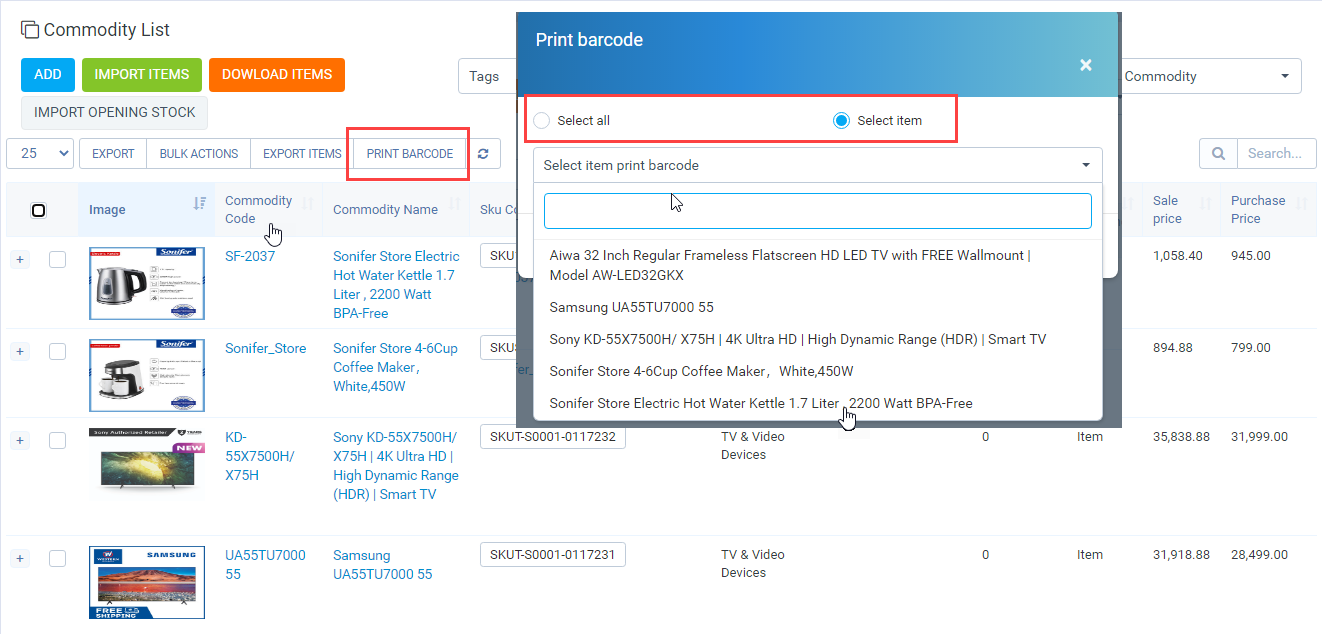
+ Click “Print barcode”, Popup show, “Select All” -> select all to print barcode, “Select item” -> choose each item
+ Click “Confirm”
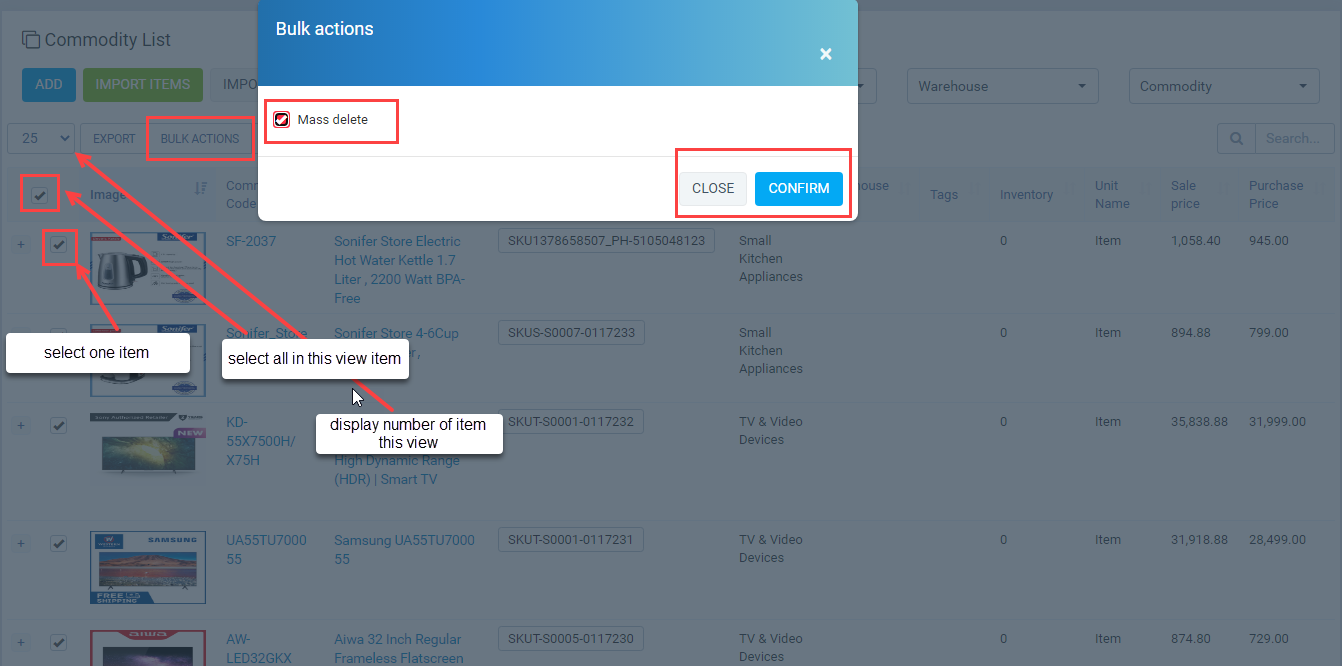
- Delete multiple item
II. Warehouse (Inventory -> Warehouse).
- Warehouse manage
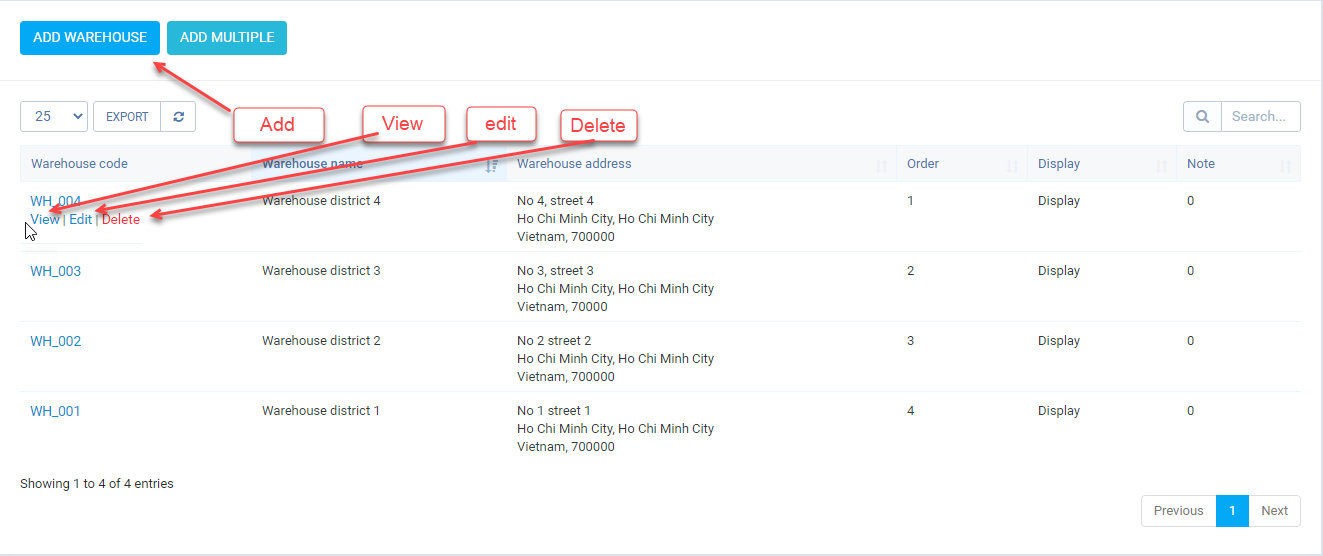
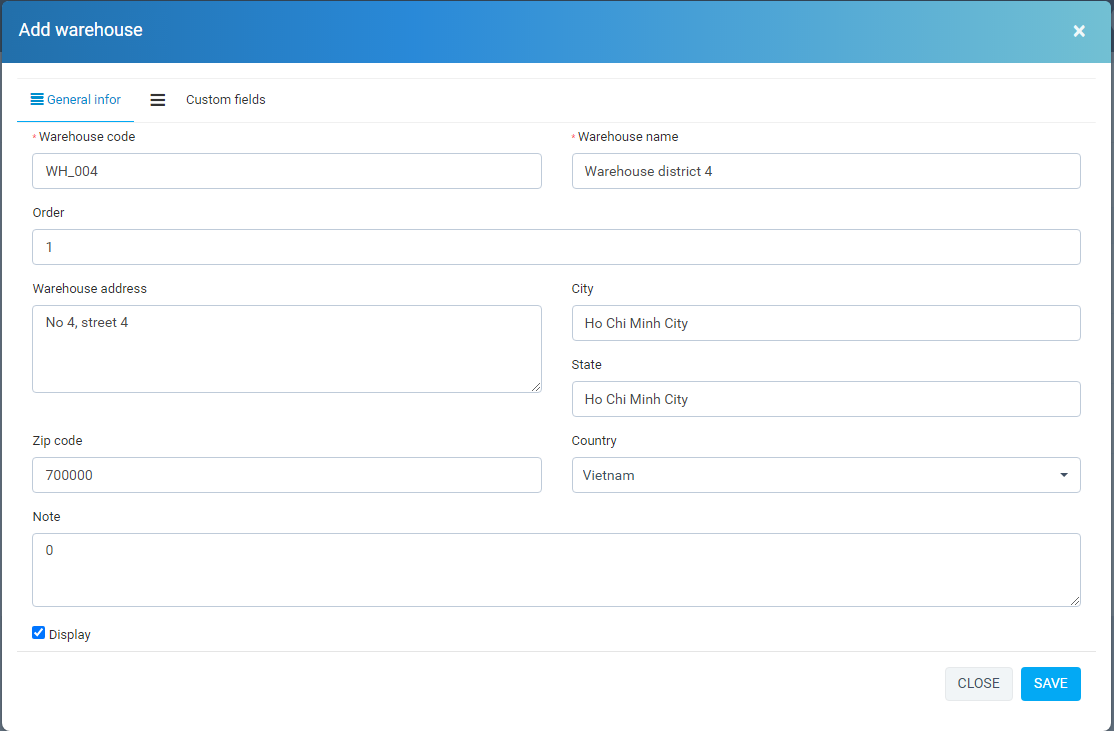
- Warehouse add
– Click button “Add warehouse”.
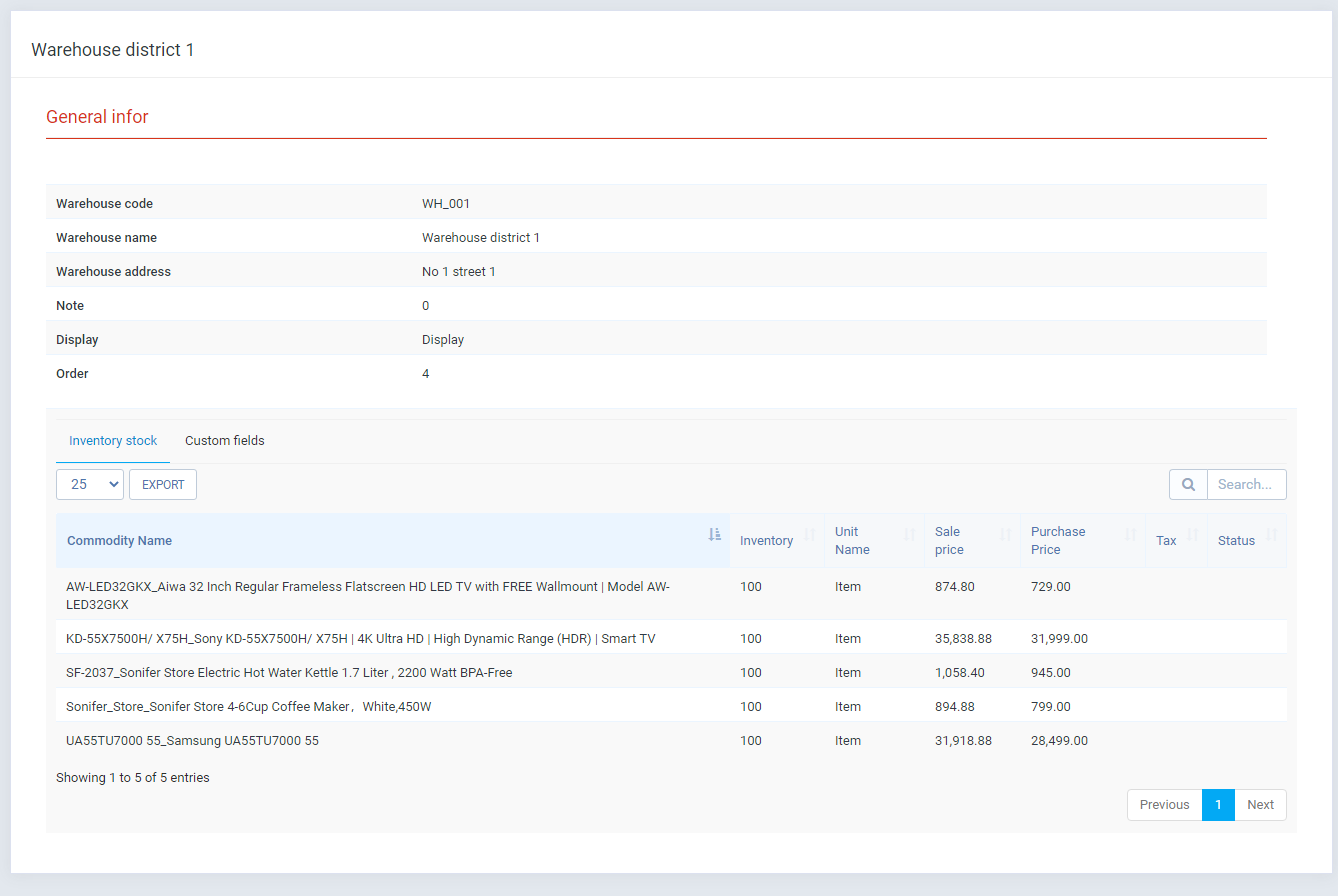
- Warehouse view details
– Display detail info. Display existing items in stock, the quantity in stock for each item.
III. Inventory receiving voucher.
-
- Management screen

– This feature allow: create inventory receiving voucher,
+ Create manual,
+ or via reference purchase order ( If Purchase module is active)
+ Automatic create if purchase changes status “Approved” ( If Purchase module is active and option “Create goods received note when create Purchase order” in “setting / Rule sale price” checkbox is checked and inventory quantity affect on warehouse “Inventory receiving voucher warehouse” in setting )
- Management screen

-
- Add (Click button “Stock received docket”)
a) Create manual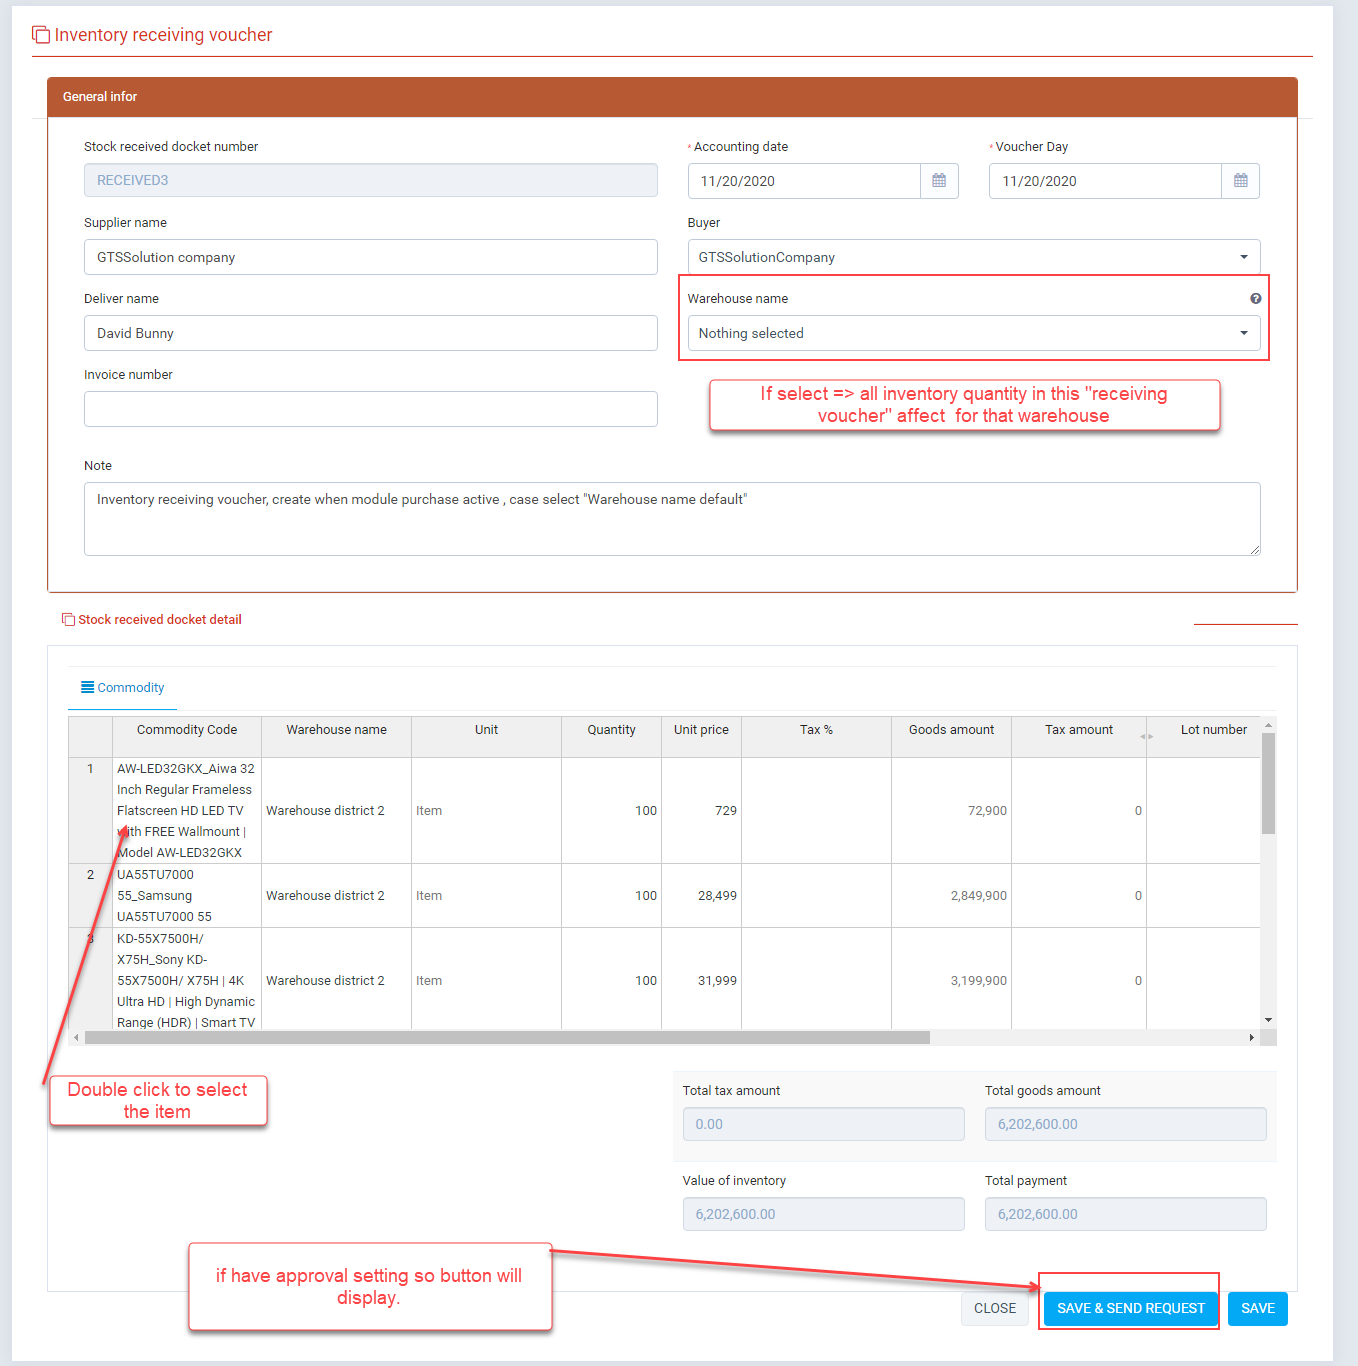
– After fill data into form you can click “Save and send request” or “Save”
+ If have approval setting: * when click “Save & send request” => it save and auto “send request to approval” (send notification, mail to approver)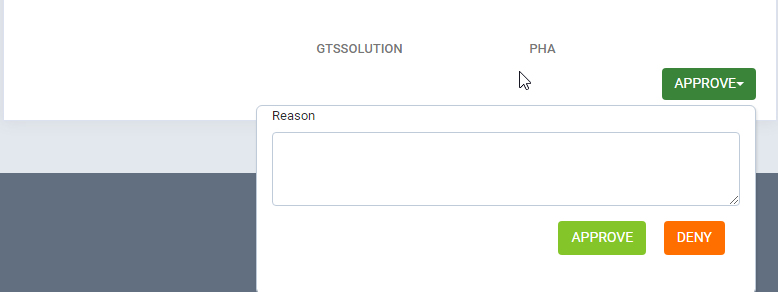
* When click “Save” => it save data, you must “send request to approval” manual
+ If don’t have approval setting: after click save button => auto approval. b) Create via “reference purchase order”
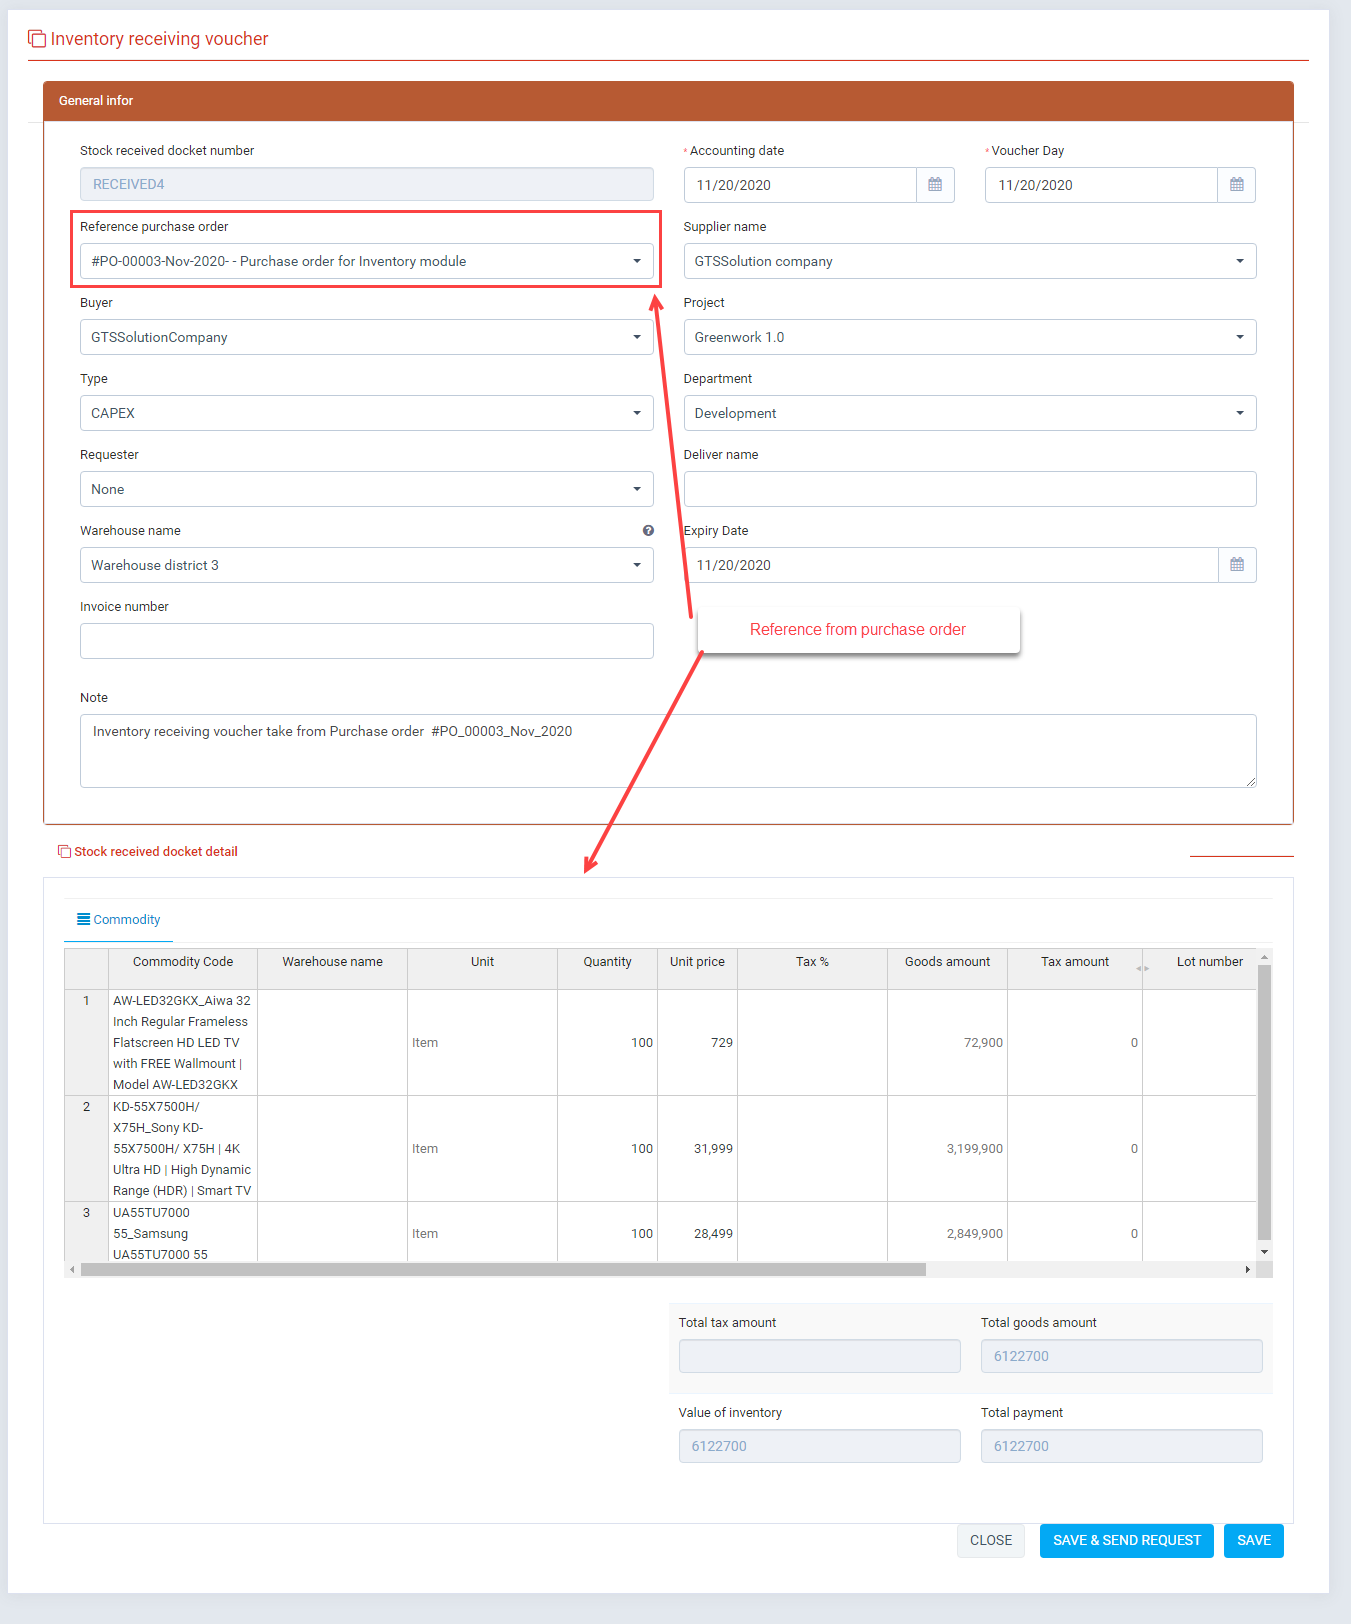
– Drop down “Reference purchase order”: you can select purchase order status “approval”, after select all information of purchase: “Supplier name”, “Project”, ” Type”, ” Deparment”, “Requester”, item have take and fill into form.c) Automatic create from “Purchase order”
– In setting menu must active this checkbox
– In module “Purchase -> Purchase order”: – When “change status to” “approved” => automatically created “stock received docket” and changes status to “approved”.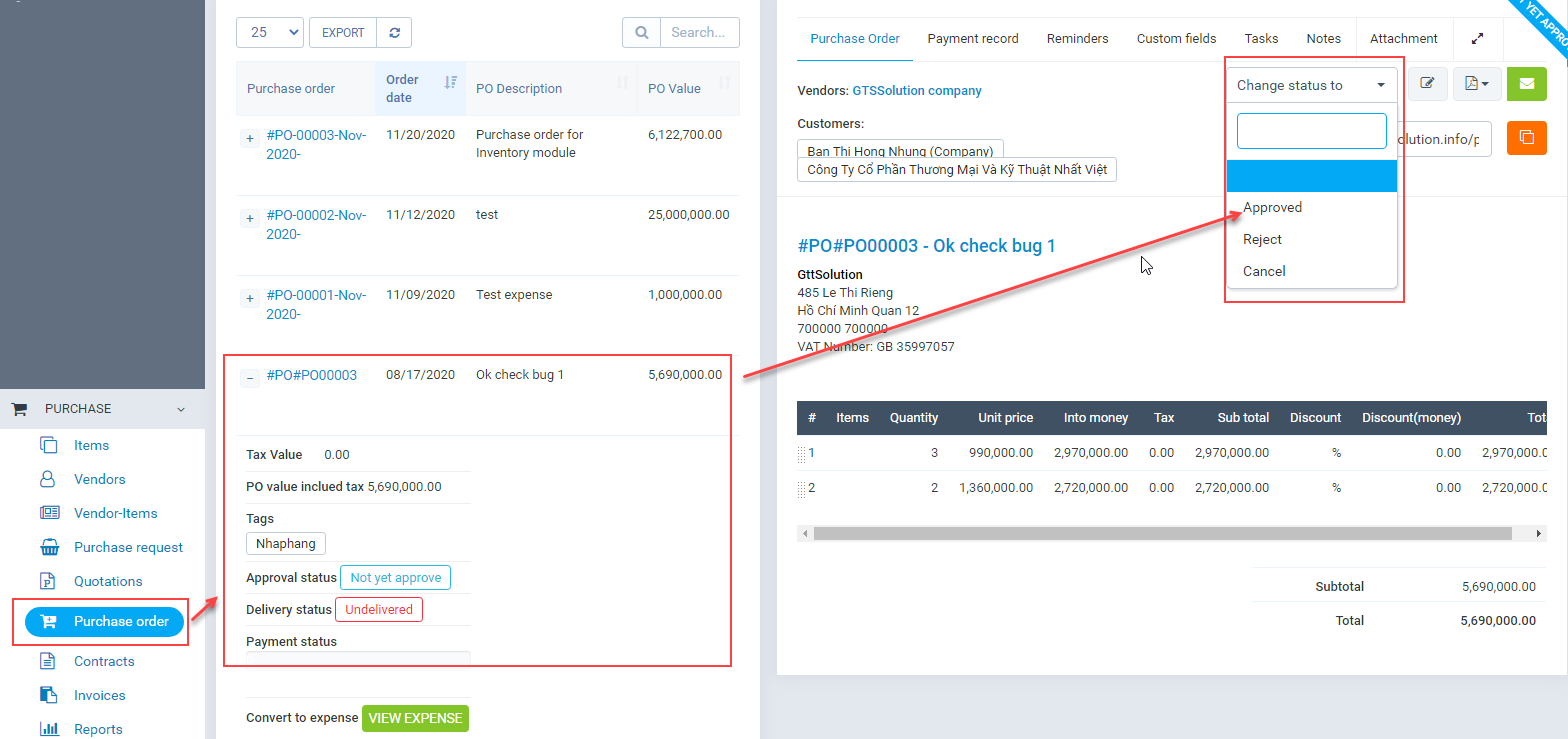
- Add (Click button “Stock received docket”)
-
- Edit
– To edit on “Management screen” click edit.
Only Edit before approved (status “Not yet approve”)
When status approved Editing is not allowed
- Edit
-
- Delete
– Delete before approved. Click button delete on “Management screen”
– If status “approved”. But you still want to delete so in “Setting / Rule sale price”, need active option
– So when you delete, transaction will be revert ( example: quantity of item)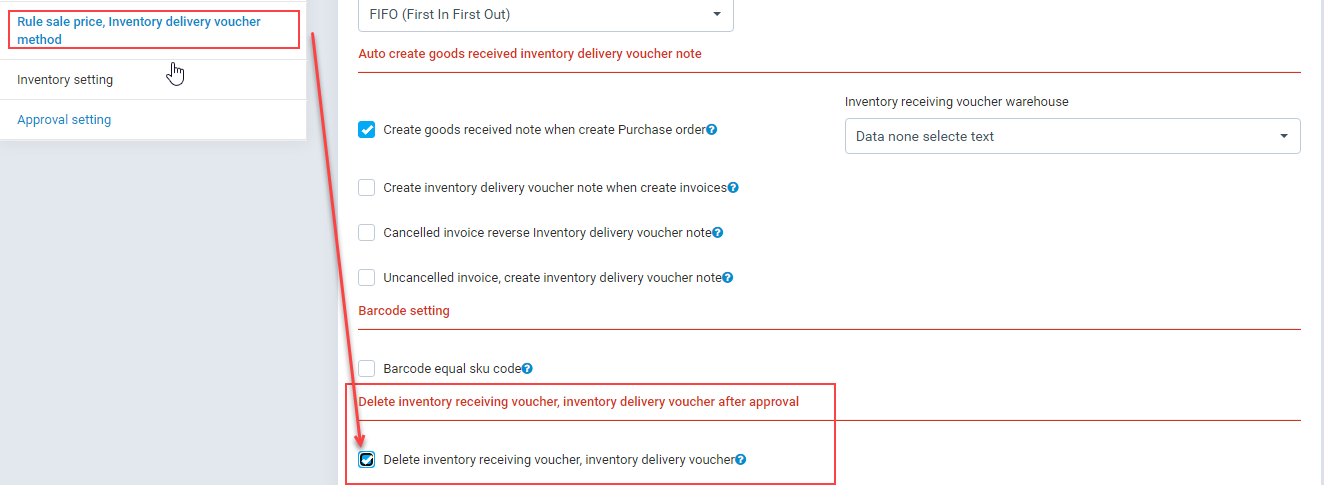
- Delete
-
- Quick view
– On “Management screen” click “quick view”.
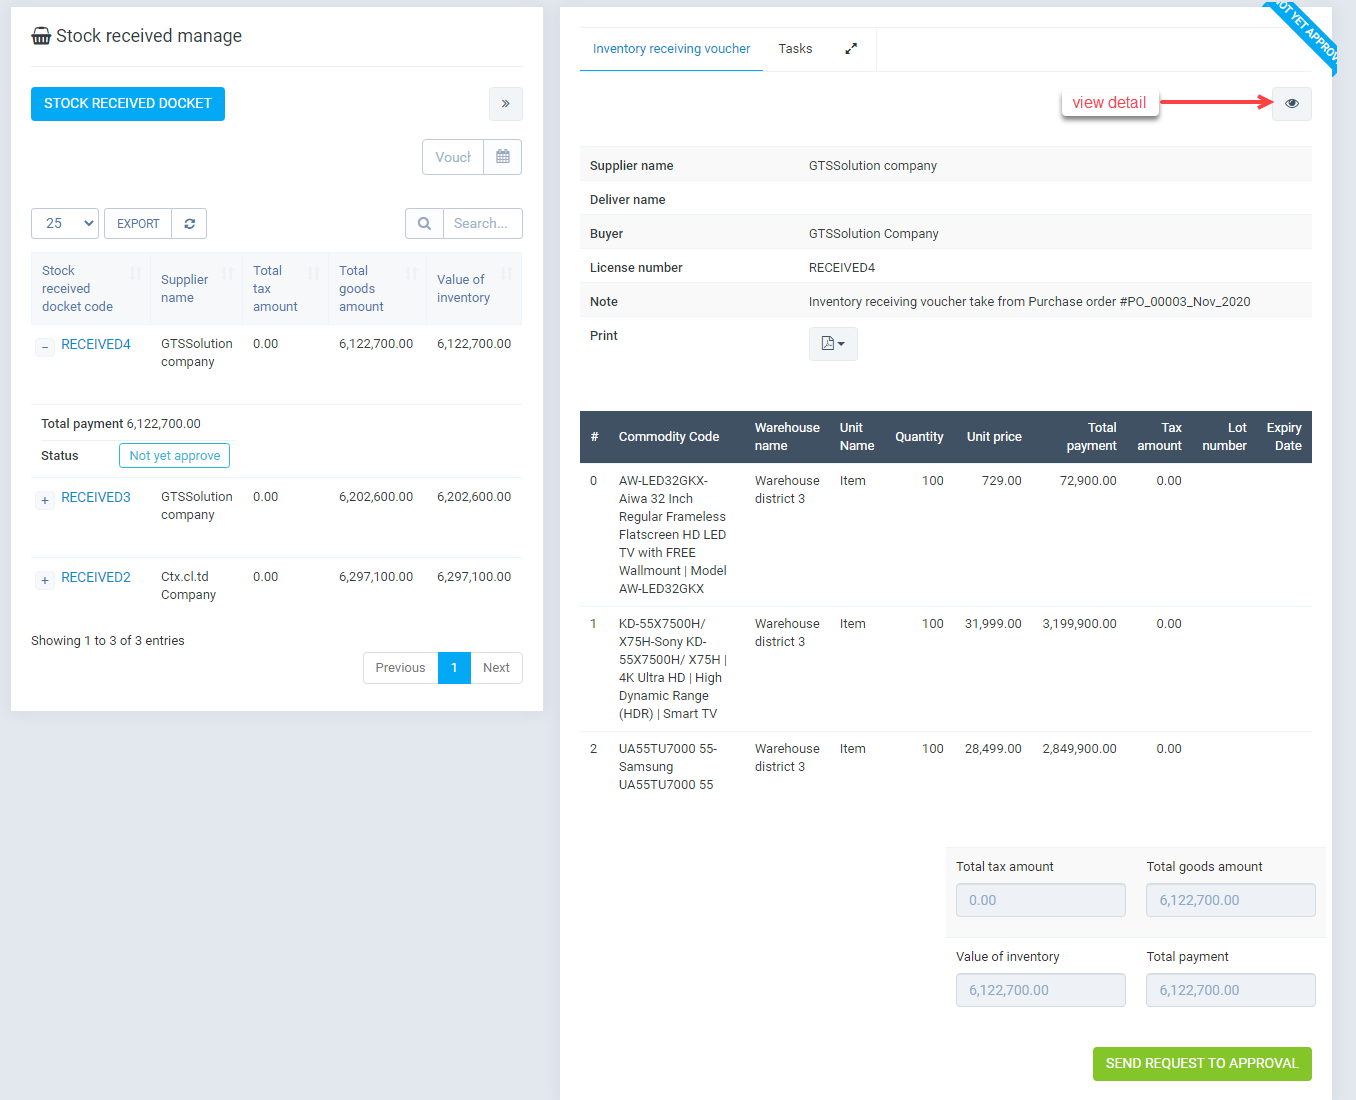
–
- Quick view
-
- View detail
– On “Management screen” click “view detail”.
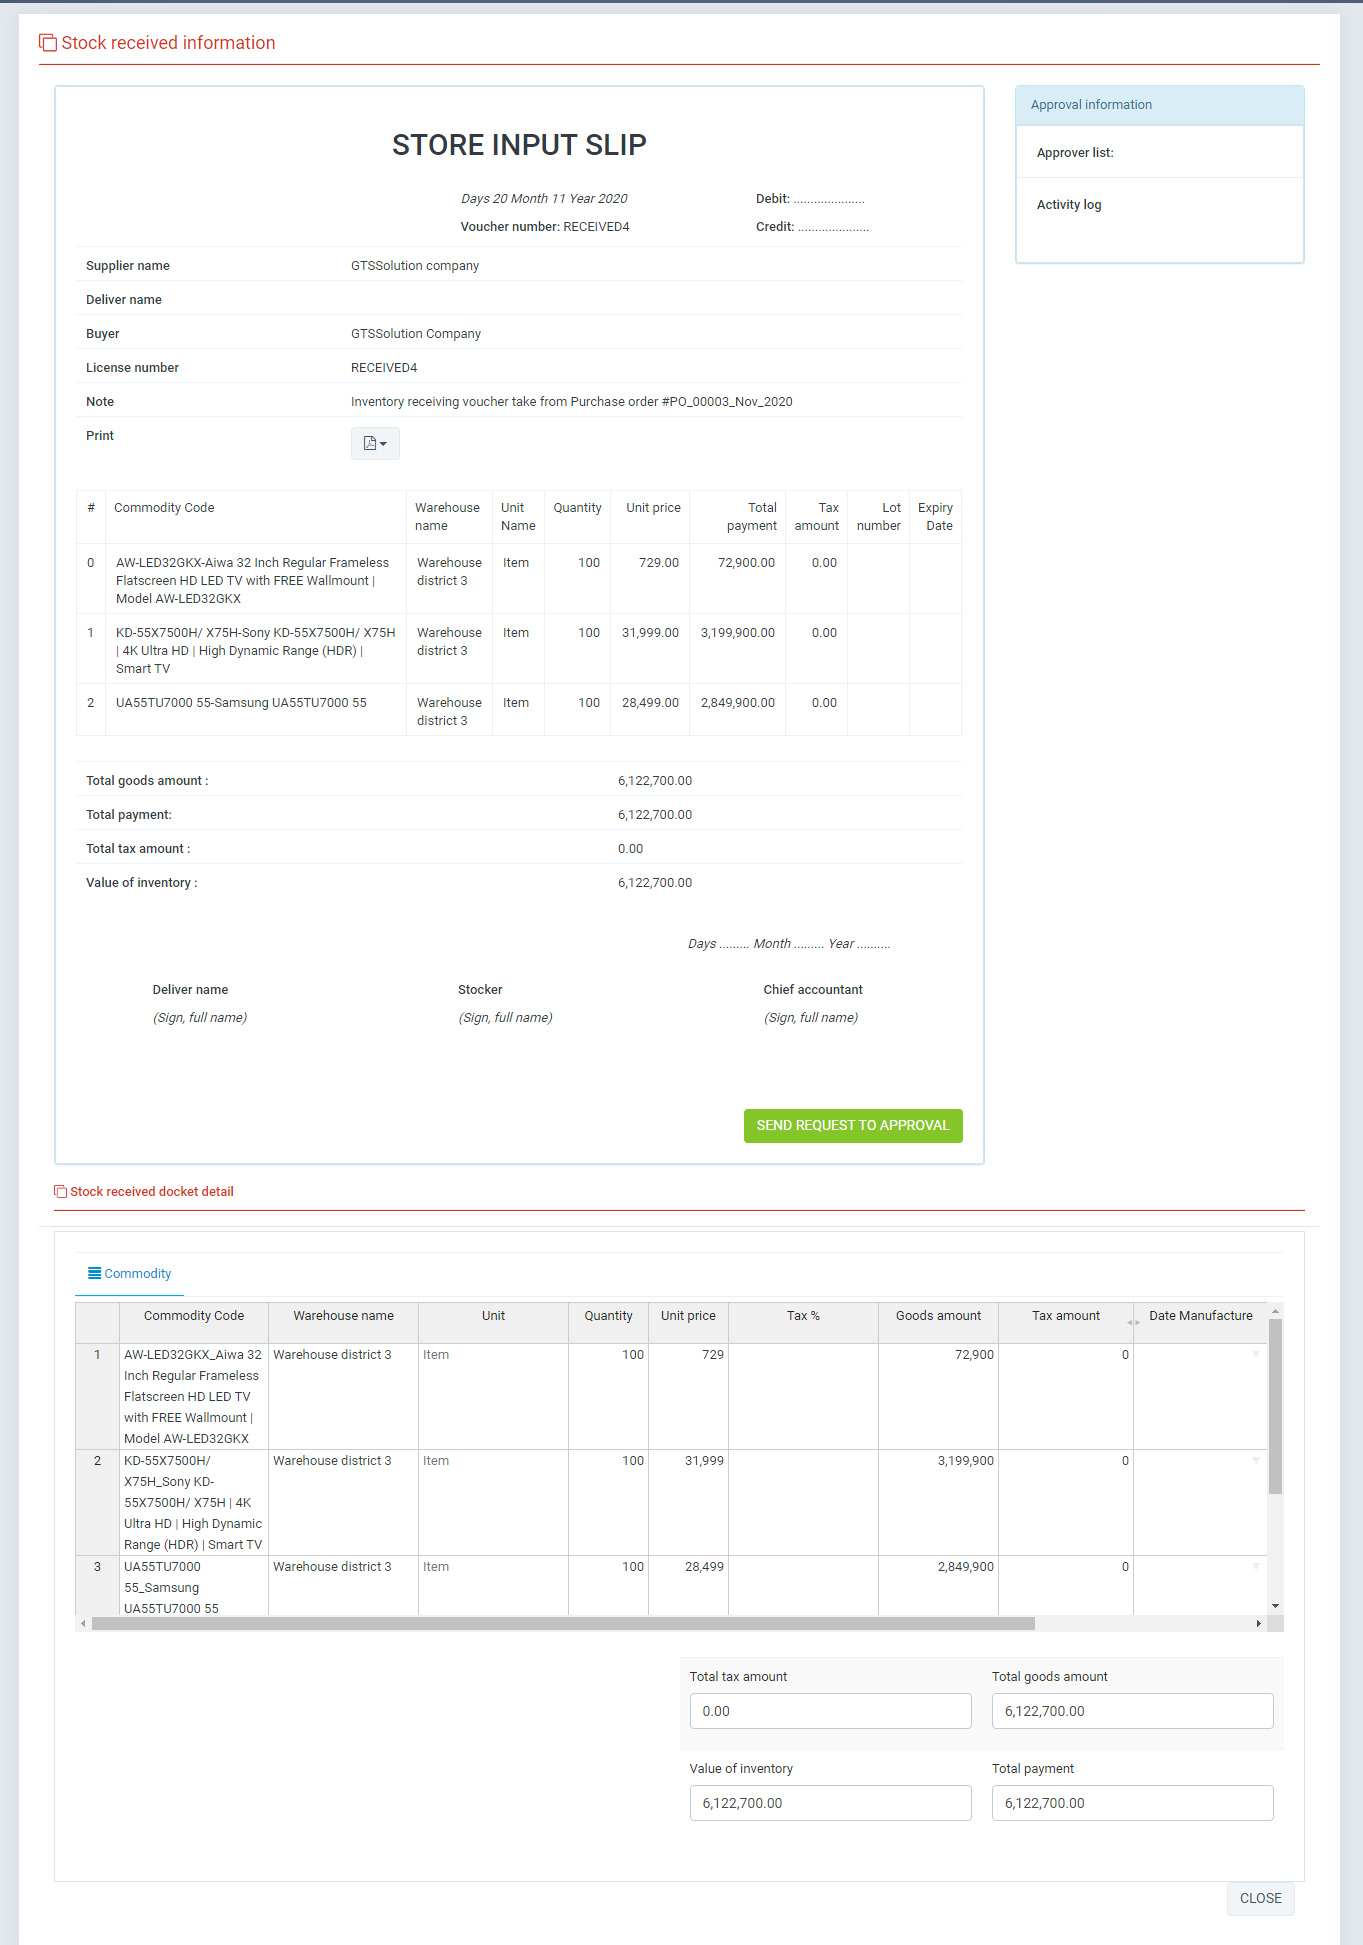
- View detail
- Approval info
– You may receive notification requests for approval, it display in notification bell on the top right
IV. Inventory delivery voucher.
-
- Management screen
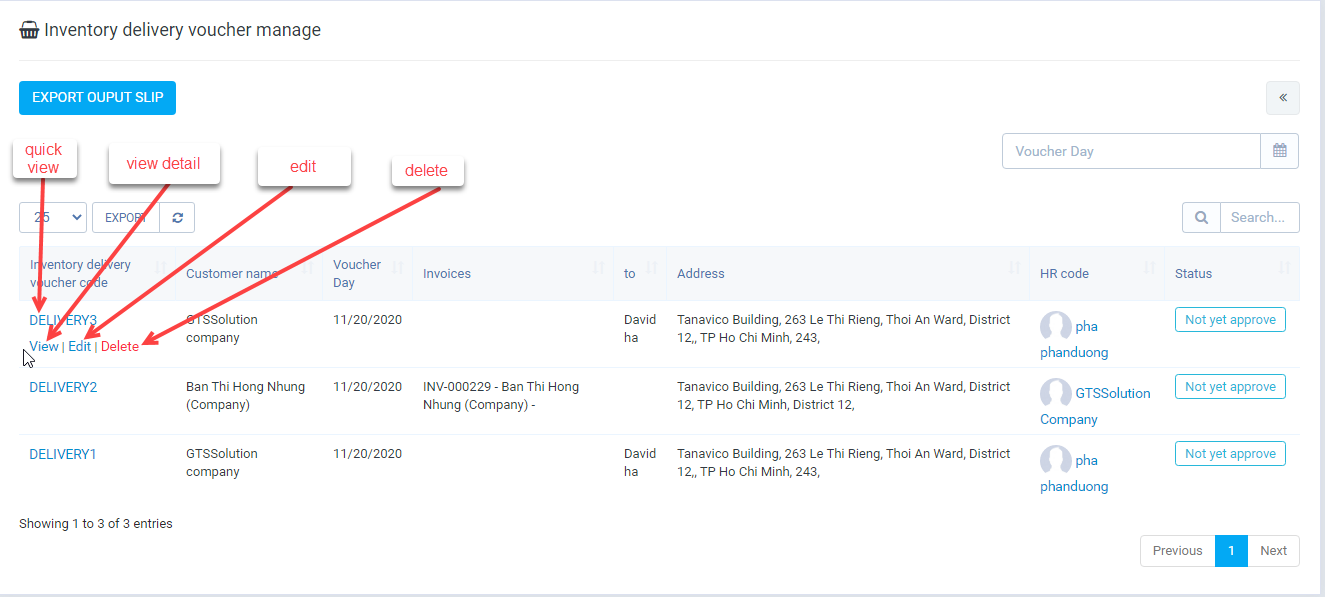
– This feature allow: create inventory delivery voucher,
+ Create manual,
+ or via reference purchase order ( If Purchase module is active, and only “puchase order” have been created “inventory receiving voucher” and is approved and option below is active)
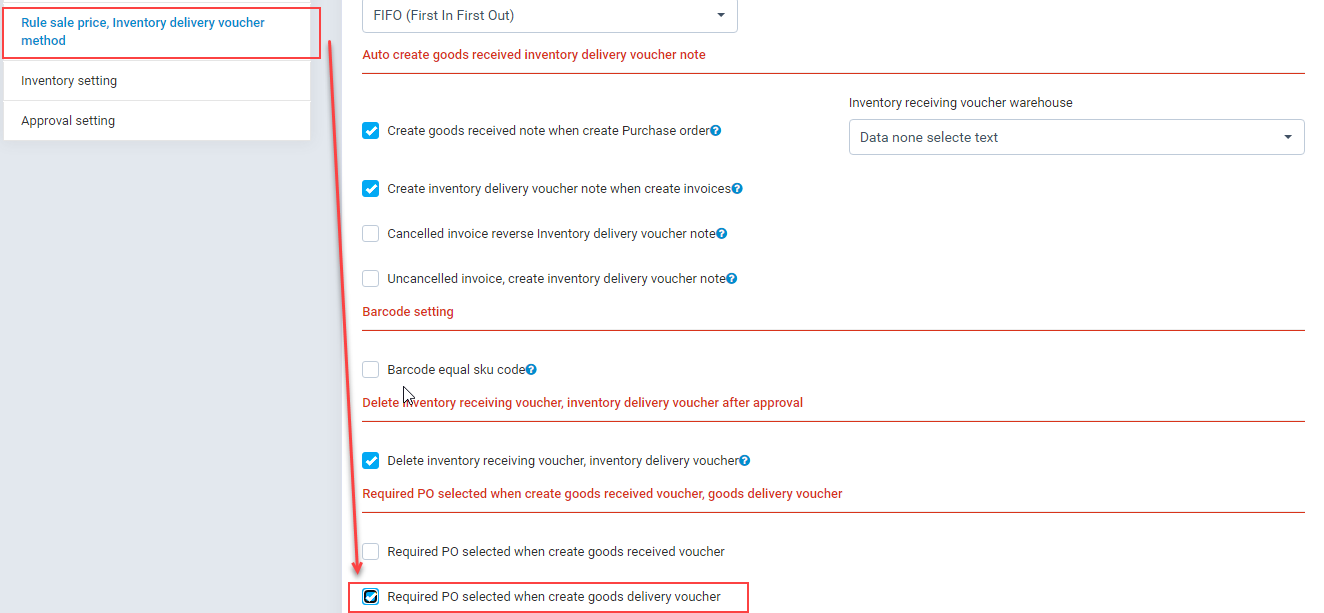
+ Create from “invoices” in sales
+ Automatic create when create “invoice” ( If “Create inventory delivery voucher note when create invoices” in “setting / Rule sale price option is active )

- Management screen
-
- Add (Click button “export output slip”)
a) Create manual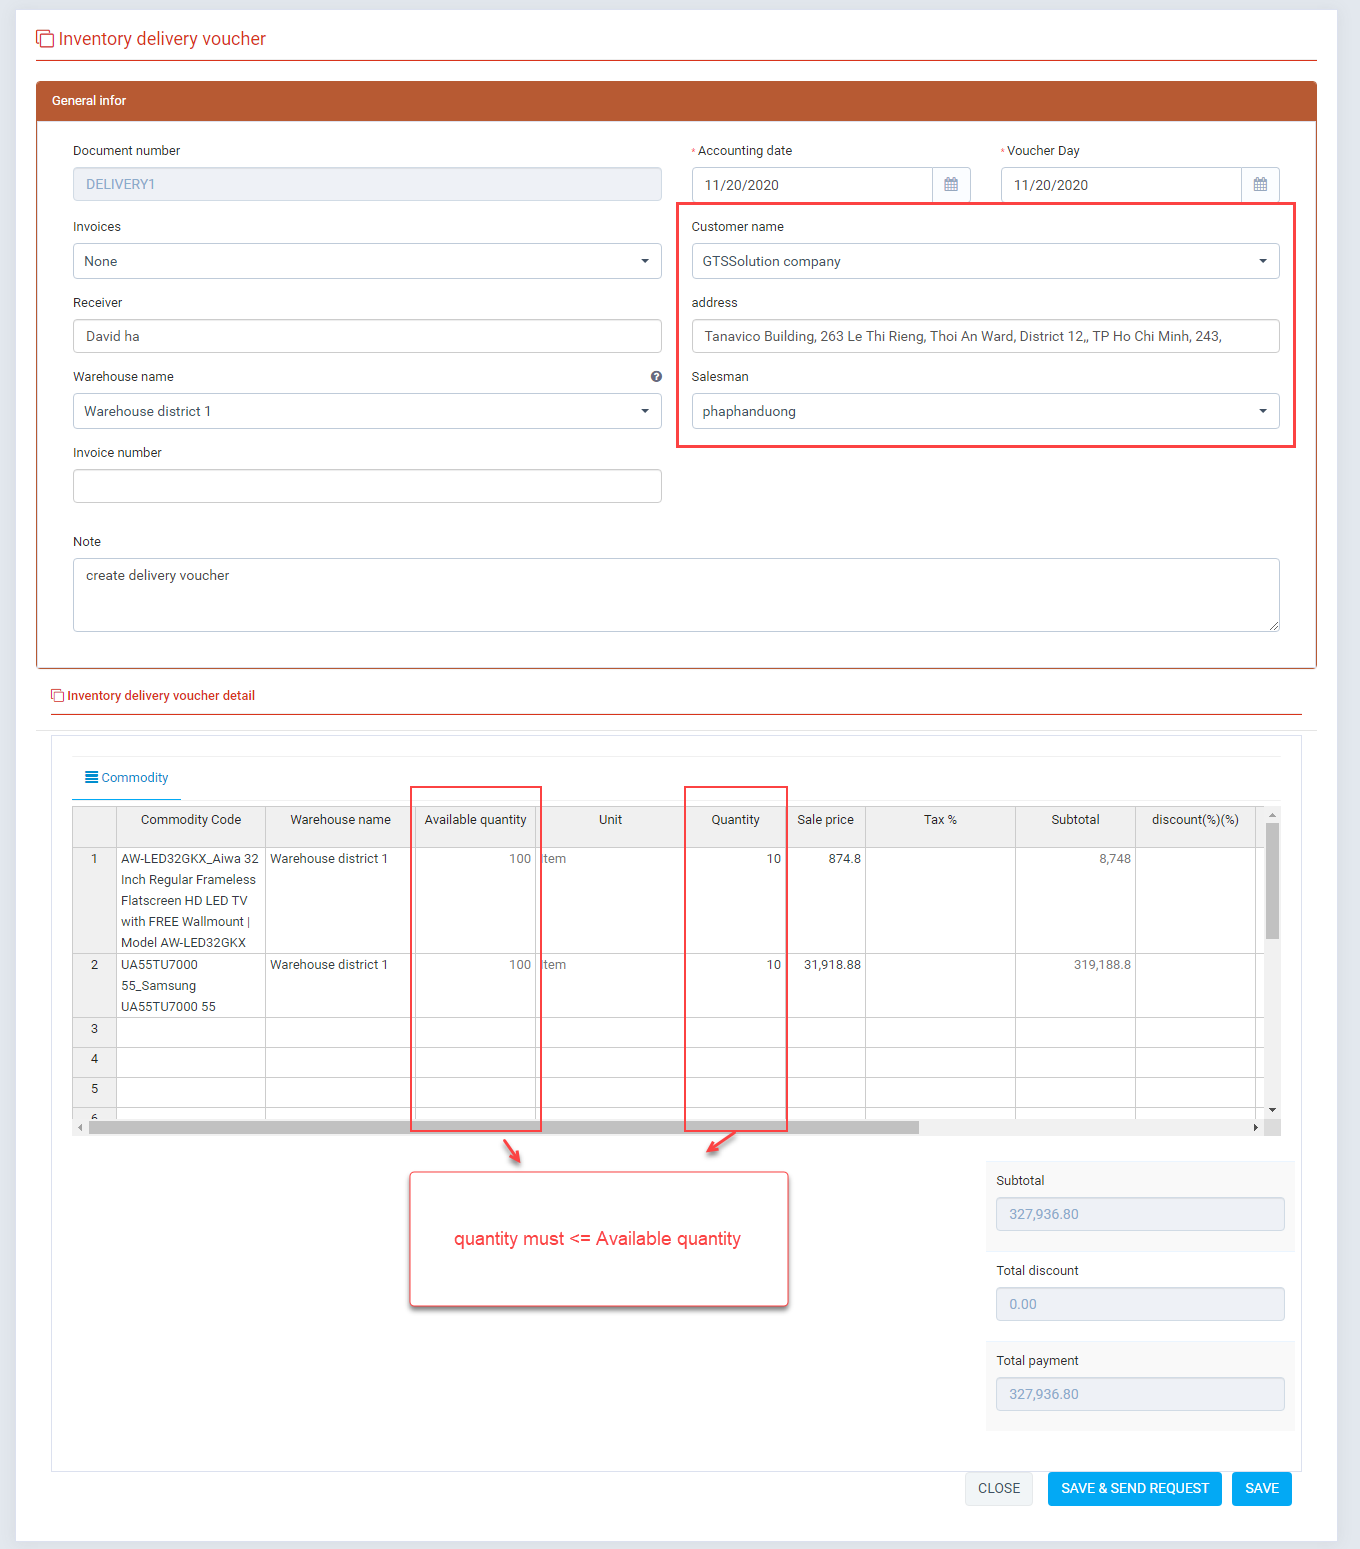
– After fill data into form you can click “Save and send request” or “Save”
+ If have approval setting: * when click “Save & send request” => it save and auto “send request to approval” (send notification, mail to approver)
* When click “Save” => it save data, you must “send request to approval” manual
+ If don’t have approval setting: after click save button => auto approval. b) Create via “reference purchase order”
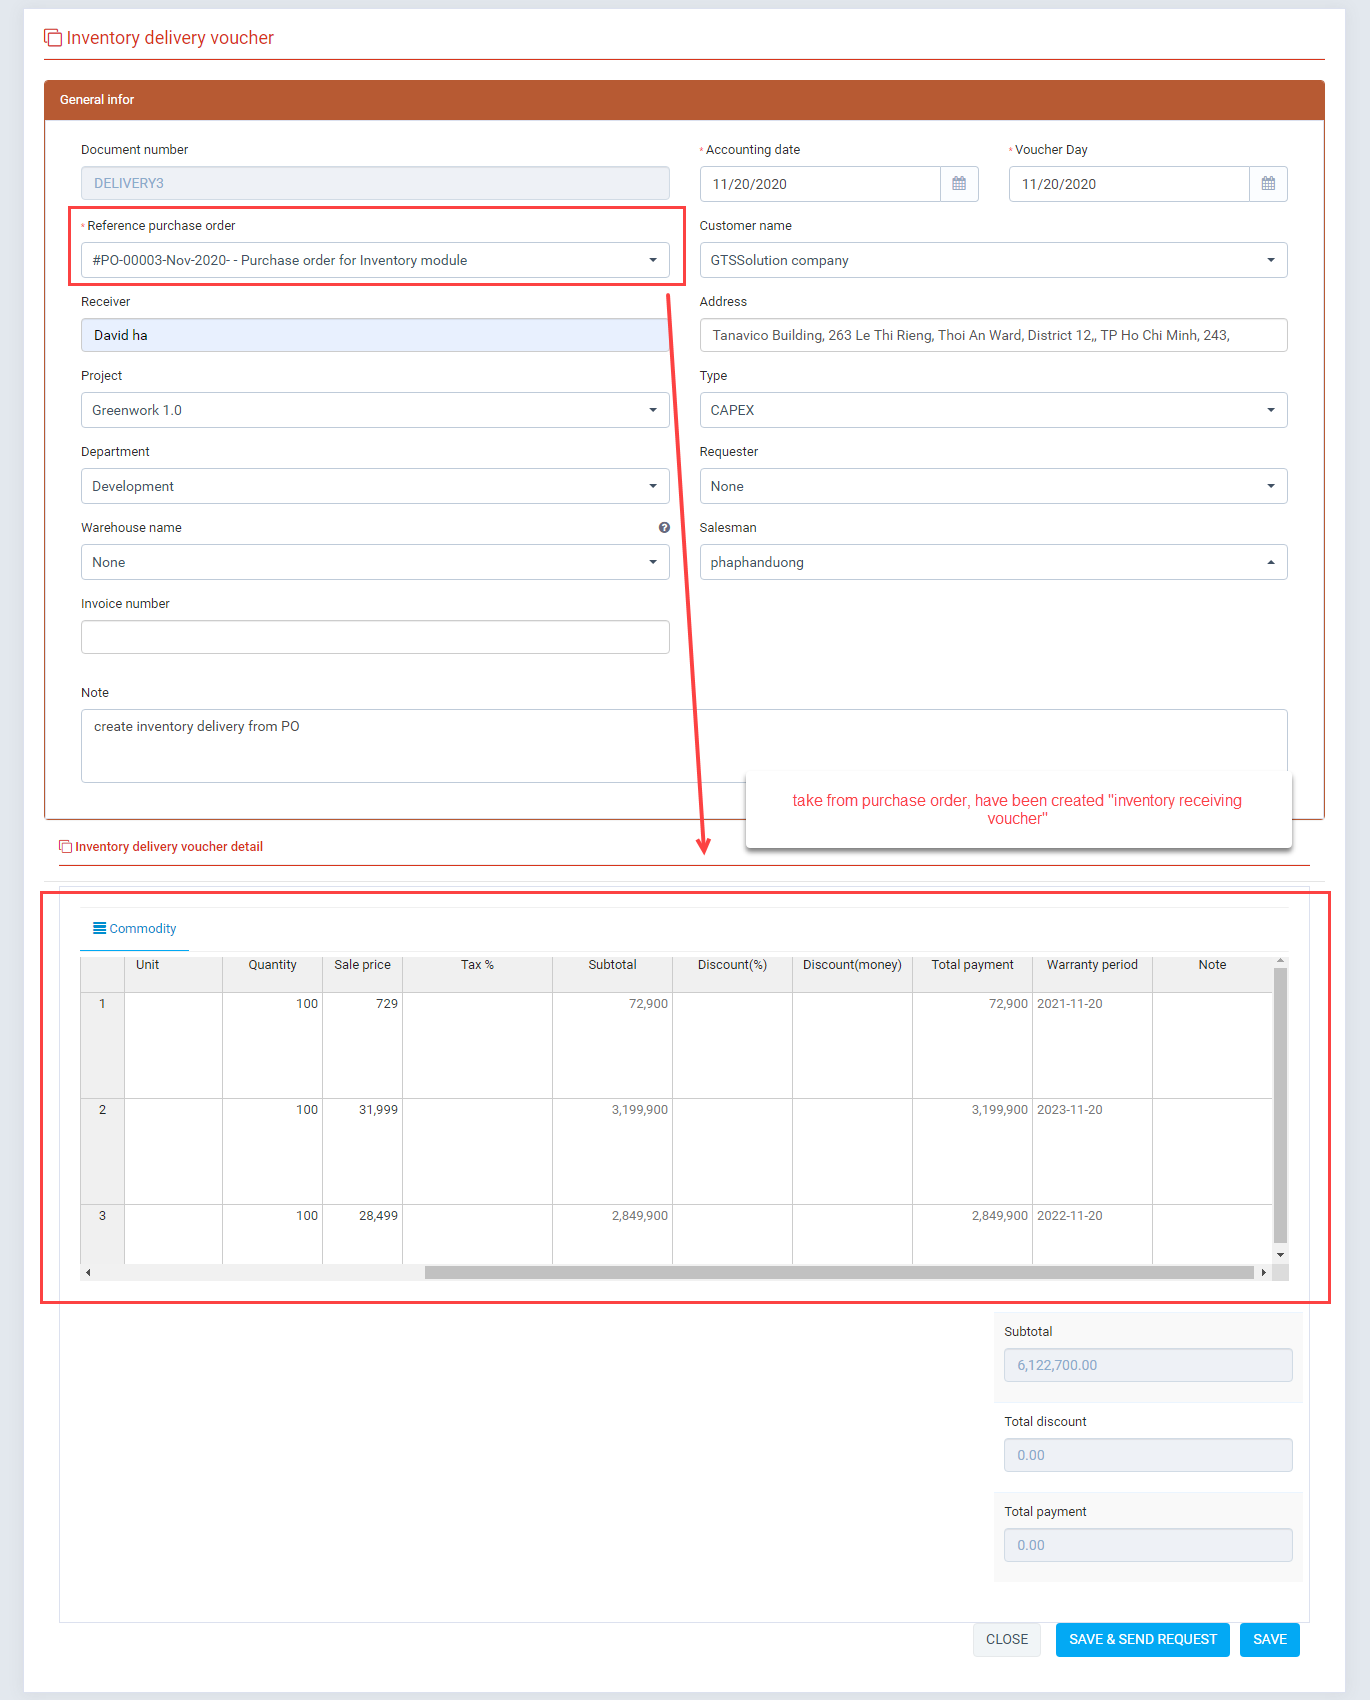
– Drop down “Reference purchase order”: you can select purchase order status “approval”, after select all information of purchase: “Supplier name”, “Project”, ” Type”, ” Deparment”, “Requester”, item have take and fill into form.c) Create from “invoices” in sales.
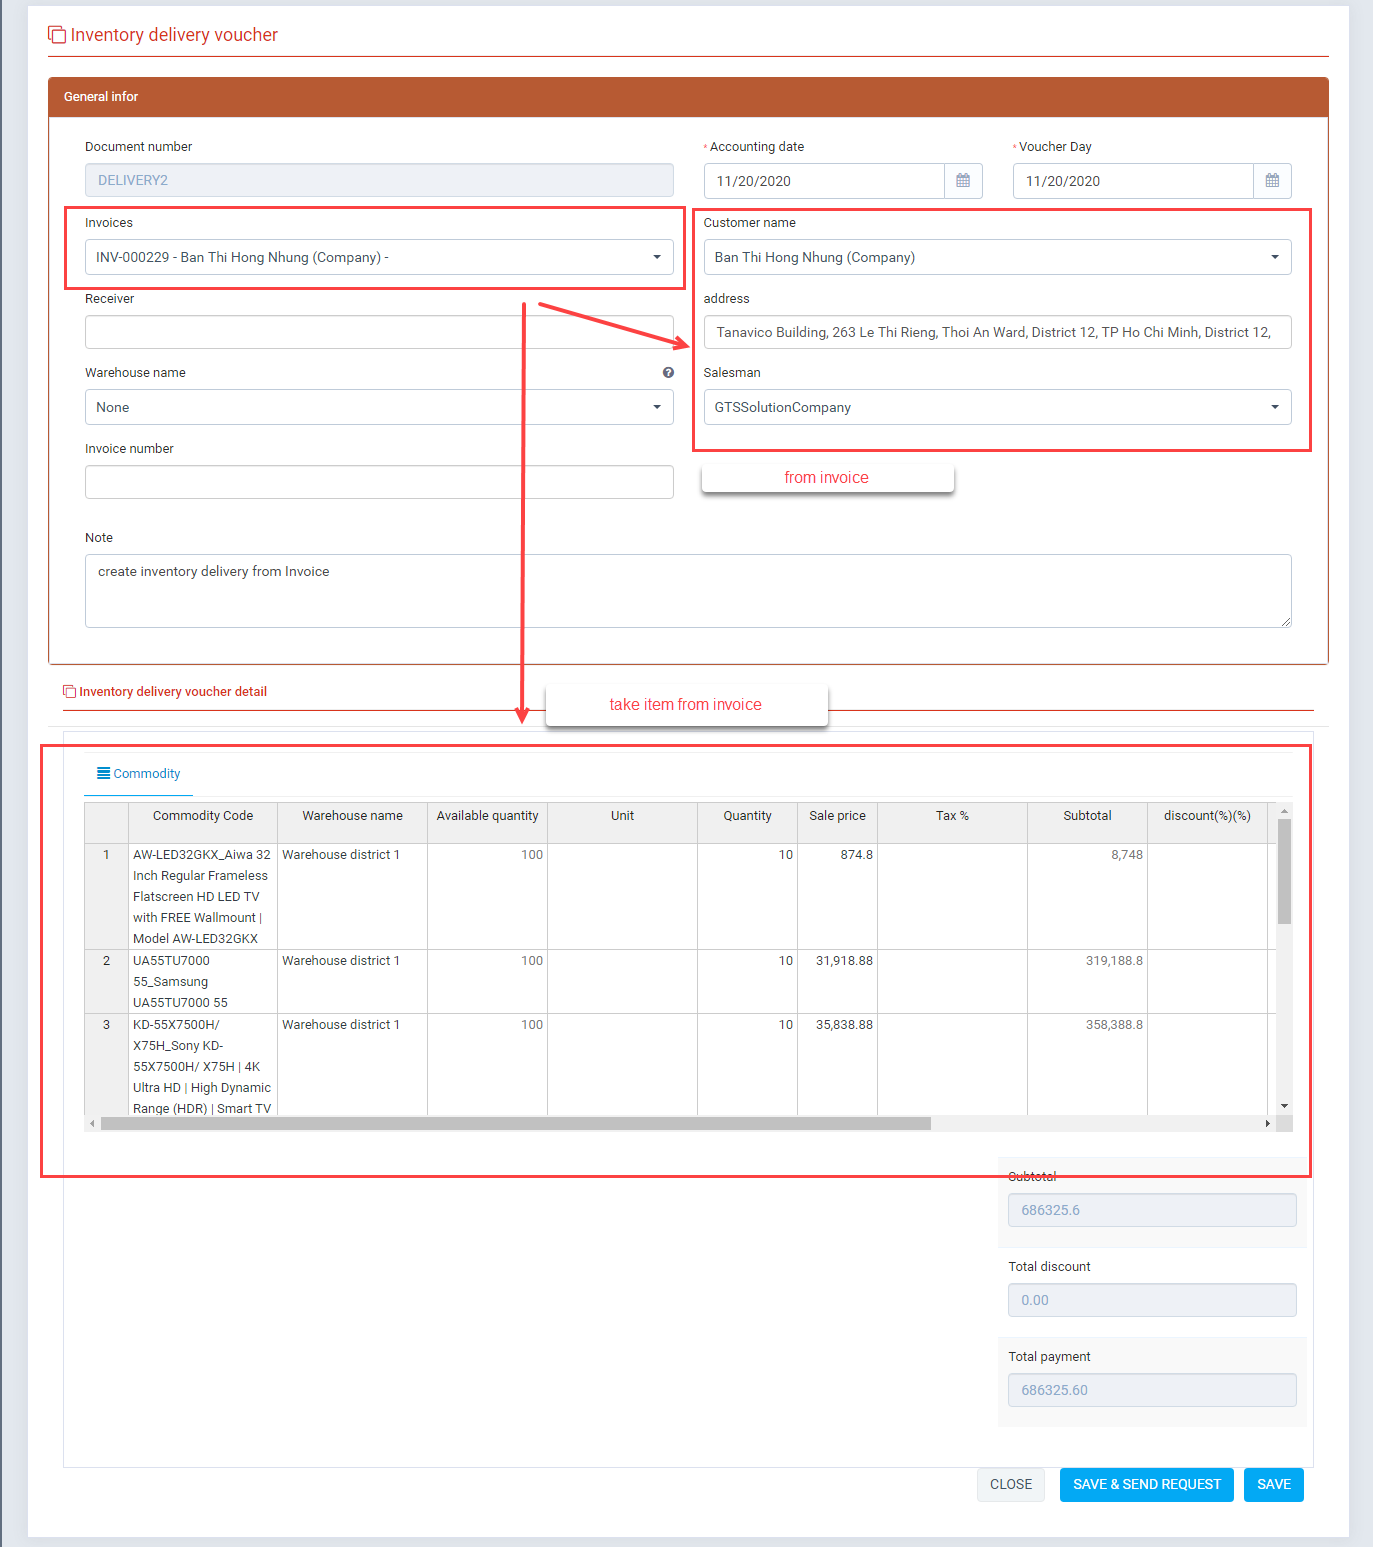
– Drop down “invoices”: you can select “invoices”, after select all infomation of invoice: “Customer name”, “Address”, “Salesman”, item have take and fill into form.d) Automatic create when “invoice created”
– In setting menu must active this checkbox

– In “Sales -> Invoices”: – When “new invoices created” => automatically created “Inventory delivery voucher” and changes status to “approved” If the inventory quantity is sufficient otherwise status changes to “Not yet approve”.
- Add (Click button “export output slip”)
-
- Edit
– To edit on “Management screen” click edit.
When status approved Editing is allowed edit “note” field
- Edit
-
- Delete
– Delete before approved. Click buton delete on “Management screen”
– If status “approved”. But you still want to delete so in “Setting / Rule sale price”, need active option
– So when you delete, transaction will be revert ( example: quantity of item)
- Delete
-
- Quick view
– On “Management screen” click “quick view”.
– If it create from “Purchase order” you can view purchase order when click link on “Reference purchase order” – If it create from “Invoices” you can view invoices when click link on “invoices”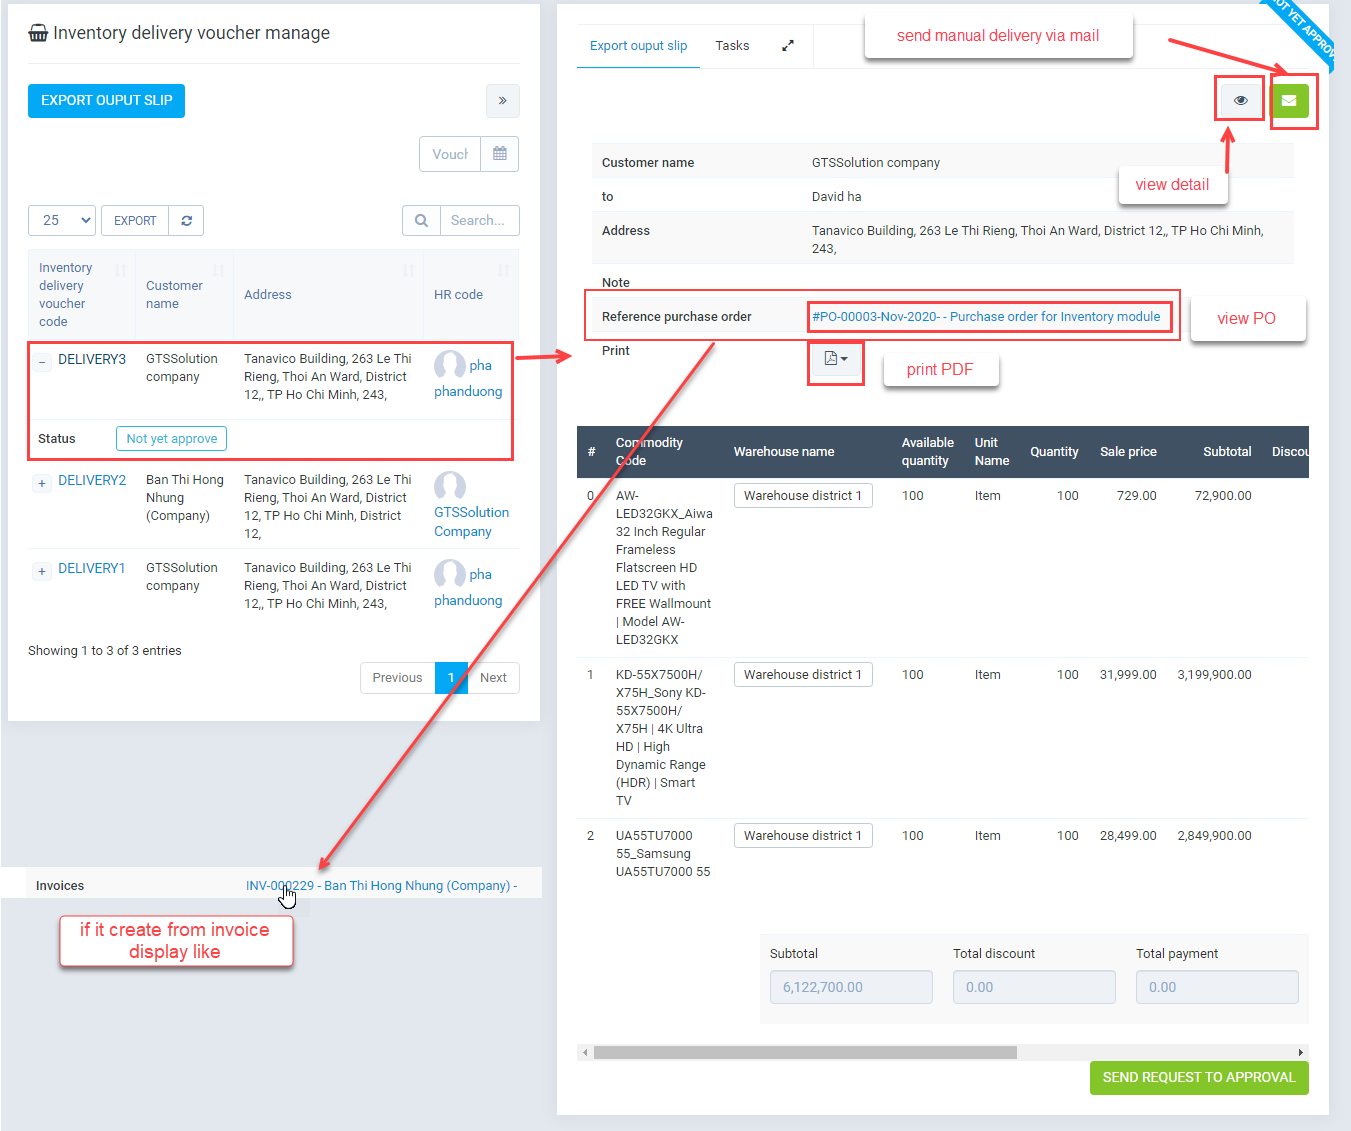
–
- Quick view
-
- Send mail
– On “quick view” click icon send mail.
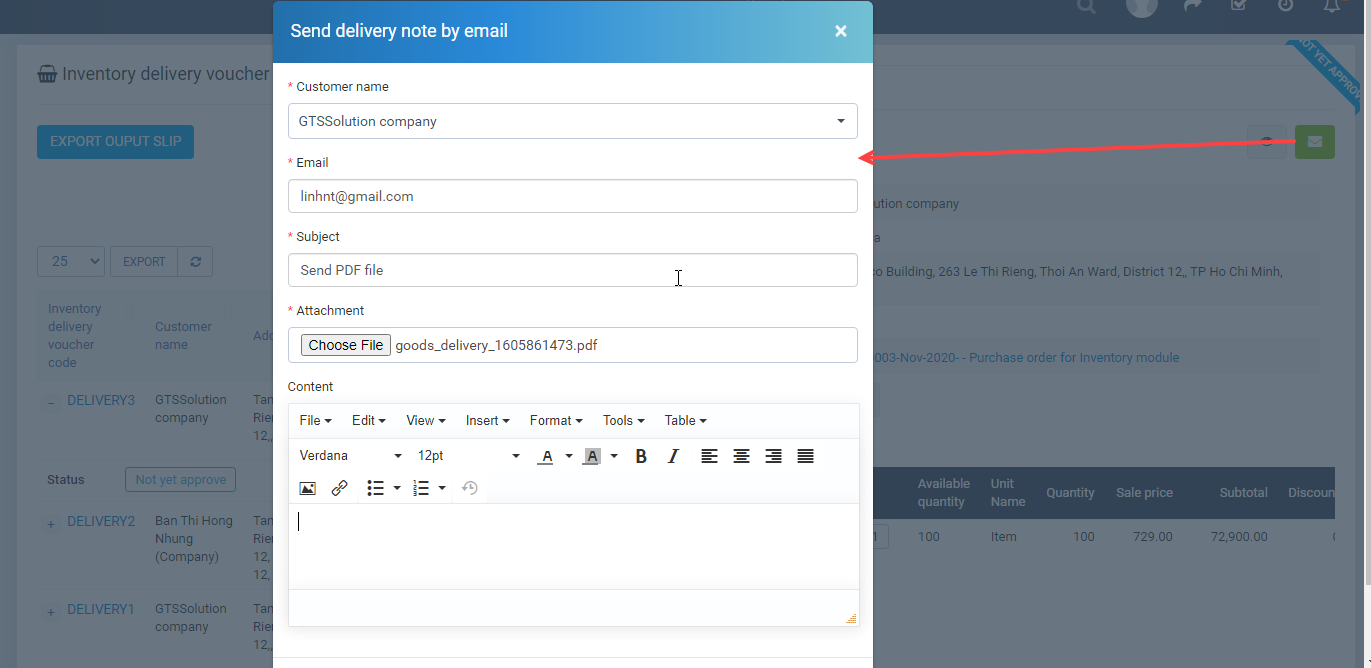
–
- Send mail
-
- View detail
– On “Management screen” click “view detail”.
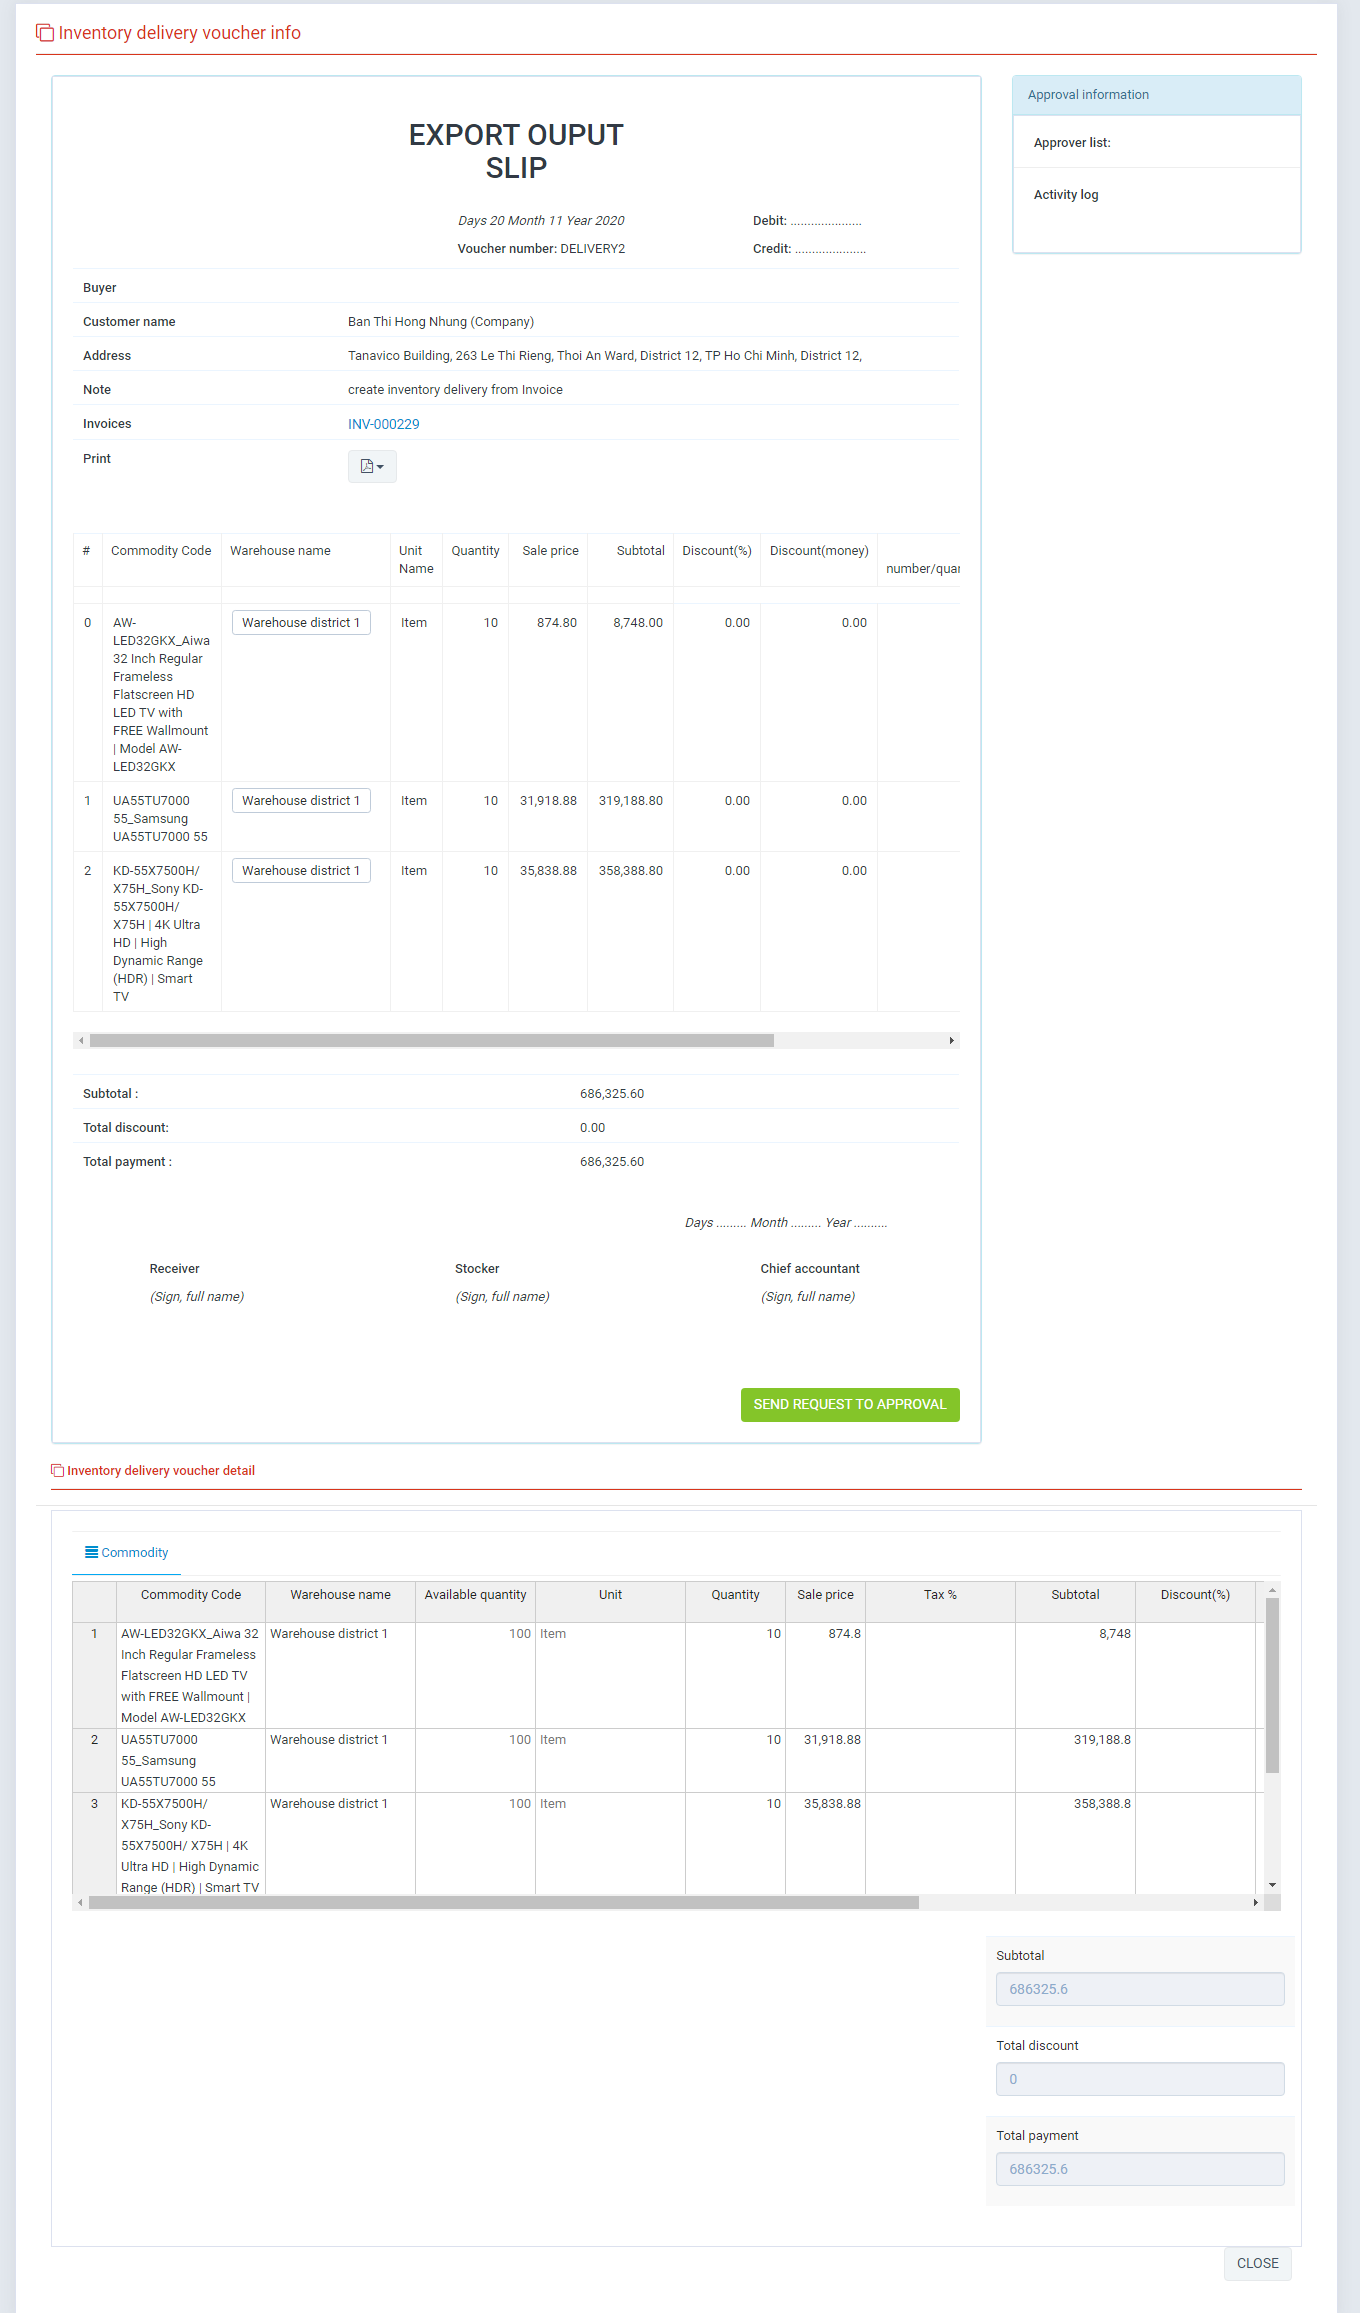
- View detail
-
- invoice has been generated goods delivery note yet
– You may receive notification requests for approval, it display in notification bell on the top right
- invoice has been generated goods delivery note yet
- invoice has been generated goods delivery note yet
– In Sales / Invoices, click invoice name -> More -> Inventory delivery voucher.
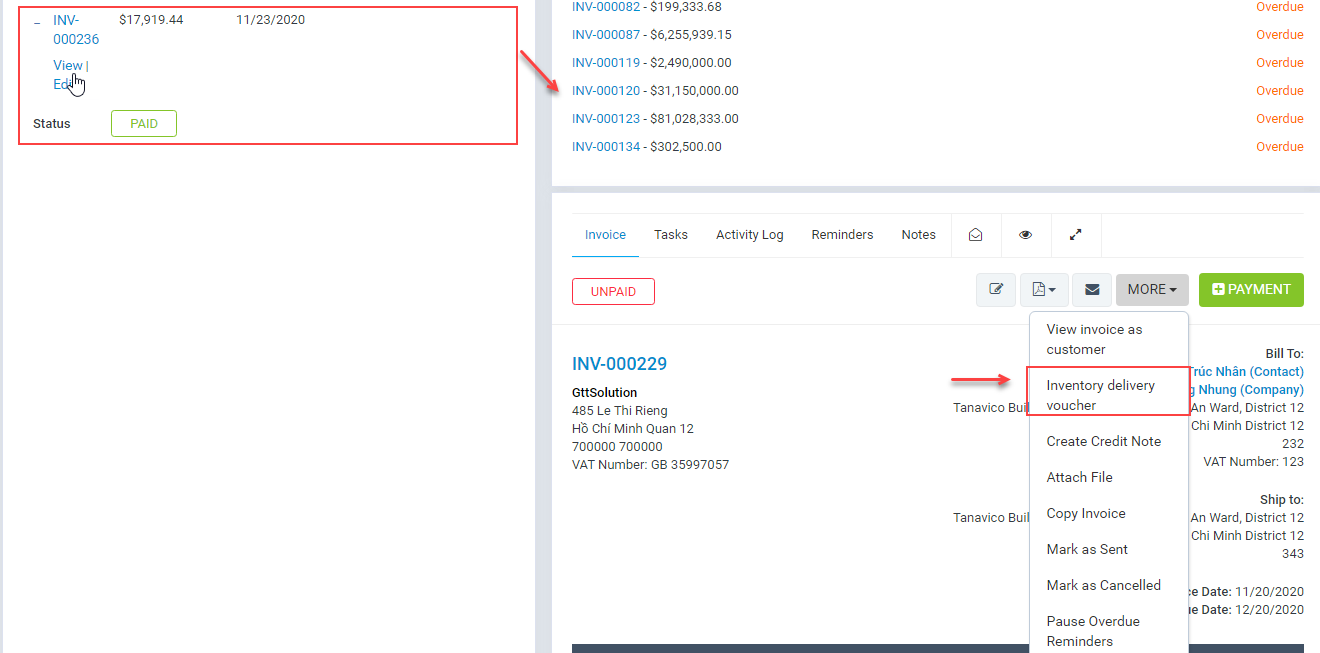
– Result
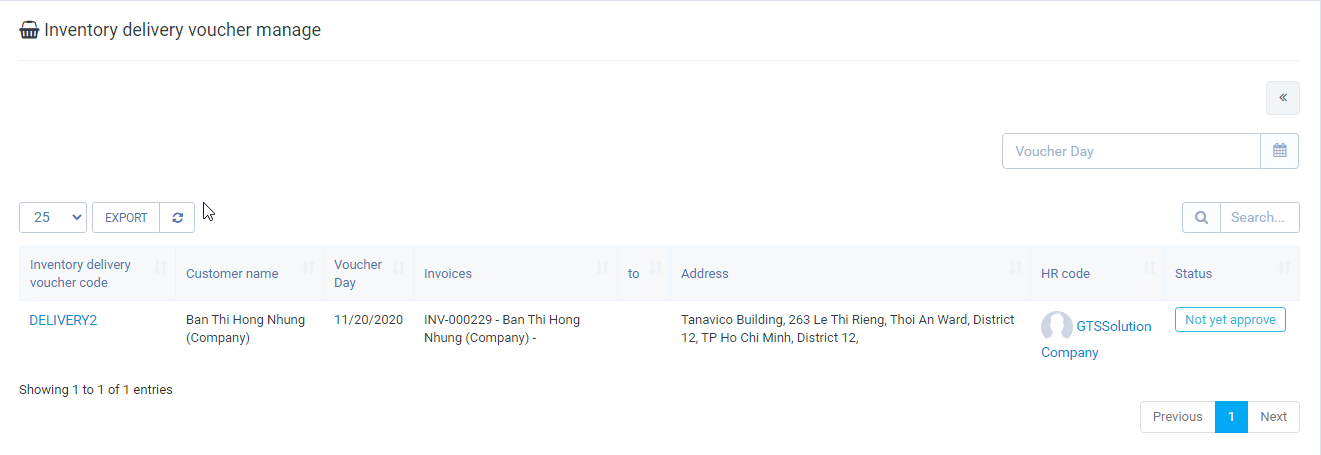
V. Internal delivery.
-
- Management screen

– This feature allow: create internal delivery note
- Management screen
-
- Add (Click button “Add”)
a) Create manual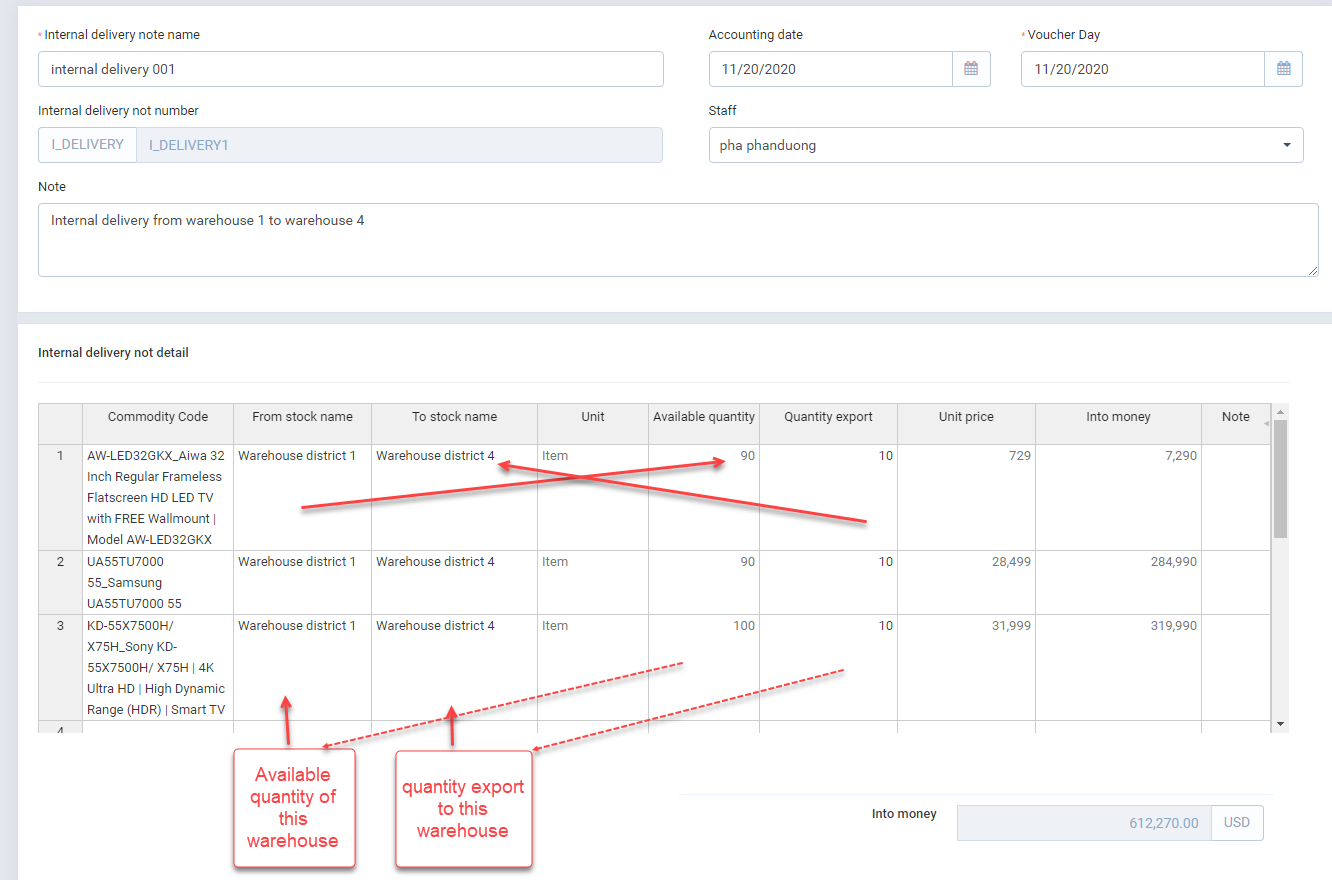
– After fill data into form you can click “Save”
+ If have approval setting: * When click “Save” => it save data, you must “send request to approval” manual
+ If don’t have approval setting: after click save button => auto approval.
- Add (Click button “Add”)
-
- Edit
– To edit on “Management screen” click edit.
When status approved Editing is don’t allowed
- Edit
-
- Delete
– To edit on “Management screen” click delete.
When status approved delete is don’t allowed
- Delete
- Quick view
– On “Management screen” click “quick view”.
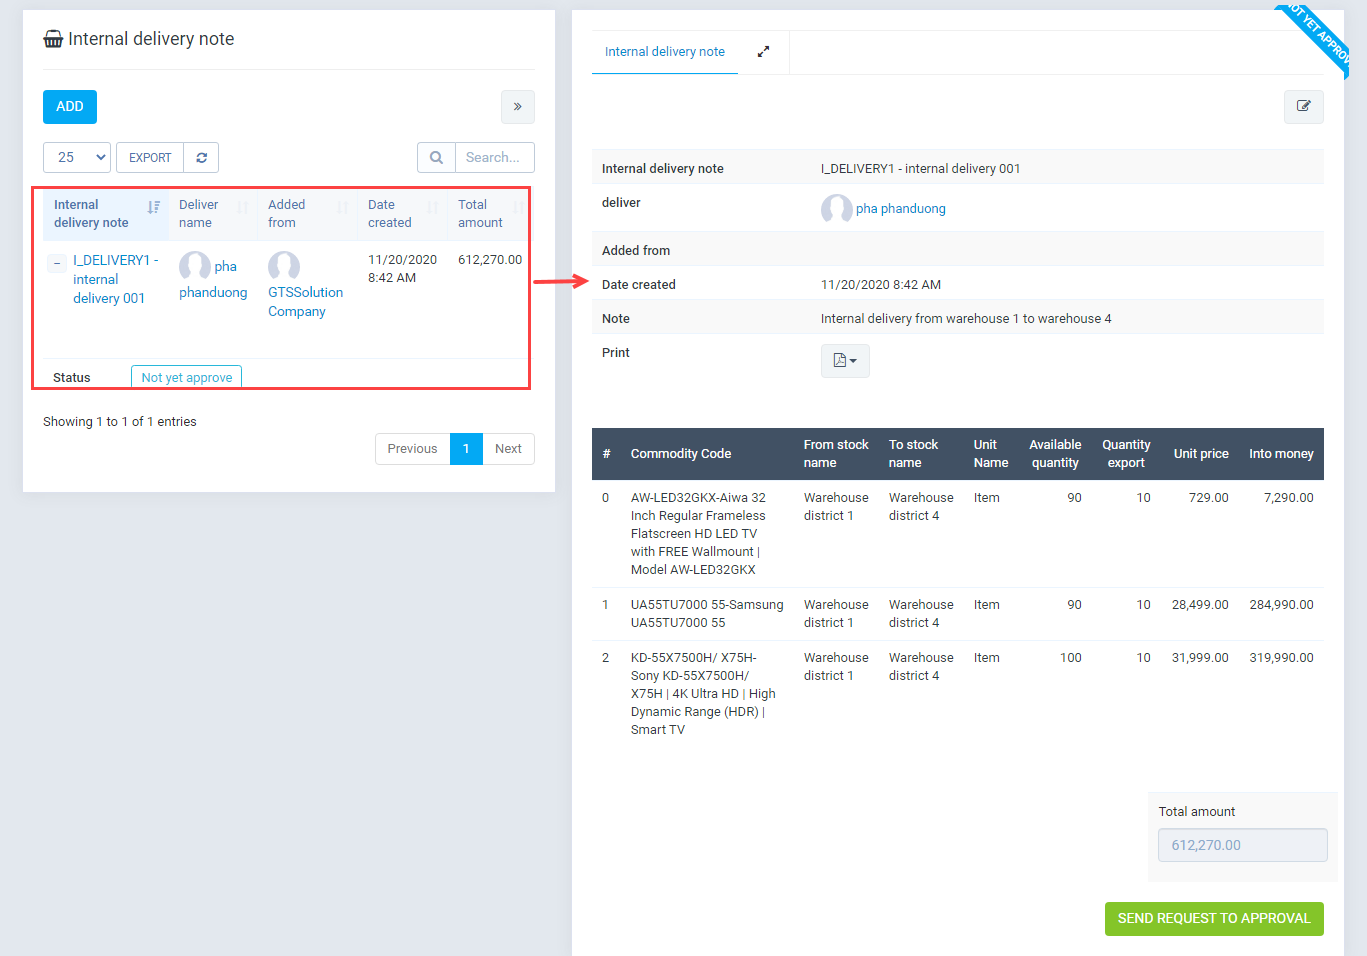
–
VI. Loss & adjustment.
-
- Management screen

– This feature allow: create Loss& adjustment note
- Management screen
-
- Add (Click button “Add”)
a) Create manual– Available quantity: Is inventory quantity of item in “Warehouse” with “Lot number” + “Expiry date”
– Stock quantity : Change inventory quantity to this number.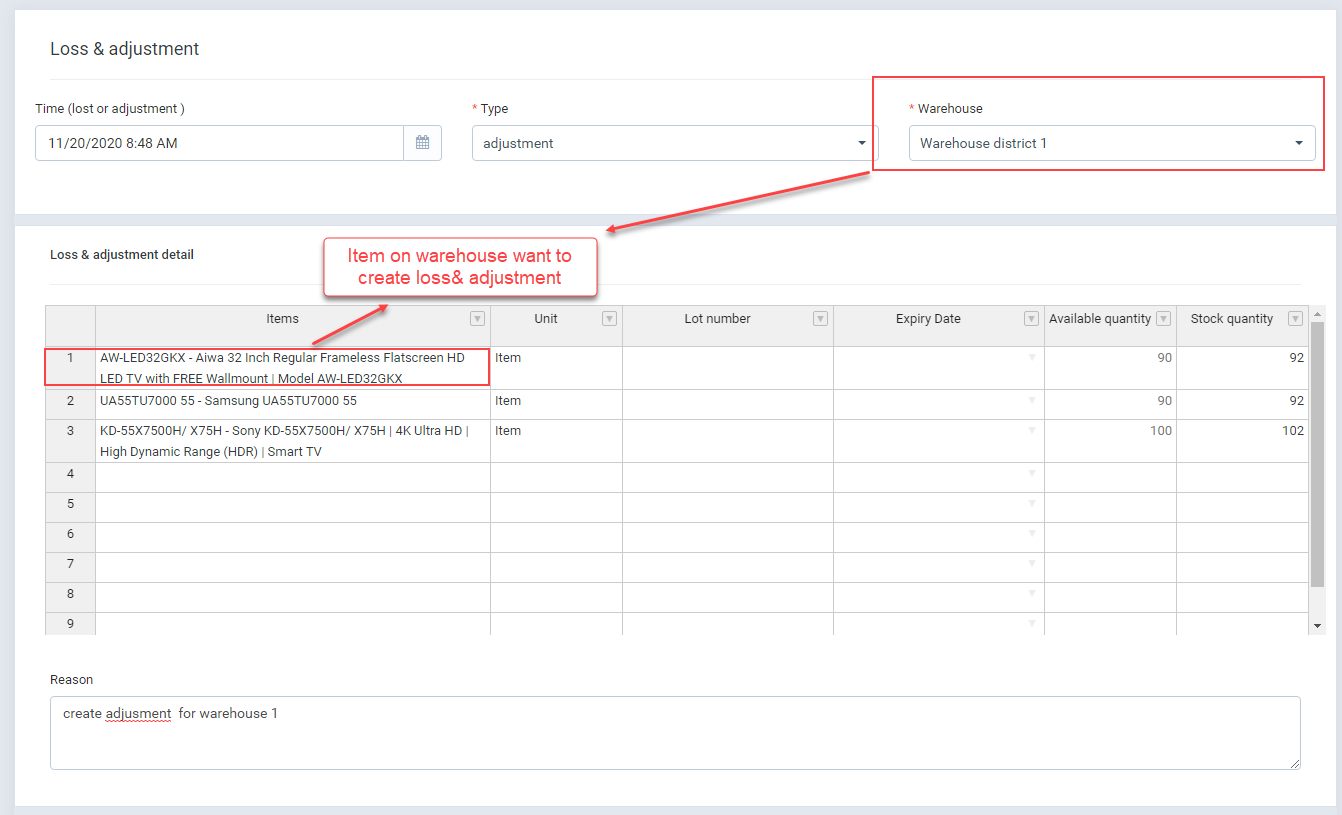
– After fill data into form you can click “Save”
+ If have approval setting: * When click “Save” => it save data, you must “send request to approval” manual
+ If don’t have approval setting: after click save button => auto approval.
- Add (Click button “Add”)
-
- Edit
– To edit on “Management screen” click edit.
When status approved Editing is don’t allowed
- Edit
-
- Delete
– To edit on “Management screen” click delete.
When status approved delete is don’t allowed
- Delete
- Quick view
– On “Management screen” click “view”.
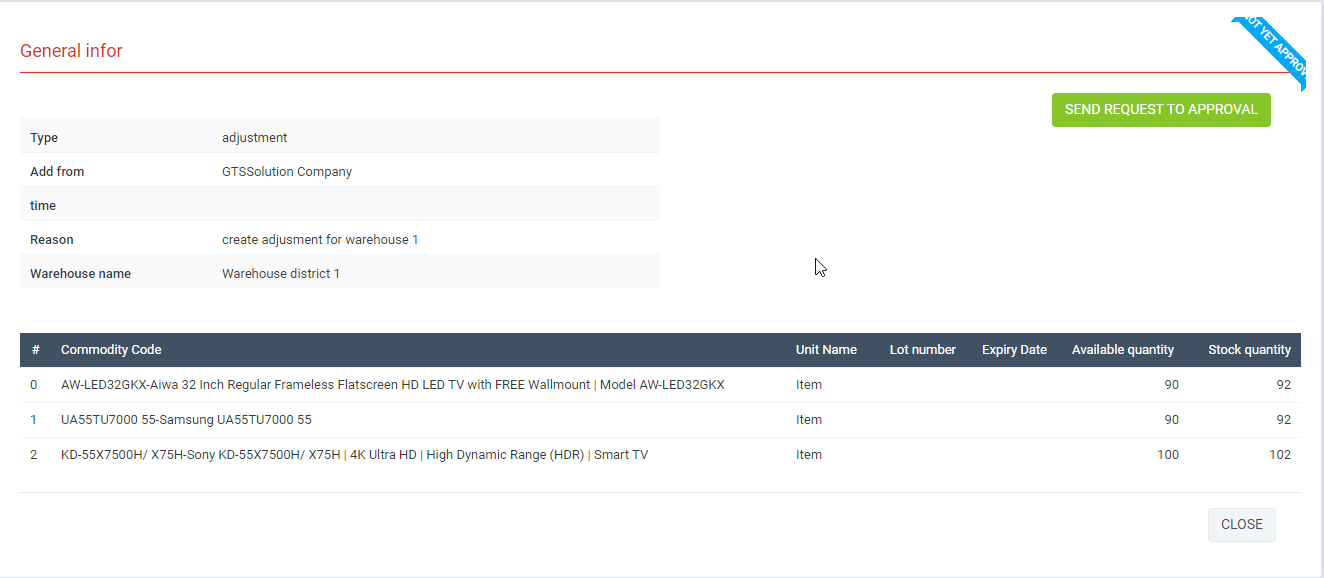
–
VII. Inventory history.
- Management screen
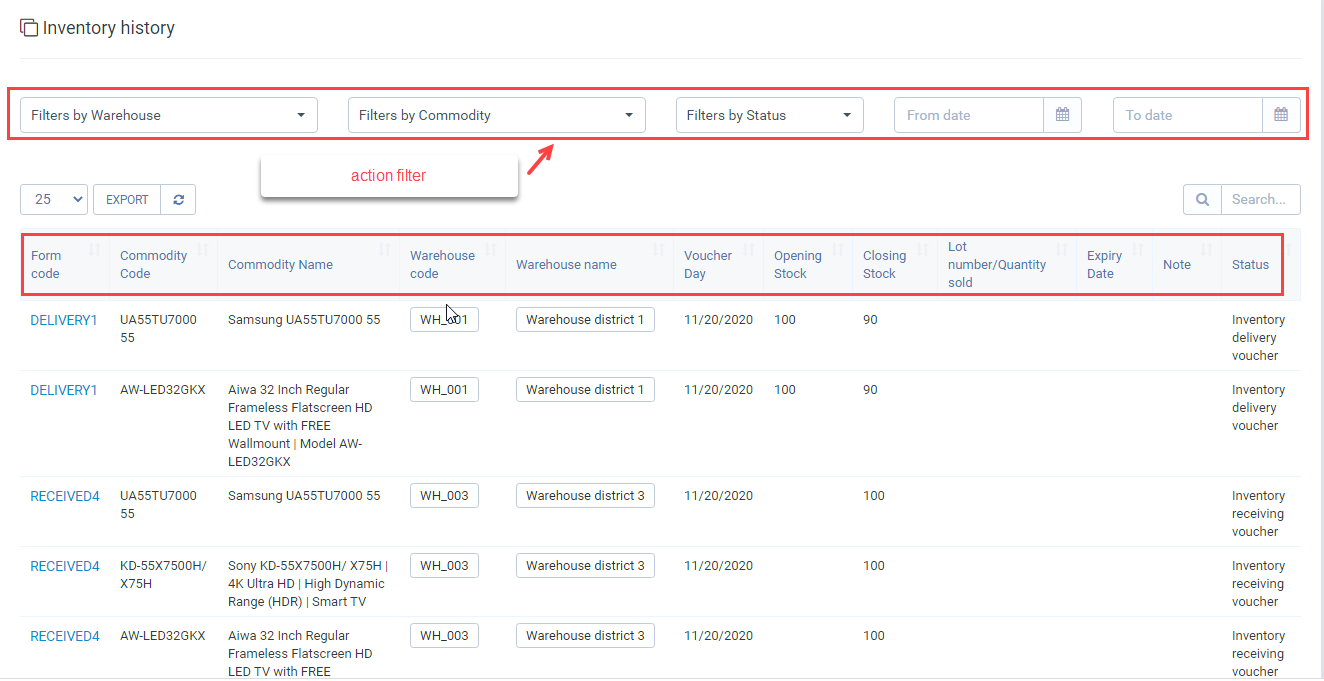
– Display all transaction effect on warehouse
– You can filter by warehouse, Commodity, status, from date, to date
– On table, click “Form code” to view transaction detail
VIII. Report.
- Stock summary report
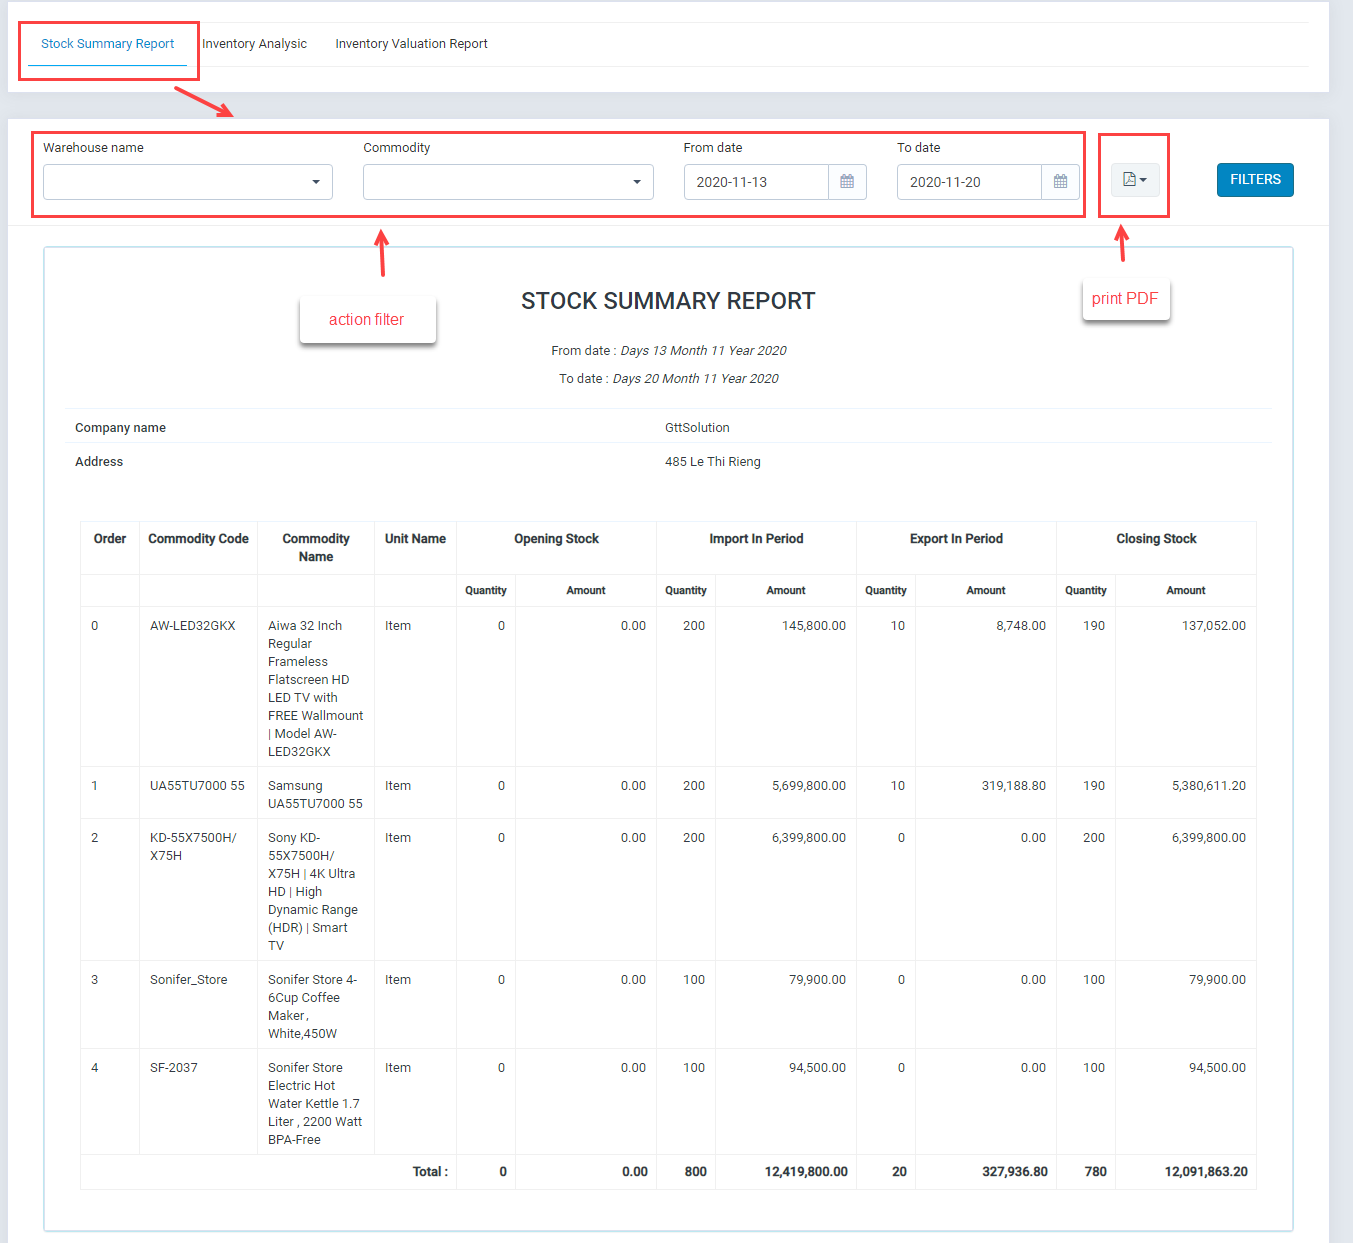
– Display inventory quantity with period ( From date -> To Date)
– “Opening stock” : Inventory quantity counted “From date”
– “Import in Period” : Is transaction “create inventory receiving voucher”, transaction of warehouse receive in “Internal delivery note”, “Loss & adjustment ” if “stock quantity” > “Available quantity”
– “Export in Period” : Is transaction “create inventory delivery voucher”, transaction of warehouse delivery in “Internal delivery note”, “Loss & adjustment ” if “stock quantity” < “Available quantity”
– “Closing stock” : Inventory quantity counted “To date” - Inventory Analysis
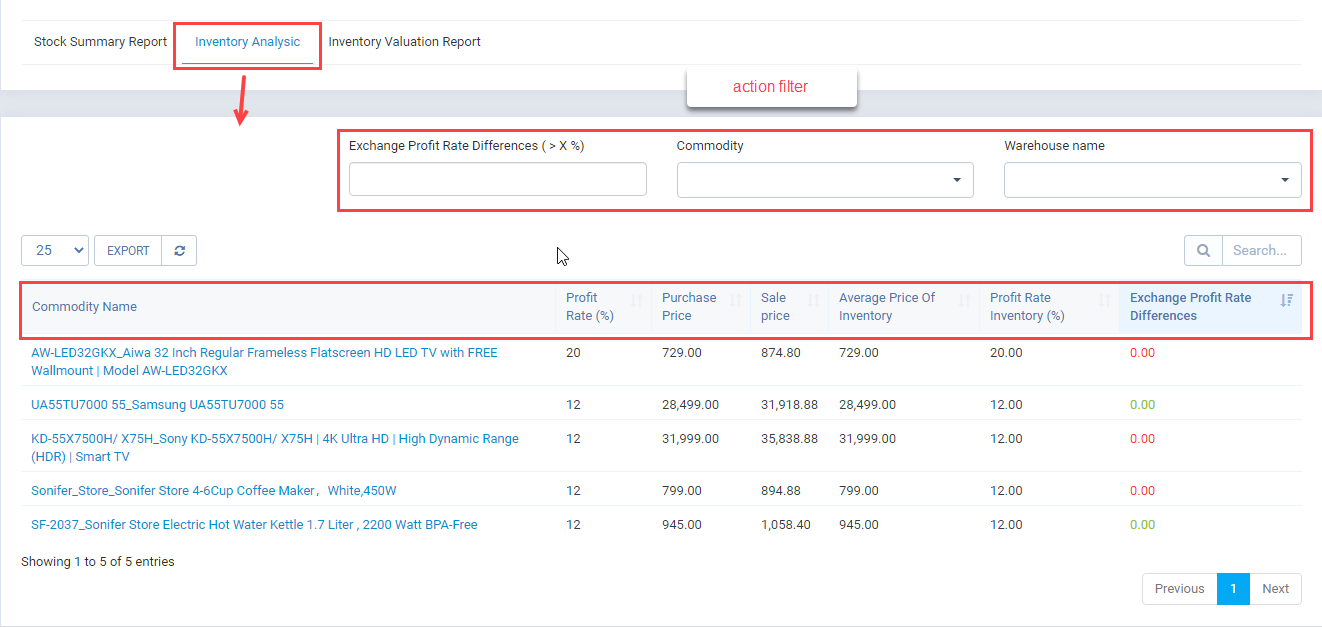
– Calculate the profit margin of inventory, thereby calculating the difference between the real profit rate and the declared profit rate on each product to decide which products can create promotions.
– “Profit Rate”: the declared profit rate on each product
– “Average Price of inventory”: average inventory price ( based on purchase price)
– “Profit rate inventory”: the real profit rate
– “Exchange Profit Rate Diferences “: Promotions percent - Inventory Valuation Report
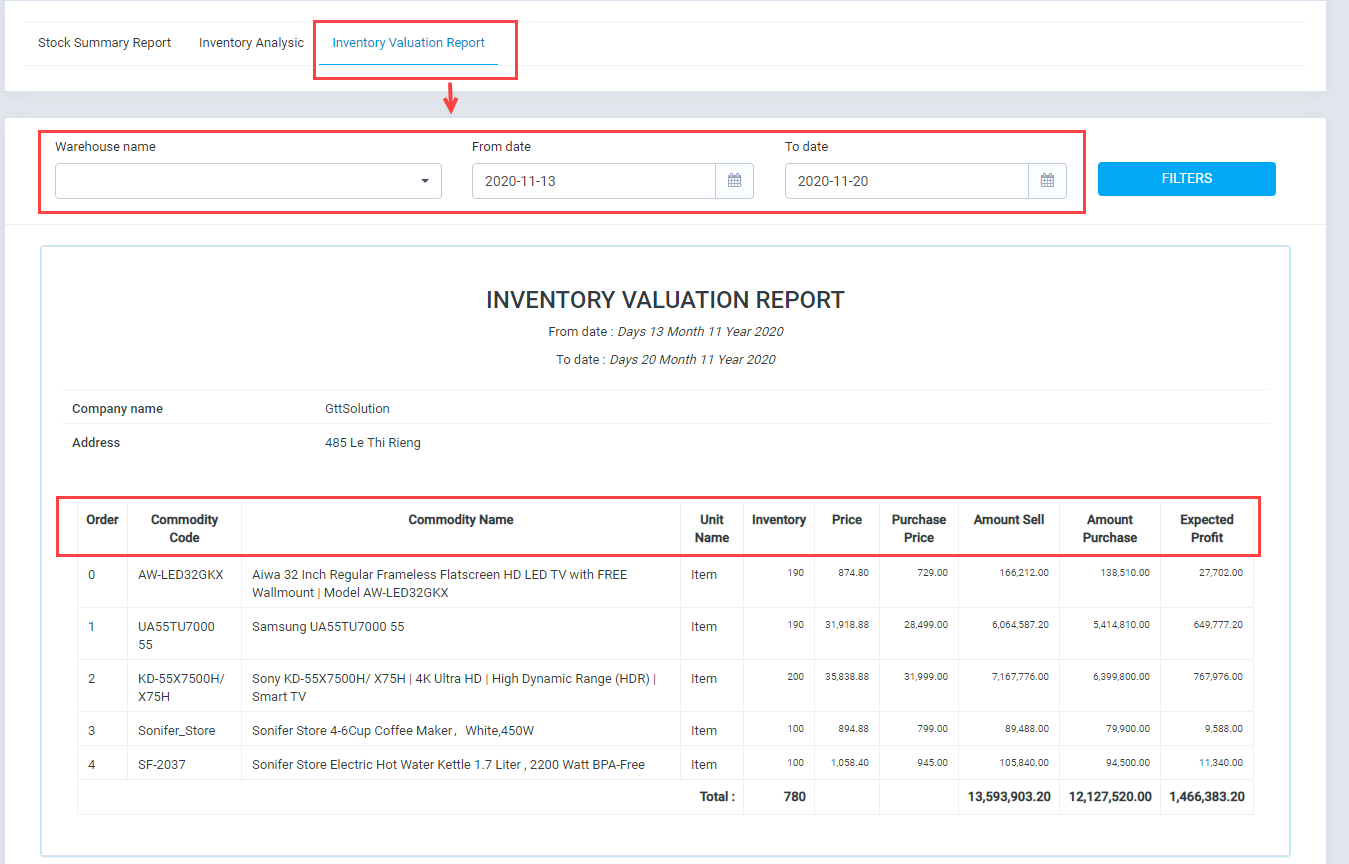
-Calculate “Expected Profit” based on quantity sell
